WooCommerce and Stripe have become a powerful duo for online businesses, simplifying the payment processing experience while enhancing the shopping journey. WooCommerce is a popular WordPress plugin that enables you to turn your website into a fully functional online store. On the other hand, Stripe is a leading payment gateway that provides an easy and secure way to accept payments. Together, they create a seamless e-commerce solution that doesn’t just meet the needs of retailers but also caters to customers looking for a hassle-free shopping experience.
Benefits of Using Stripe with WooCommerce

When you integrate Stripe with your WooCommerce store, you’re opening up a world of advantages that can help elevate your e-commerce business. Let’s explore some of the key benefits:
- Easy Integration: Setting up Stripe with WooCommerce is a breeze! With just a few clicks, you can connect the two platforms, and you’re ready to start accepting payments.
- Multiple Payment Options: Stripe supports various payment methods, including credit/debit cards, Apple Pay, Google Pay, and more. This flexibility can cater to a broader audience.
- Secure Transactions: Stripe puts security at the forefront, PCI compliance, and built-in fraud prevention technologies, ensuring that your customers’ information is well-protected.
- Subscription and Recurring Payments: If you’re offering subscriptions or memberships, Stripe makes it easy to manage recurring payments without stress.
- Customizable Payment Experience: You can tailor the payment form to match your branding, providing a smooth transition that feels cohesive for your customers.
- Diverse Currency Support: Stripe allows you to accept payments in multiple currencies, making it easier to sell to an international audience.
In conclusion, integrating Stripe with WooCommerce not only enhances the shopping experience for your customers but also simplifies your payment processes, making it an excellent choice for online businesses.
3. Prerequisites for WooCommerce Stripe Integration

Before diving into the exciting world of WooCommerce Stripe integration, it’s essential to ensure you have everything set up correctly. Think of this step as laying the foundation for a sturdy house. Without a strong base, everything you build on top could crumble, right? Let’s look at what you’ll need:
- A WordPress Site: First and foremost, you’ll need an operational WordPress site. If you haven’t done this yet, no worries! Setting up WordPress is straightforward; plenty of hosting providers make it super easy.
- WooCommerce Plugin: Make sure you’ve installed the WooCommerce plugin on your WordPress site. WooCommerce is the powerhouse behind your online store, allowing you to manage products, inventory, and, of course, payments.
- SSL Certificate: Security is vital! An SSL certificate encrypts sensitive information like credit card details, fostering trust with your customers. Most hosting companies offer this as part of their service, so check in with them.
- Stripe Account: You will need a Stripe account for processing payments. Don’t worry if you haven’t signed up yet; it’s free to create one. You’ll link this with your WooCommerce store later.
- Basic Understanding of WordPress: A little familiarity with WordPress can be quite beneficial. Don’t sweat it if you’re not a tech whiz! As long as you can navigate through the admin panel, you’re good to go.
Once you tick these prerequisites off your list, you’ll be ready to embark on the Wizard of Oz-like journey to integrate Stripe with WooCommerce. And trust me, it’ll be worth it!
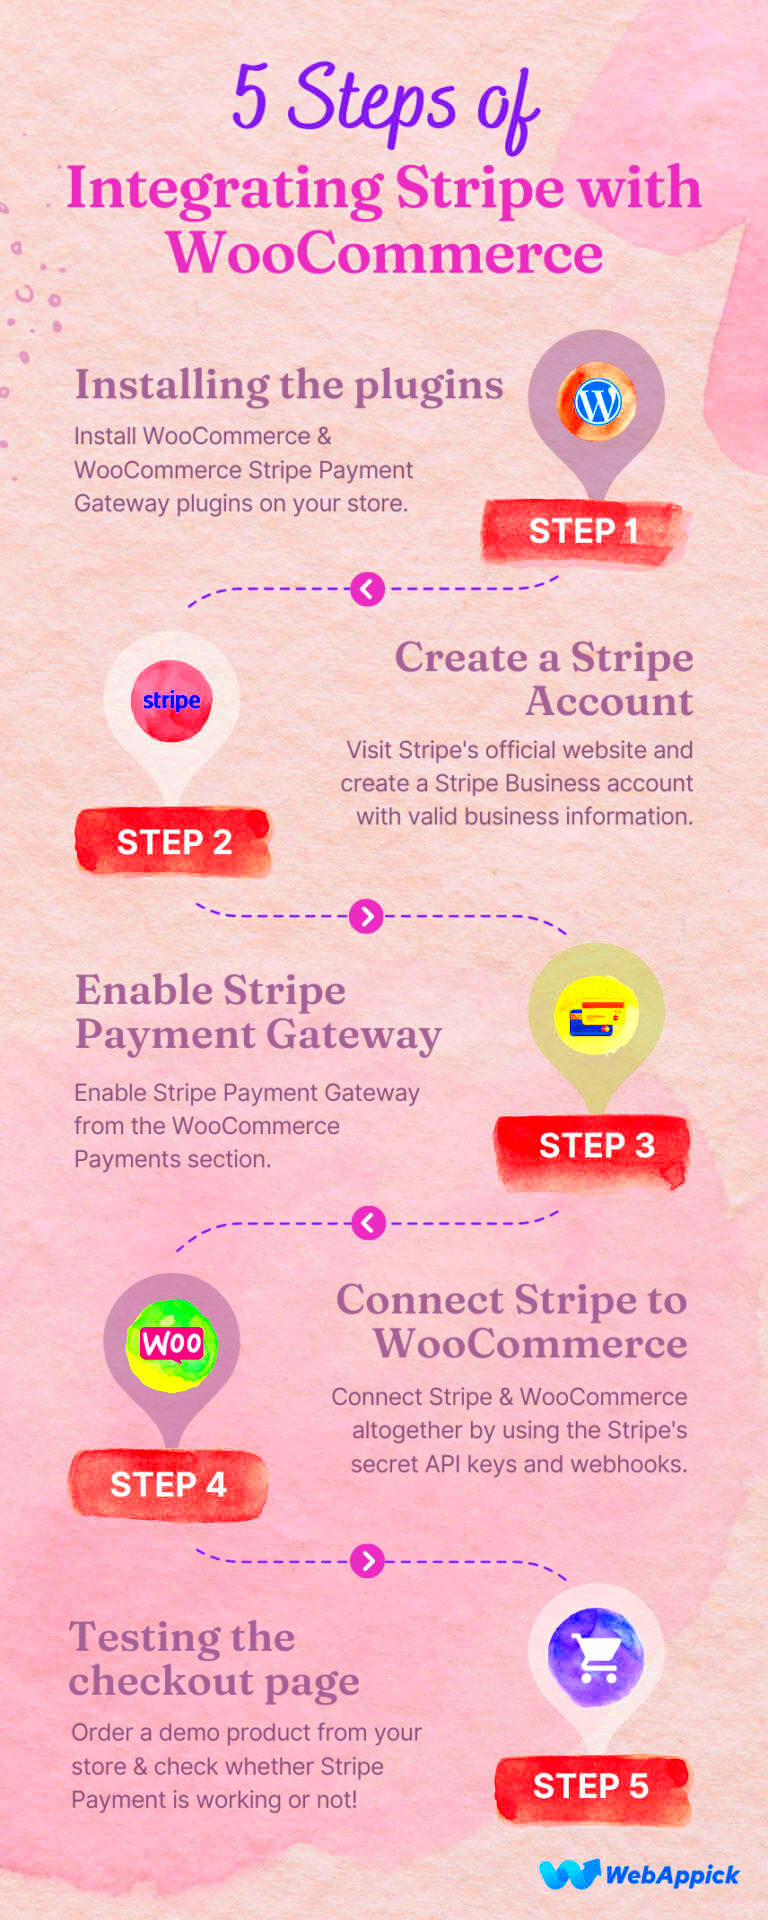
4. Step 1: Setting Up a Stripe Account
Getting your Stripe account up and running is like choosing the right tools before starting a complicated project. You don’t want to find out halfway through that you’ve used the wrong wrench, right? Setting up your Stripe account is a straightforward process, and I’m here to guide you through it. Let’s break it down step-by-step:
- Visit the Stripe Website: Head over to the Stripe website. You can do this from any browser; it’s a straightforward URL.
- Sign Up: Click the “Start now” or “Sign up” button. You’ll be prompted to enter your email address and a password. Make sure to choose a strong password to keep your account secure!
- Verify Your Email: After signing up, you’ll receive a verification email. Click on that link to verify your email address. This step is crucial, as it confirms that you own the email account.
- Complete Account Info: Next, you’ll need to provide some basic information about your business, like its name, address, and phone number. Be as accurate as possible; this info helps Stripe tailor their services to suit your needs.
- Add Your Bank Information: Finally, to receive payments, you’ll need to connect your bank account. This allows Stripe to deposit the payments directly into your account. Fill in your bank details carefully, double-checking for any mistakes.
And voilà, you’ve set up your Stripe account! You’re one step closer to integrating it with WooCommerce. Just think of the possibilities ahead: seamless transactions, happy customers, and a thriving online store!
Step 2: Installing the WooCommerce Stripe Payment Gateway Plugin
Now that you’ve decided to integrate Stripe with WooCommerce, it’s time to get the plugin installed. But don’t worry! This is a straightforward process that even beginners can tackle. Let’s dive into it step by step.
- Access Your WordPress Dashboard: Begin by logging into your WordPress admin area. If you’re unsure how to do this, just add “/wp-admin” to your website’s URL.
- Navigate to Plugins: From the left-hand sidebar, hover over the “Plugins” section, then click on “Add New.” This will take you to the plugin installation screen.
- Search for the Stripe Plugin: In the search bar located at the top right, type in “WooCommerce Stripe Payment Gateway.” You’ll see a list of plugins related to your search.
- Install the Plugin: Once you find the WooCommerce Stripe Payment Gateway plugin, click on the “Install Now” button. WordPress will handle all the heavy lifting and download the plugin for you.
- Activate the Plugin: After the installation, the button will change to “Activate.” Tap on that, and voilà! Your plugin is now live and ready for configuration.
And just like that, you’ve installed the WooCommerce Stripe Payment Gateway plugin. Now, let’s move on to the next step, where we’ll configure the settings to ensure everything runs smoothly!
Step 3: Configuring the Plugin Settings
With the WooCommerce Stripe Payment Gateway plugin now installed, it’s time to configure its settings. This step is crucial because it dictates how your customers will interact with their payment options. Let’s ensure everything is set up perfectly!
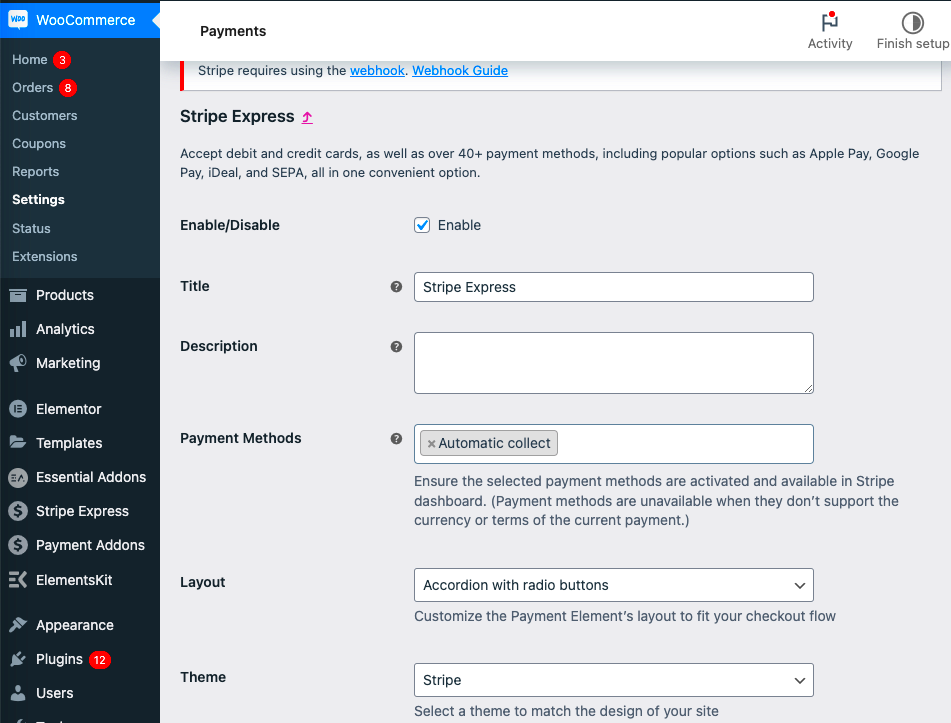
- Access WooCommerce Settings: From your WordPress dashboard, hover over “WooCommerce” and click on “Settings.” It’ll bring you to a new page with several tabs at the top.
- Select the Payments Tab: In the settings menu, you’ll find a tab labeled “Payments.” Click on that to see all the payment options available to you.
- Enable Stripe: You should now see “Stripe” in the list of payment methods. Toggle the switch to enable it. When you do this, additional options will become available.
- Configure Payment Options: Click on the “Manage” button next to Stripe. Here, you can enter your Stripe API keys. These keys allow your store to securely communicate with Stripe’s servers. Don’t forget to copy both your Publishable Key and Secret Key from your Stripe dashboard.
- Customize Your Settings: You’ll also see some other options like enabling or disabling the Stripe Checkout, customer credit card payment fields, and more. Tweak them according to your store’s needs!
Once you’ve filled everything out to your satisfaction, don’t forget to hit “Save changes.” And just like that, your WooCommerce store is now set up to accept payments through Stripe!
Remember, testing is key. Always make sure to run a few test transactions to confirm everything is functioning as expected before you go live.
Step 4: Testing the Integration
Once you’ve successfully set up the WooCommerce Stripe integration, the next crucial step is testing to ensure everything functions as intended. Testing helps you identify any glitches before going live. Here’s how you can go about it:
- Enable Test Mode: In your WooCommerce settings, go to the Stripe section and check the “Enable test mode” option. This allows you to process transactions without affecting your live payment account.
- Create Test Card Details: Stripe provides a variety of test card numbers that mimic real cards. You can use these for your transactions:
- Visa: 4242 4242 4242 4242
- MasterCard: 5555 5555 5555 4444
- American Express: 3782 8224 6310 005
- Place Test Orders: With test mode enabled, try making purchases using the test card details. Experiment with different scenarios, such as successful payments, failed payments, and refunds.
- Check Transaction Logs: After placing test orders, log into your Stripe dashboard and review the transaction logs. Confirm that all test transactions are recorded properly.
- Review Email Notifications: Make sure that order confirmation emails are sent and received correctly. This will help ensure that your customers receive their notifications without issues.
By following these steps, you’ll secure a smooth checkout process from the get-go. After confirming that everything is working properly, you can confidently switch off test mode and start accepting real payments!
Common Issues and Troubleshooting
No integration is without its hiccups, and WooCommerce Stripe is no exception. However, knowing how to troubleshoot common issues can save you a lot of headache. Here are some typical problems and their solutions:
| Issue | Possible Causes | Solutions |
|---|---|---|
| Payments Declined | Incorrect card details or insufficient funds | Verify card information is entered correctly; advise users to check for sufficient balance. |
| Failed Transactions | Network issues or server timeouts | Check payment gateway status; ensure your internet connection is stable. |
| Order Email Not Sent | Email misconfiguration or SMTP issues | Verify your email settings and consider setting up an SMTP plugin for reliability. |
| Inconsistent Transaction Logs | API key misconfiguration | Double-check that you’re using the correct API keys for live and test modes respectively. |
For more stubborn issues, it may be beneficial to consult with the WooCommerce support community or check the Stripe documentation. Remember, taking proactive steps to troubleshoot will enhance the user experience and build trust with your customers!
Conclusion
In summary, the integration of Stripe with WooCommerce provides a powerful solution for managing online payments. This seamless setup not only enhances user experience through a variety of payment options but also ensures secure transactions, boosting customer trust. By following the outlined steps for installation, configuration, and troubleshooting, you can optimize your WooCommerce store’s payment system effectively.


