When you’re working with WordPress, understanding the settings that affect your site’s performance is crucial. One such setting is the PHP max_execution_time. Ever wondered what it is, or why it matters for your WordPress site? You’re in the right place! This blog post will break down the essentials of PHP max_execution_time and its importance in the
Understanding PHP max_execution_time

So, what exactly is PHP max_execution_time? In simple terms, it dictates how long a PHP script is allowed to run before the server forcibly stops it. This is a critical setting in web hosting because it helps prevent poorly written scripts from hanging the server and causing slowdowns or crashes.
Here’s a little more detail:
- Default Value: Typically, the default value is set to 30 seconds, but this may vary based on your hosting provider.
- Measured in Seconds: The time is measured in seconds. For example, a setting of 60 means scripts have a minute to complete.
- Impact: If a script takes longer than the specified time, you’ll encounter an error, usually resulting in a “500 Internal Server Error”.
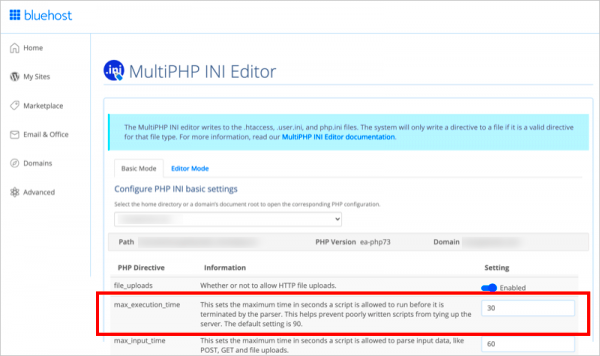
You can find and modify this setting in various places within your WordPress hosting environment, such as php.ini files, .htaccess files, or directly from the WordPress dashboard if your hosting allows it. Knowing where to find it is the first step toward optimizing your site’s performance.
Why PHP max_execution_time Matters for WordPress
Understanding PHP max_execution_time is crucial for several reasons, particularly for your WordPress site:
- Performance Optimization: A well-set execution time can enhance your site’s performance, ensuring that scripts run smoothly without unnecessary delays.
- Preventing Timeouts: Long-running processes, like backups or heavy plugins, can timeout if the execution time is too low, leading to incomplete tasks.
- Adjusting for Complexity: If your site runs complex tasks like e-commerce transactions or heavy image processing, you might need to increase the execution time.
By managing this setting effectively, you’re not just avoiding errors; you’re also paving the way for a more reliable and user-friendly website. In summary, PHP max_execution_time is a vital setting for maintaining optimal performance in your WordPress environment. So, ensure you know how to find and adjust it based on your site’s needs!
3. Checking Your Current PHP max_execution_time Setting
If you’re curious about how long your scripts are allowed to run before they experience a timeout, checking the current PHP max_execution_time setting is a must. This is particularly essential in a WordPress environment where you might be dealing with large datasets or complex plugins that demand more processing time. Fortunately, finding this information is pretty straightforward!
Here are a few methods to check your current PHP max_execution_time:
- Using PHP Info:
The simplest way to check is to create a small file named
phpinfo.php. In this file, just add the following lines of code:Upload this file to your WordPress root directory and open it in your browser. Look for the max_execution_time directive in the output; it will show the current setting.
- Using a WordPress Plugin:
If you prefer using plugins, you can utilize a plugin like “Site Health” that gives you a comprehensive overview of your server settings, including PHP configurations.
- Check via the Hosting Control Panel:
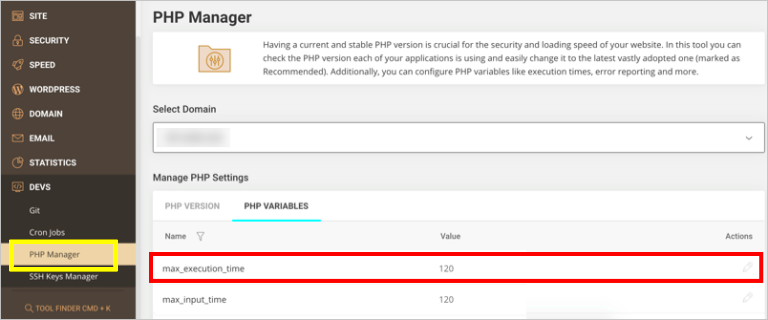
Some hosting control panels, like cPanel or Plesk, might display your PHP settings under a section named “PHP Settings” or “PHP Configuration”.
Once you’ve found the max_execution_time, you’ll know if it’s set appropriately for your website’s needs. If you find it to be low, don’t fret! There are ways to increase it, which we’ll explore later.
4. Finding PHP max_execution_time in Different Hosting Environments
Depending on your hosting environment, finding the max_execution_time setting can vary. Let’s break it down for some of the most common hosting types:
1. Shared Hosting
In shared hosting environments, you often have limited control over server settings. However, you can still access the max_execution_time through:
- PHP Info File – As mentioned before, you can create a PHP info file to check the value.
- .htaccess file – Sometimes, you can tweak the max_execution_time directly through your .htaccess file with a line like:
php_value max_execution_time 300, but this isn’t always supported.
2. VPS and Dedicated Hosting
For VPS or dedicated hosting, you have more control, and you can check or change the max_execution_time directly in the PHP configuration file (php.ini). Here’s how:
- Connect to your server via SSH.
- Locate your php.ini file, usually found in
/etc/php/{version}/apache2/or/etc/php/{version}/fpm/. - Open the file and search for max_execution_time. You can modify the value here for more flexibility.
3. Managed WordPress Hosting
Managed hosting environments often abstract these settings to maintain optimal configurations. To check the max_execution_time:
- Reach out to the support team, as they typically can provide you with this information promptly.
- Many managed hosts offer control panels that display PHP settings upfront, making it easier to find:
| Managed Host | How to Check |
|---|---|
| WP Engine | Contact Support |
| Kinsta | Check in your dashboard |
| SiteGround | PHP Manager in cPanel |
Regardless of your hosting environment, knowing how to find and adjust the PHP max_execution_time helps to keep your WordPress site running smoothly!
How to Increase PHP max_execution_time in WordPress
Increasing the PHP max_execution_time in WordPress is often necessary, especially if you’re running plugins that require more processing time or if you’re dealing with large files. The good news is that this can be done quite easily! Here are a few methods you can try:
- Using the .htaccess File: If your hosting provider uses Apache, you can modify the .htaccess file to change the max execution time value. Just add the following line:
php_value max_execution_time 300
This sets it to 300 seconds. Make sure to backup the file before making changes!
- Editing the php.ini File: If you have access to your server’s php.ini file, open it and look for the line that reads:
max_execution_time = 30
Change it to your desired duration (e.g., `max_execution_time = 300`), save the file, and restart your server for the changes to take effect.
- WordPress Configuration File (wp-config.php): You can directly write a line in your wp-config.php file, which is located in the root of your WordPress install. Simply add the following line:
set_time_limit(300);
This tells PHP to allow the script to run for up to 300 seconds.
- Through a Plugin: Prefer a simpler method? There are plugins available such as “WP Maximum Execution Time Exceeded” that let you adjust the max execution time from the WordPress dashboard. Just install, activate, and set your preferred time!
After making any of these changes, running resource-intensive scripts should be easier without hitting the limits set by your server.
Common Issues Related to max_execution_time
Even with the increase in php max_execution_time, some common issues may arise. Being aware of these can help you troubleshoot more effectively:
- Server Configuration Limits: Sometimes, your web hosting provider has additional limits that override your changes. If you increase your PHP max_execution_time but still see the same error, check with your provider to see if they impose any restrictions.
- Improper Code in Plugins/Themes: If a plugin or theme is poorly coded, it may lead to long-running scripts that exceed even the increased max execution time. In such cases, it’s wise to either find an alternative plugin or contact the developer for help.
- Memory Limit Issues: Increasing max_execution_time may not solve the problem if your PHP memory limit is too low. Check the memory limit in your php.ini file and consider increasing it as well.
- Unhandled Errors: Errors in your script (like infinite loops) can cause the execution time to exceed. Review your code and make sure there’s proper error handling.
- Timeouts from External Resources: If your script pulls data from external APIs and those requests take too long, you might still face issues. Consider optimizing these requests.
Understanding these typical issues can help you to manage max_execution_time effectively and keep your WordPress site running smoothly!
Best Practices for Managing PHP max_execution_time in WordPress
When it comes to managing the `PHP max_execution_time` setting in your WordPress hosting environment, there’s a lot more to it than just increasing the number. By following some best practices, you can ensure that your site runs smoothly while minimizing the risk of server overload and downtime. Here are some essential tips to consider:
- Understand Your Needs: Before modifying `max_execution_time`, evaluate what your WordPress site requires. For instance, if you’re running a large e-commerce site with multiple plugins, you might need to increase the limit faster than a simple blog.
- Start Small: If you decide to increase the max execution time, don’t go overboard. Start by incrementing the limit in small steps (e.g., from 30 to 60 seconds) to find a suitable configuration without overloading your server.
- Optimize Your Site: Focus on performance optimization by optimizing images, caching pages, and minimizing the use of heavy plugins. This can decrease the required execution time for various processes.
- Monitor Your Site: Use monitoring tools to keep an eye on your site’s performance and errors. Tools like Google Analytics and server logs can help you identify issues related to max execution time.
- Consider Using a Staging Environment: Implement a staging site to test changes before applying them to your live site. This avoids potential disruptions and lets you see how changes might affect performance.
- Consult With Your Hosting Provider: If you’re unsure about the execution time settings, don’t hesitate to reach out to your hosting provider. They can provide guidance tailored to your specific hosting environment.
By implementing these best practices, you can effectively manage the `PHP max_execution_time` setting in your WordPress hosting environment, ensuring that your website remains fast and functional.
Conclusion
In summary, managing the `PHP max_execution_time` in WordPress is crucial for maintaining a healthy website. While it might be tempting to set this value high to eliminate timeout errors, it’s essential to strike the right balance. Overly lengthy execution times can lead to server strain and might even create user experience issues.
Remember that it’s not just about the number itself; optimizing your site, using efficient coding practices, and selecting the right plugins can drastically reduce the necessity for extended execution times. As you adjust these settings, keep in mind the hosting environment you’re using and consult with your provider for the best approach tailored to your specific needs.
Ultimately, by following best practices and keeping a watchful eye on your site’s performance, you can ensure that your WordPress installation remains robust, efficient, and user-friendly.


