Thinking about starting a WordPress site but feeling a little intimidated? Don’t worry! Let’s dive into the world of Virtual WordPress Installation. This process makes it super easy to set up your website without worrying about the complexities of server management. By using a virtual environment, you can test, develop, and run your
What is Virtual WordPress Installation?

So, what exactly do we mean when we talk about a Virtual WordPress Installation? Essentially, it refers to the practice of setting up WordPress on a virtual environment, rather than directly on a live server. Here’s why you might want to consider this approach:
- Local Development: You can develop and test your site locally without exposing it to the internet.
- Performance: By using PHP 7, you get improved speed and efficiency, which is perfect for running WordPress smoothly.
- Cost-Effective: You won’t incur hosting fees until you’re ready to launch your site.
- Experimentation: Feel free to try out themes, plugins, and customizations without the risk of breaking your live site.
Setting up a virtual installation typically involves software like XAMPP, MAMP, or WAMP, which act as local servers on your computer. This environment mimics a real web server, allowing you to run PHP scripts and interact with MySQL databases just like you would online.
In summary, Virtual WordPress Installation is an ideal way to dip your toes into web development, perfect your WordPress skills, or simply create a personal site without the commitment of a full server. Excited to get started? Let’s move on to the next steps!
Why Use PHP 7 for WordPress?

So, why should you consider using PHP 7 for your WordPress installation? The answer lies in the performance, security, and overall experience it brings to the table. Let’s break it down:
- Increased Performance: PHP 7 offers significant speed improvements over earlier versions. On average, PHP 7 can perform twice as fast as PHP 5.6. This means your WordPress site will load faster, resulting in a better user experience and potentially higher search engine rankings.
- Improved Error Handling: One of the coolest features of PHP 7 is its improved error handling capabilities. With the introduction of the Throwable interface, errors are now easier to catch and manage. This can drastically reduce downtime due to coding issues and provide a more stable environment for your WordPress site.
- Lower Resource Consumption: Because of its enhanced efficiency, PHP 7 uses fewer CPU resources. This not only helps your server handle more requests but also lowers your hosting costs. If you’re on shared hosting, this could be a game changer.
- Enhanced Security: Security is paramount, especially in the digital world where vulnerabilities are rampant. PHP 7 includes various security enhancements that work to protect your WordPress site from threats. It’s vital to keep your site safe, and PHP 7 plays a key role in achieving that.
- Future-Proofing: As WordPress continues to evolve, adapting to future versions of PHP becomes essential. By using PHP 7, you’re ensuring compatibility with future updates, which means less hassle down the road.
In summary, PHP 7 is a crucial upgrade for any WordPress site owner looking to enhance their website’s performance, security, and overall reliability. Making the switch is not just about having the latest tech—it’s about providing a better experience for your users.
Prerequisites for Virtual WordPress Installation
Before diving into the virtual WordPress installation process, there are some prerequisites you’ll need to tick off your list. Planning ahead makes everything smoother and saves you from potential headaches later on. Here’s what you need to set up:
- Web Server: You’ll need a reliable web server to host your WordPress site. Popular options include Apache and Nginx. Both have their merits, but ensure that your choice supports PHP 7 and the latest MySQL versions.
- PHP 7 Installation: Obviously, you’ll need PHP 7 installed on your server. Double-check the installation by running
php -vin your terminal to verify the version. - Database Management System: WordPress relies on a database. You can use popular systems like MySQL or MariaDB. Ensure it’s set up and running correctly. Create a database specifically for WordPress before installation.
- Text Editor: Choose a text editor you’re comfortable with. Whether it’s Notepad++, Sublime Text, or Visual Studio Code, make sure you have it ready to modify configuration files.
- Domain Name: If you plan to go live with your WordPress site, you’ll need a domain name. It’s advisable to get a domain before installation so you can configure it properly.
- Basic Knowledge of Command Line: Since we’re talking about a virtual installation, some command line usage will be necessary. Familiarize yourself with basic commands to navigate and manipulate files in your environment.
By ensuring you have these prerequisites in place, you’re setting yourself up for a successful and hassle-free WordPress installation. Remember, a little preparation goes a long way!
Step-by-Step Guide to Setting Up a Virtual Environment
Creating a virtual environment is a crucial step in running WordPress with PHP 7. It isolates your development environment from your local machine, ensuring that you can test and develop without affecting your live site. Here’s a straightforward guide to get you started:
- Choose a Virtualization Tool: First things first, you need a virtualization tool. Options like VirtualBox, Vagrant, or Docker are popular. For simplicity, we’ll proceed with VirtualBox.
- Download and Install VirtualBox: Head over to the VirtualBox website, download the relevant version for your OS (Windows, macOS, or Linux), and follow the installation instructions.
- Create a New Virtual Machine (VM): Open VirtualBox and click on “New.” Assign the VM a name, select the type (Linux or Other), and choose the version (Ubuntu for example). Allocate memory (at least 2GB recommended).
- Set Up Hard Disk: Choose “Create a virtual hard disk now.” You can use the default option (VDI), and decide between dynamically allocated or fixed size. The size should be at least 20GB.
- Configure Network: Go to “Settings” > “Network,” and select “Bridged Adapter“ or “NAT” depending on your needs. Bridged allows your VM to access the network directly.
- Start Your Virtual Machine: Once everything is set, start your VM. You’ll need an ISO file to install the OS – I recommend using Ubuntu LTS for the best compatibility.
- Install the Operating System: Follow the prompts to complete the OS installation. After that, you’ll have a clean slate for your WordPress site!
And there you have it! You’ve set up a virtual environment where your WordPress setup with PHP 7 can thrive.
Installing WordPress in a Virtual Environment
Now that your virtual environment is all set up, it’s time to install WordPress! This process is quite simple, but let’s go through it step-by-step to ensure everything goes smoothly.
- Install PHP and Required Extensions: Open a terminal and run:
sudo apt updatesudo apt install php7.4 php7.4-mysql php7.4-xml php7.4-mbstring php7.4-curl
- Install MySQL Server: You’ll need a database for WordPress, so let’s install MySQL by running:
sudo apt install mysql-server
- Fetch the Latest WordPress: Download WordPress with the following command:
wget https://wordpress.org/latest.tar.gz
- Extract WordPress: Unzip the downloaded file using:
tar -xvzf latest.tar.gz
- Move WordPress Files to Web Directory: Move the extracted files to your web server’s directory, usually `/var/www/html`. You can use:
sudo mv wordpress/* /var/www/html/
- Set Permissions: Ensure the web server can read and write files in your WordPress directory:
sudo chown -R www-data:www-data /var/www/html/*sudo chmod -R 755 /var/www/html/
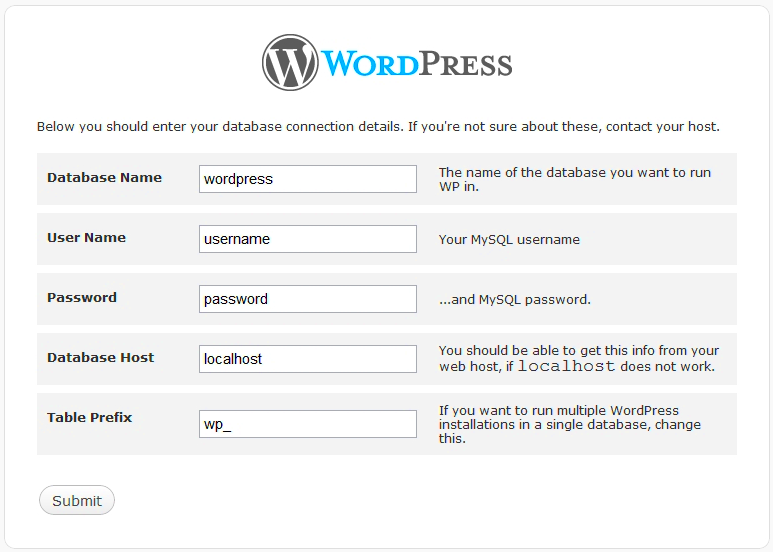
- Create a Database for WordPress: Log into MySQL and create a database:
sudo mysql -u root -pCREATE DATABASE wordpress;GRANT ALL PRIVILEGES ON wordpress.* TO 'yourusername'@'localhost' IDENTIFIED BY 'yourpassword';FLUSH PRIVILEGES;EXIT;
- Access WordPress Installation Wizard: Open your browser and navigate to `http://localhost`. Follow the prompts to complete the installation.
And voila! You have successfully installed WordPress in your virtual environment, ready to explore and develop your site further.
7. Configuration and Optimization Tips
When setting up a virtual WordPress installation using PHP 7, making the right configurations can significantly enhance your site’s performance. Below are some practical tips to help you optimize your setup and ensure that everything runs smoothly.
- Configure Memory Limit: WordPress thrives on resources. Increasing the memory limit in your
wp-config.phpfile can prevent memory-related errors. You can set it to 256M or higher:
define('WP_MEMORY_LIMIT', '256M');.htaccess file:Options -Compression AddOutputFilterByType DEFLATE text/html text/plain text/xml text/css text/javascript application/javascript application/x-javascript These configuration and optimization tips can help ensure your virtual WordPress installation is not only functional but also performant.
8. Common Issues and Troubleshooting
Even with a well-optimized setup, you might encounter issues along the way. Here’s a handy troubleshooting guide focusing on common problems you might face when using virtual WordPress with PHP 7.
| Issue | Possible Causes | Solutions |
|---|---|---|
| 404 Errors | Permalink issues or .htaccess file corrupt. | Reset Permalinks in WordPress settings or regenerate the .htaccess file. |
| White Screen of Death | Memory limit exceeded or PHP errors. | Increase memory limit and check error logs for specific issues. |
| Database Connection Error | Wrong database credentials or server issues. | Verify database settings in wp-config.php and ensure the database server is running. |
| Slow Performance | Heavy plugins or shared server resources. | Deactivate unnecessary plugins and optimize your database. |
Remember that most troubleshooting can be an iterative process. If one solution doesn’t work, don’t hesitate to try another. Community forums and WordPress documentation are also excellent resources for finding help!
Conclusion and Next Steps
In this blog post, we’ve explored the process of setting up a virtual WordPress installation using PHP 7. This setup not only enhances the performance of your WordPress site but also ensures that you are utilizing the latest features and security enhancements offered by PHP 7. Below, we’ve summarized key takeaways and outlined next steps to further improve your WordPress environment.
Key Takeaways
- PHP 7 Performance Improvement: PHP 7 can process scripts almost twice as fast as its predecessor, PHP 5.6, leading to faster page loads.
- Enhanced Security: With the introduction of new features like scalar type hints and return type declarations, PHP 7 offers a more secure coding environment.
- Virtual Environment Benefits: Using a virtual server allows easy management of dependencies, libraries, and configuration settings without affecting the main system.
Next Steps
| Action Item | Description |
|---|---|
| Backup Your Site | Always create a backup before making significant changes to your WordPress installation. |
| Test Compatibility | Check your themes and plugins for compatibility with PHP 7. |
| Optimize for Performance | Consider using caching plugins and optimizing your database for improved speed. |
| Stay Updated | Regularly update WordPress, themes, and plugins to ensure security and functionality. |
By following these next steps, you can ensure a stable and efficient WordPress environment that leverages the capabilities of PHP 7 while providing the best possible experience for your users.


