Thinking about turning your photography passion into a source of income? Shutterstock is one of the biggest platforms out there for photographers to showcase their work and earn royalties. But it’s not just about uploading random images — success depends on how well you prepare and submit your photos. In this guide, I’ll walk you through the essentials of uploading your photos to Shutterstock and how to make sure they stand out. Whether you’re a seasoned pro or just starting out, these tips will help you maximize your earnings and get your work seen by a global audience.
Preparing Your Photos for Submission
Before you hit that upload button, it’s crucial to prepare your photos properly. High-quality, well-edited images will not only get approved faster but will also fetch higher royalties. Here are some key steps to ensure your photos are ready for submission:
- Check Your Image Quality: Make sure your photos are sharp, properly exposed, and free of noise or artifacts. Use editing software like Adobe Lightroom or Photoshop to enhance clarity and correct any flaws.
- Follow Shutterstock’s Technical Requirements: Upload images in JPEG format, with a minimum of 4 megapixels (preferably higher for versatility). The color profile should be sRGB, and the file size should not exceed 50MB.
- Remove Watermarks and Logos: Your submissions should be free of any watermarks, logos, or branding that aren’t part of the original shot. Shutterstock prefers clean, professional images.
- Ensure Proper Composition and Focus: Pay attention to framing, rule of thirds, and overall composition. Focus on capturing a clear subject that tells a story or evokes emotion.
- Use Accurate and Descriptive Keywords: When submitting, carefully select relevant keywords that describe your photo’s content, mood, and context. This will help your images appear in relevant searches and increase visibility.
- Check for Model and Property Releases: If your photo includes recognizable people or private property, make sure you have the necessary releases. Shutterstock requires these for licensing.
Taking the time to properly prepare your photos not only improves your chances of acceptance but also positions you to earn more from each sale. Think of it as laying a strong foundation for your Shutterstock portfolio — quality and relevance are key!
Creating a Shutterstock Contributor Account

So, you’ve decided to share your amazing photos with the world—and potentially earn some cash along the way. The first step is creating a Shutterstock Contributor account. Don’t worry, it’s pretty straightforward, and I’ll walk you through it.
First, head over to the Shutterstock Contributor website. You’ll see a button that says “Join Now” or “Sign Up.” Click on it, and you’ll be prompted to fill out some basic info:
- Personal details: Name, email address, and country of residence.
- Username and password: Pick a professional username that reflects your brand, and choose a strong password.
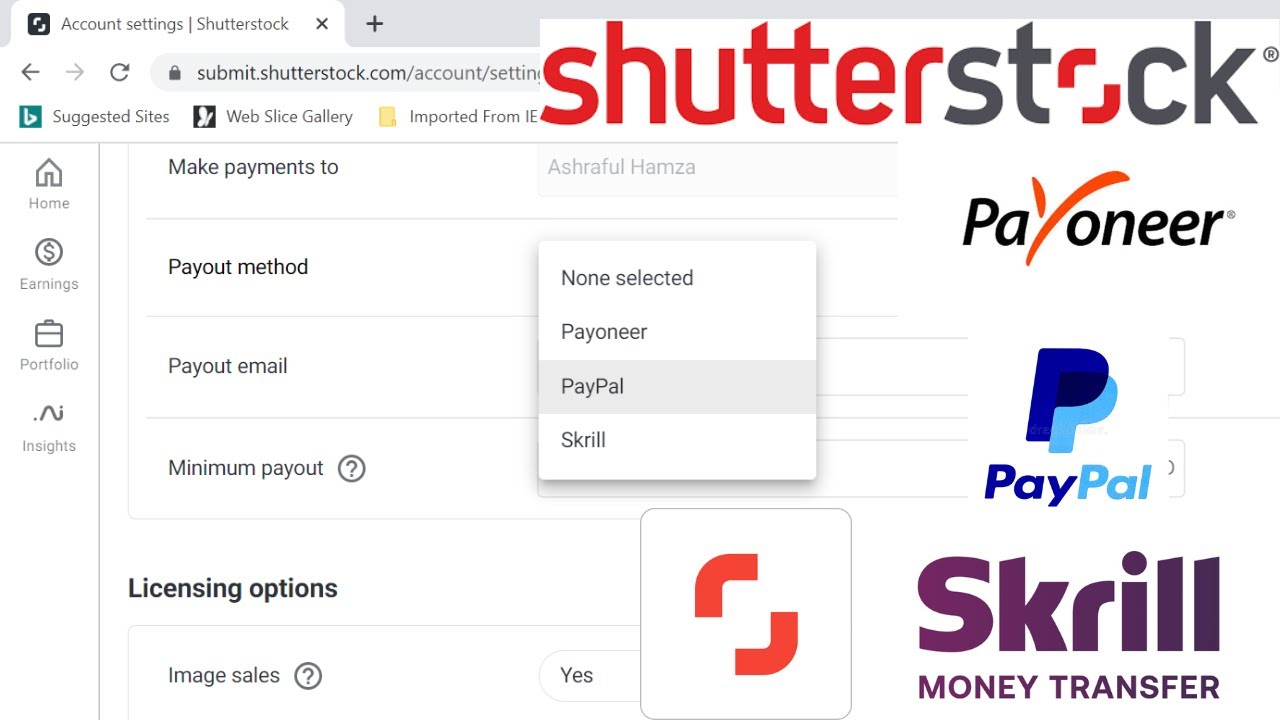
- Payment information: Set up how you want to receive your earnings—PayPal, bank transfer, etc.
Once you’ve entered your details, you’ll need to agree to Shutterstock’s terms and conditions. It’s a good idea to read through them, just so you know what to expect. After submitting, Shutterstock will send you a confirmation email. Click on the link in that email to verify your account.
After verification, you’ll be asked to review your profile and upload some sample images. This helps Shutterstock assess your style and ensure your work aligns with their standards. Remember, the more polished and professional your initial submissions are, the better impression you’ll make!
Finally, take some time to familiarize yourself with the Contributor Dashboard. This is where you’ll upload photos, track your sales, and manage your account. Think of it as your control center for all things Shutterstock!
Uploading Your Photos Step by Step

Now that your account is set up, it’s time to upload your photos. Uploading might seem simple, but there are some tips and steps to follow to ensure your images are optimized for sales and approval.
Step 1: Prepare Your Photos
Before uploading, make sure your images meet Shutterstock’s requirements:
- File Format: JPEG format with RGB color mode.
- Resolution: At least 4 megapixels (generally 3000 x 2000 pixels or higher).
- Quality: Sharp, well-lit, and free of noise or compression artifacts.
- Model and Property Releases: If applicable, ensure you have releases for recognizable people or private property.
Step 2: Log into Your Contributor Dashboard
Go to your Shutterstock Contributor account and click on the “Upload” button. You’ll see options to upload individual images or bulk upload multiple files at once—choose what suits you best.
Step 3: Select Your Files
Browse your computer and select the photos you want to upload. A good tip is to organize your images in folders beforehand to make the process smoother. Drag and drop files or use the upload window to choose your images.
Step 4: Add Metadata and Descriptions
This is a crucial step. You’ll need to add:
- Title: Be descriptive but natural—think about what a buyer might search for.
- Keywords: Add relevant keywords that describe your photo. Use a mix of broad and specific terms.
- Description: Write a brief, engaging description of the image.
Remember, the right keywords can significantly boost your photo’s visibility. Avoid spammy or irrelevant tags, as that can hurt your reputation and chances of acceptance.
Step 5: Choose Appropriate Categories
Select the best categories that match your image. Shutterstock provides suggested categories, but you can also manually choose ones that fit best. Proper categorization makes it easier for buyers to find your work.
Step 6: Submit for Review
Once everything is filled out, click “Submit.” Your images will then go through Shutterstock’s review process. Usually, it takes a few days, but it can be longer depending on the volume of submissions. You’ll get an email once your images are approved or if they need any adjustments.
Pro tip: Keep uploading regularly! The more high-quality images you add, the higher your chances of making sales. Patience and consistency are key. Happy uploading!
Optimizing Metadata and Keywords for Better Visibility
Alright, let’s talk about the secret sauce to making your photos stand out on Shutterstock — optimizing your metadata and keywords. Think of metadata as the label on a jar; it tells viewers what’s inside, and keywords are the clues that help search engines find your work. The better you do here, the more likely your images are to get discovered by buyers looking for exactly what you offer.
First off, always use relevant and specific keywords. Instead of just typing “flower,” go for “sunflower in bloom” or “bright yellow sunflower.” This way, your image can appear in more targeted searches. Remember, Shutterstock’s search algorithm favors images that match the search intent closely.
Here are some tips to optimize your metadata:
- Use descriptive titles: Make your titles clear and concise, like “Morning Sunrise Over Mountain Range.”
- Write detailed descriptions: Provide context or story behind the image, such as “A serene lake at dawn with mist rising.”
- Select the right categories: Assign your photo to the most relevant categories to help users find it easily.
- Include a variety of keywords: Think of all the related terms, synonyms, and even common misspellings people might use.
Remember not to stuff keywords or use irrelevant tags—it can hurt your ranking and violate Shutterstock’s policies. Instead, focus on quality and accuracy. For example, if you upload a picture of a “red vintage bicycle,” include keywords like “retro bike,” “classic bicycle,” “urban transportation,” and “cycling.” This broadens your reach without being spammy.
Pro tip: Use the keyword tags feature wisely. Shutterstock allows multiple keywords, so take advantage of all slots but stay within relevance. Also, periodically review your existing images’ metadata; updating keywords can sometimes boost older work’s visibility if trends shift.
In a nutshell, well-optimized metadata and keywords are your best friends for maximizing exposure and sales. They ensure your photos appear in the right searches, attracting buyers who are genuinely interested in what you’ve created.
Understanding Shutterstock’s Content Guidelines and Quality Standards
Before you start uploading tons of images, it’s crucial to understand Shutterstock’s content guidelines and quality standards. Think of these as the rulebook for what can and cannot be accepted on the platform. Playing by these rules not only keeps your submissions smooth but also boosts your reputation and earning potential.
First, let’s talk about content guidelines. Shutterstock is pretty strict about what they accept. Your images should be:
- Original and authentic: No copyrighted material unless you have permission. This includes logos, trademarks, or recognizable private properties.
- High-quality: Clear, sharp, well-exposed, and properly focused. Blurry or pixelated images won’t make the cut.
- Appropriate content: No offensive, violent, or adult material. Keep it professional and suitable for a broad audience.
- Properly model and property releases: When people or private properties are identifiable, you need the correct releases to sell those images.
Next, the quality standards are equally important. Shutterstock looks for images that are technically excellent and visually appealing. Here’s what they check for:
- Sharpness and focus: Your main subject should be crisp and clear.
- Correct exposure and lighting: No overexposed highlights or underexposed shadows unless artistically intended.
- Color accuracy: Colors should be natural unless your style calls for something different.
- Proper composition: Think about framing, rule of thirds, and avoiding distracting elements.
Another thing to keep in mind is releases. If your photo features identifiable people or private property, you’ll need signed model or property releases. Without these, your image won’t be accepted or sold for commercial uses.
Finally, stay updated! Shutterstock’s policies can evolve, especially around sensitive content or emerging themes. Regularly review their contributor guidelines and community forums to stay in the know.
By understanding and adhering to Shutterstock’s content guidelines and quality standards, you’re setting yourself up for success. Quality images that meet platform standards are more likely to be approved, featured, and purchased — ultimately helping you maximize your earnings on the platform.
Strategies to Increase Your Photos’ Reach and Earnings
So, you’ve uploaded some fantastic photos to Shutterstock and are eager to boost your reach and earnings. The good news is, there are several tried-and-true strategies to get your work seen by more people and, ultimately, earn more. Let’s dive into some practical tips that can help you make the most out of your Shutterstock portfolio.
Optimize Your Metadata
Think of your photos’ metadata—titles, descriptions, and keywords—as the map that guides buyers to your images. Use clear, descriptive, and relevant keywords that match what your potential buyers might search for. Avoid keyword stuffing; instead, focus on accuracy and variety. For example, if you have a photo of a sunny beach, include keywords like “beach,” “summer,” “vacation,” “ocean,” and “relaxing.”
Stay Consistent and Upload Regularly
Consistency is key. Regular uploads keep your portfolio fresh and can improve your visibility on the platform. Set a manageable goal—whether it’s uploading a few photos each week or month—and stick to it. Over time, this builds a steady stream of content that can attract more views and sales.
Focus on Trending Topics and Niches
Pay attention to current trends and seasonal themes. For example, during holidays or big events, create and upload relevant images. Also, consider specializing in a niche where there’s high demand but less competition—like drone photography, virtual work setups, or eco-friendly lifestyles. Becoming known for a particular niche can boost your earnings over time.
Engage with the Shutterstock Community
Join forums, social media groups, or communities of stock photographers. Sharing tips, feedback, and insights can inspire new ideas and help you stay motivated. Sometimes, collaborations or feedback from peers can elevate your work and lead to increased exposure.
Promote Your Portfolio Outside Shutterstock
Don’t rely solely on Shutterstock’s internal traffic. Share your best images on your social media profiles, personal website, or blog. This can direct more traffic to your portfolio and increase your chances of sales. Use engaging captions and hashtags to reach broader audiences.
Monitoring Your Performance and Earnings
Once you’ve uploaded your photos and started applying some of these strategies, it’s important to keep an eye on how your images are performing. Shutterstock provides robust tools to help you track your progress, understand what’s working, and identify areas for improvement.
Use Shutterstock’s Dashboard
Log in regularly to your contributor account and explore the dashboard. Here, you’ll find metrics like:
- Views – How many times your images have been seen.
- Downloads – How many times your images have been purchased.
- Earnings – Your total income from sales.
- Top Performing Images – Which photos are generating the most income.
Analyze Your Data
Look for patterns—are certain subjects, keywords, or styles performing better? If so, consider creating more similar content. Conversely, if some images aren’t selling, think about why. Maybe the keywords aren’t optimized, or the subject isn’t in demand anymore.
Set Goals and Track Progress
Set achievable milestones—like increasing your monthly earnings by a certain amount or uploading a set number of images. Use the data to adjust your approach. For example, if you notice videos perform better than photos, consider investing more time in creating clips.
Stay Updated on Platform Changes
Shutterstock occasionally updates its policies, algorithms, or contributor tools. Keep an eye on their official blog or emails so you’re always in the loop. Adapting quickly to platform changes can give you an edge over other contributors.
Monitoring your performance isn’t just about numbers—it’s about understanding your audience, refining your strategy, and continuously improving your craft. With consistent tracking and adjustment, you’ll be well on your way to maximizing your Shutterstock earnings!
Tips for Consistent Uploads and Portfolio Growth
Building a successful portfolio on Shutterstock isn’t just about uploading a handful of images and hoping for the best — it’s about consistency, quality, and strategic growth. Think of your portfolio as a living, breathing entity that needs regular attention to flourish. So, how can you stay on top of your game and keep your portfolio growing steadily?
Set a Realistic Upload Schedule. Whether it’s once a week, bi-weekly, or monthly, pick a schedule that fits your lifestyle. Consistency helps you build momentum, and Shutterstock’s algorithm favors active contributors. Plus, it keeps your creative juices flowing!
Focus on Quality Over Quantity. While it’s tempting to upload everything you create, prioritize high-quality images that meet Shutterstock’s standards. Clear, well-lit, and technically perfect photos tend to perform better and attract more buyers.
Diversify Your Content. Don’t put all your eggs in one basket. Cover different subjects, styles, and themes — from lifestyle shots to abstract designs. This broad approach attracts a wider audience and increases your chances of making sales.
Research Trends and Popular Topics. Keep an eye on what’s trending — whether it’s seasonal themes, new technology, or current events. Incorporate these into your shoots to stay relevant and boost your chances of being discovered.
Practical Tips for Portfolio Growth:
- Batch Uploads: Prepare multiple images at once to maintain a steady flow of new content.
- Revisit Old Work: Update and re-upload older images if they can be improved or repurposed for current trends.
- Engage with the Community: Participate in forums or groups to learn from others, get feedback, and stay inspired.
- Use Keyword Optimization: As you add new images, refine your keywords to maximize visibility.
Remember, growing your Shutterstock portfolio is a marathon, not a sprint. Patience, persistence, and continuous learning are your best allies. Each upload is a step forward, so stay committed and keep your creative wheels turning!
Conclusion and Final Tips for Success on Shutterstock
Congratulations! You’re now equipped with the essential strategies to upload photos to Shutterstock and maximize your earnings. But before you dive back into creating and uploading, let’s wrap up with some final tips to keep you on the path to success.
Be Patient and Persistent. Earnings on Shutterstock often grow over time. Don’t get discouraged if your initial sales are slow. Keep uploading consistently, refining your work, and learning from feedback.
Focus on Market Needs. Understand what buyers are looking for — whether it’s versatile lifestyle shots, clean vectors, or trending themes. Tailor your content to meet these demands without sacrificing your unique style.
Optimize Your Metadata. Use relevant, specific keywords and compelling descriptions. Good metadata helps your images get discovered and increases the chances of sales.
Stay Informed and Adapt. The stock photography industry evolves rapidly. Follow Shutterstock’s updates, participate in community forums, and stay inspired by other successful contributors.
Protect Your Work. Always upload original images, and be aware of licensing restrictions and model/model releases when applicable. Protecting your work maintains your reputation and ensures ongoing success.
Final Quick Tips:
- Upload Regularly to stay active and relevant.
- Maintain high standards for image quality.
- Research and adapt to current trends.
- Use smart keywords to boost visibility.
- Engage with the community for tips and inspiration.
Remember, turning your passion for photography into a steady income on Shutterstock is possible with perseverance and strategic effort. Keep creating, keep learning, and most importantly — enjoy the journey. Happy uploading!