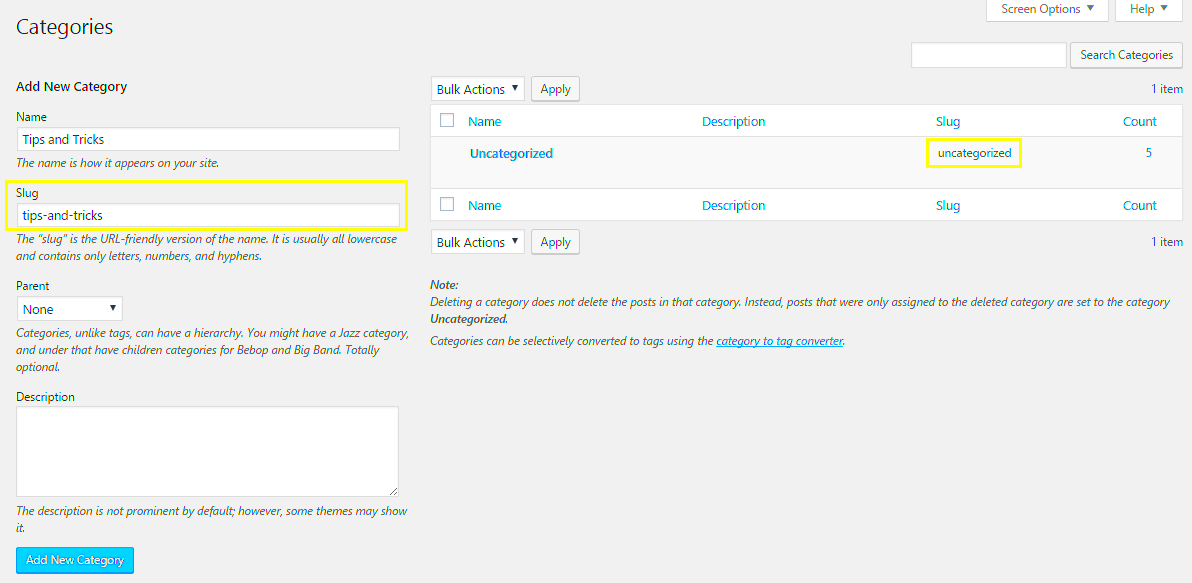
When you create a post or page in WordPress, you’re also creating what’s known as a “slug.” This might sound fancy, but it’s simply the part of the URL that identifies a specific page on your website. For example, in the URL www.yourwebsite.com/awesome-blog-post, the slug is “awesome-blog-post.” Understanding slugs is essential because they not only make your links more readable but also play a vital role in SEO. Let’s dive deeper into the world of WordPress slugs!
Understanding the Importance of Slugs

Slugs are crucial for a variety of reasons. They help humans and search engines understand what your content is about. Here’s why you should pay attention to them:
- SEO Benefits: Search engines use slugs to determine the relevance of your content. A well-structured and descriptive slug can improve your chances of ranking higher.
- User Experience: Clean and meaningful slugs enhance user experience by making it easier for visitors to read and remember your URLs.
- Social Sharing: When you share a link on social media, a descriptive slug can encourage more clicks. People are more likely to click on a link that conveys a clear idea of the content.
Let’s break it down further:
| Aspect | Importance |
|---|---|
| SEO | A well-formed slug can improve search visibility and attract organic traffic. |
| Readability | Simple slugs make it easier for users to identify the content type and topic. |
| Link Length | Shorter slugs are often more appealing and easier to share. |
In summary, slugs are more than just part of your URL; they are a vital cog in the machinery of your website’s SEO and usability. Attention to detail here can lead to improved engagement and conversions.
Finding Slugs in Your WordPress Dashboard

So, you want to find slugs on your WordPress website, huh? First off, let’s clarify what a slug is: it’s that user-friendly and SEO-friendly part of your URL that comes after your domain name. For instance, in the URL www.example.com/my-awesome-post, the slug is my-awesome-post.
Finding slugs in your WordPress Dashboard is pretty straightforward. Here’s how you can do it:
- Log into your WordPress Admin: Use your credentials to log in to your WordPress dashboard. Once you’re in, you’ll be greeted with lots of options on the left sidebar.
- Navigate to Posts or Pages: Click on either Posts or Pages from the menu. This will take you to a list of your existing content.
- Hover Over the Title: Once you see the list of your posts or pages, simply hover your mouse over the title of the content you want to check.
- View the Slug: Look closely, and you’ll see a small link or option labeled “Edit” or “Quick Edit.” Click on that, and it should display the slug right there. You can also view the full URL which shows the slug section as well.
By following these steps, you can effectively identify the slugs associated with each piece of content. Whether you’re optimizing for SEO or just want to keep track of your site’s URLs, knowing how to find and manage slugs is crucial!
Using the WordPress Admin Editor to Search for Slugs
Alright, so you found some slugs, but what if you want to search for a specific one? Enter the WordPress Admin Editor! This handy tool can make your search for slugs a lot easier. Let’s dive right in!
Here’s how to use the WordPress Admin Editor to find slugs:
- Go to the Admin Dashboard: Just like before, log in to your WordPress dashboard. You’re going to be spending some time in here.
- Click on the “Edit” Option: Navigate to either Posts or Pages and click on “All Posts” or “All Pages.” This will display everything you have listed.
- Utilize the Search Bar: At the top right corner, there’s usually a search bar. Type in part of the slug you’re looking for or even the title of the post. For instance, if you’re looking for “awesome,” type that in!
- Examine the Results: Once you hit search, the editor will filter and display relevant results. From there, you can see the slugs displayed in their URLs. Click “Edit” to modify them if necessary.
This method not only saves time but also helps in making sure you don’t overlook any posts or pages with similar slugs. It’s essential to keep slugs unique to avoid confusion and improve your SEO strategy!
5. Using Plugins to Manage and Search for Slugs
If you’re looking to manage and search for slugs on your WordPress website effectively, leveraging plugins can make your life much easier. There are numerous plugins available in the WordPress repository designed specifically for this purpose. Here’s how you can utilize them:
- SEO Plugins: Plugins like Yoast SEO or All in One SEO Pack often have features that help you manage slugs. They provide real-time feedback on your slugs as you create posts or pages, ensuring they are optimized and readable.
- Custom Post Type Plugins: If you are using custom post types, plugins such as Custom Post Type UI add functionality to define slugs effectively and can help in managing slugs site-wide.
- Slugify Plugins: There are dedicated plugins like “Slugify” that automatically generate SEO-friendly slugs based on your post titles. This can save time and reduce errors.
To get started, simply navigate to the “Plugins” section in your WordPress admin dashboard, search for your desired functionality, and install the plugin. Most plugins come with user-friendly interfaces that guide you through the slug management process.
In summary, using plugins not only streamlines slug management but also enhances your site’s SEO and overall organization. Just be sure to choose a plugin that suits your specific needs, especially considering its compatibility with your theme and other plugins.
6. Searching for Slugs in the Database
If you’re comfortable diving deeper into your WordPress installation, you can search for slugs directly in the database. This approach can give you a comprehensive look at how slugs are stored, allowing for more advanced troubleshooting or customization. Here’s how you can go about it:
- Accessing Your Database: Most commonly, you’ll use phpMyAdmin, which is often included in your hosting control panel. Log in to your hosting account, find the phpMyAdmin section, and select your WordPress database.
- Searching in the Right Table: Slugs are typically stored in the
wp_poststable (the prefix may vary). Here, the slugs for your posts and pages are saved in thepost_namecolumn. - Using SQL Queries: You can execute an SQL query to search for specific slugs. For example:
SELECT post_name FROM wp_posts WHERE post_name LIKE '%your_slug%';
This query will return all posts that contain ‘your_slug’ in their slug. You can also modify it to filter by post type or status, making it a powerful tool for site management.
Remember to be cautious when making changes in the database. Always back up your database before making any alterations. This knowledge can be incredibly handy for developers or advanced users wanting to clean up or optimize their site’s content.
Best Practices for Creating SEO-Friendly Slugs
Creating SEO-friendly slugs is a crucial aspect of optimizing your WordPress website. A good slug not only improves your search engine rankings but also enhances user experience. Here are some best practices to consider when crafting slugs:
- Keep It Short and Sweet: Aim for brevity. A slug that’s too long can be overwhelming and hard to read. Ideally, keep it under 60 characters.
- Use Keywords Wisely: Include relevant keywords that reflect the content of your page. This helps search engines understand what your content is about.
- Choose Lowercase Letters: Use lowercase characters to maintain consistency and avoid issues with case sensitivity on some servers.
- Separate Words with Hyphens: Instead of underscores or spaces, use hyphens to separate words. For example, “best-practices-for-slugs” is better than “best_practices_for_slugs.”
- Avoid Stop Words: Remove unnecessary words like ‘and’, ‘the’, or ‘of’ unless they are critical for clarity. This not only shortens your slug but also makes it more focused.
Following these best practices ensures that your slugs are user-friendly and SEO-optimized, making it easier for both visitors and search engines to navigate and index your content effectively. So, spend some time crafting those slugs; they’re more important than you might think!
Troubleshooting Common Slug Issues
Even with careful planning, you might run into some common slug issues on your WordPress site. Here’s a rundown of these problems and how to resolve them:
- Slug Conflicts: If two posts or pages have identical slugs, WordPress will automatically append a number to the duplicate slug. To resolve this, rename one of the slugs to ensure uniqueness.
- Redirect Issues: When you change a slug, it might lead to 404 errors if the old slug isn’t redirected. Use a redirect plugin to guide users to the correct URL.
- Special Characters: Avoid using special characters or spaces in your slugs, as these can create unwanted complications. Always stick to alphanumeric characters and hyphens.
- SEO Plugin Settings: Sometimes, your SEO plugin settings can conflict with WordPress slugs. Check your plugin’s configuration to ensure everything is working smoothly.
If you encounter any of these issues, don’t panic! A quick tweak here and there can help you get back on track. Remember, the integrity of your website depends on well-structured slugs that function flawlessly. So, keep an eye out and fix any issues promptly to maintain a seamless user experience!
Conclusion
In conclusion, searching for slugs in a WordPress website is a straightforward process that can significantly improve your site management and SEO performance. By understanding how to locate and optimize your slugs effectively, you can enhance the overall user experience and ensure that your content is easily reachable by search engines.


