Are you looking to manage your WooCommerce store better by controlling how many products customers can buy at once? You’re in the right place! Restricting quantity per product attribute can help you prevent stock issues, optimize sales, and create a fair shopping experience for your customers. In this guide, we’ll walk you through the concept of product attributes in WooCommerce and explain how you can implement these restrictions effectively. Let’s dive in!
Understanding Product Attributes in WooCommerce

Before we jump into quantity restrictions, let’s first grasp what product attributes are in WooCommerce. Attributes are characteristics that help define your products more specifically. They allow customers to filter and sort products based on their needs, making it easier to find what they’re looking for. Here’s a deeper look:
- What Are Product Attributes?
Attributes can include color, size, weight, and other features that differentiate similar products. For example, if you sell T-shirts, attributes could be color (red, blue, green) and size (S, M, L).
- Types of Product Attributes:
- Global Attributes: These can be used across multiple products. They’re great for consistency.
- Custom Attributes: These are unique to a specific product and offer flexibility for specialized items.
- Why Use Attributes?
Using attributes can enhance user experience by allowing customers to filter their searches, making it easier to find products that meet their criteria. This can lead to higher conversion rates!
In summary, product attributes are vital for organizing and presenting your products in a way that benefits both you and your customers. Understanding these features is key to effectively restricting quantities per product attribute.
Why Restricting Quantity Per Attribute is Important
When running an online store using WooCommerce, managing inventory is crucial. One of the key factors that often gets overlooked is the importance of restricting quantity per product attribute. This feature can be a game-changer for your business for several reasons:
- Preventing Stockouts: If you’re selling products like apparel, understanding the demand for specific sizes or colors helps avoid running out of popular items. By limiting how many of a particular attribute can be purchased, you maintain sufficient stock.
- Improving Customer Experience: When customers are limited to how much they can buy of a specific attribute, it creates a more equitable shopping experience, especially during sales or promotions. No one likes to see a “sold out” label after they’ve had their heart set on a product!
- Encouraging Bulk Purchases Wisely: Sometimes, you may want to offer bulk discounts for certain attributes, but controlling how much can be purchased helps you manage overall costs. Effective restriction means you can incentivize bulk buying on terms that suit your pricing model.
- Reducing Fraud: In some industries, certain items may be prone to hoarding or scalping, especially during high-demand periods. Limiting the quantity helps in ensuring that your stock is fairly distributed among genuine customers.
- Enhancing Analytics: By restricting quantities, you can gain better insights into buying trends for specific attributes, helping you make informed decisions for future inventory and marketing strategies.
Step-by-Step Guide to Restrict Quantity Per Product Attribute
Ready to take control of your inventory? Restricting quantity per product attribute in WooCommerce is simpler than you might think. Follow this step-by-step guide to set things up:
- Install and Activate a Quantity Restriction Plugin: While WooCommerce doesn’t have this feature by default, plugins like “WooCommerce Min/Max Quantities” or “WooCommerce Product Add-ons” can help. Go to your WordPress dashboard, click on Plugins, then Add New. Search for the plugin and click Install Now.
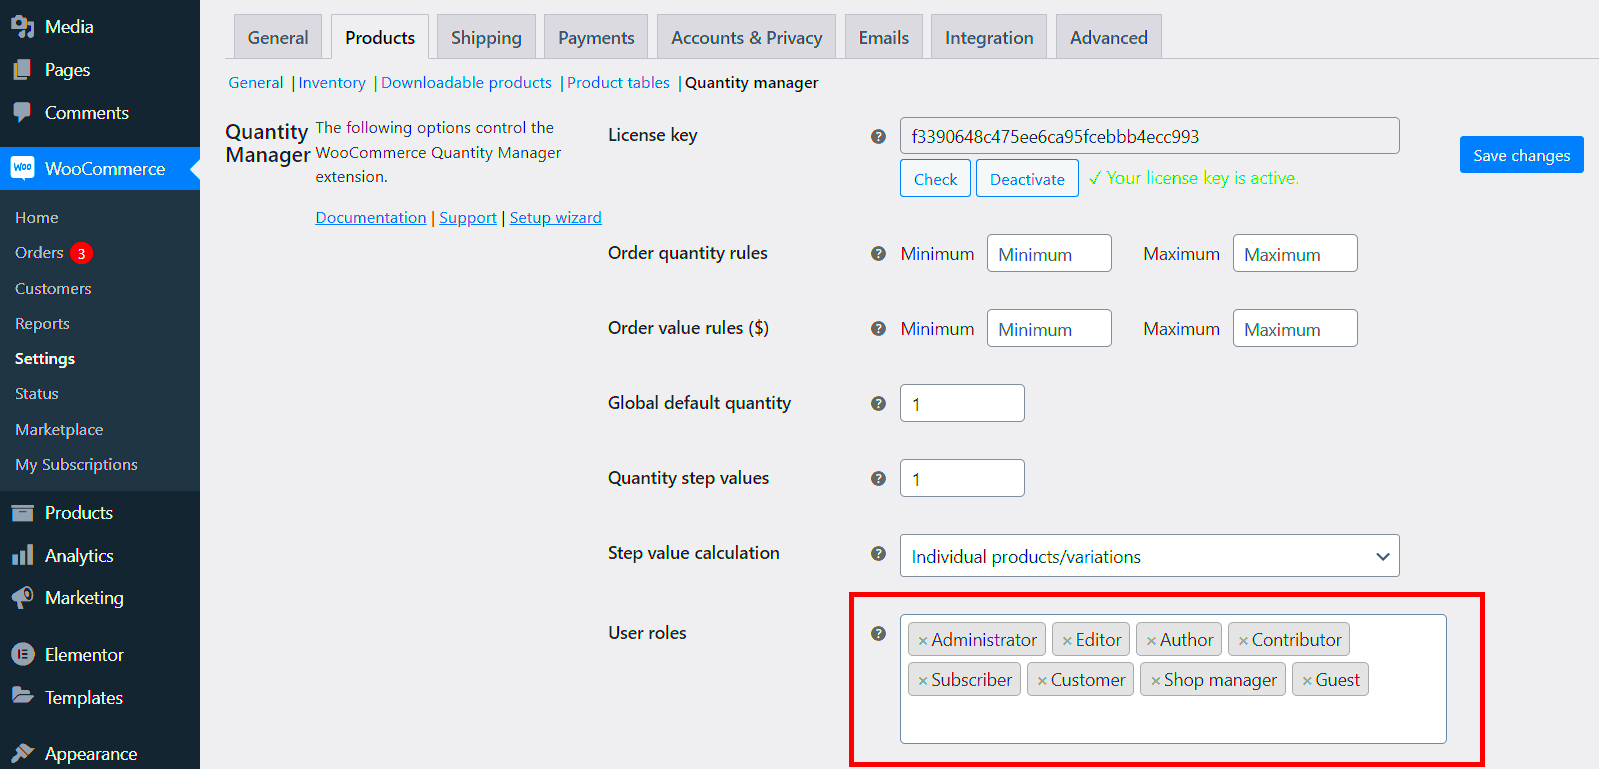
- Configure the Plugin Settings: Once activated, navigate to WooCommerce > Settings > Products > Min/Max Quantities. Here, you’ll find various options for configuring how many of each product attribute can be purchased.
- Select Your Product: Go to the Products section in your dashboard. Choose the product for which you want to restrict quantities and click on it to edit.
- Set Quantity Limits: Scroll down to the Product Data section, look for the tab related to the plugin you installed (it could be called Min/Max). Here, set the “Minimum” and “Maximum” quantities for specific attributes (like size or color) as needed.
- Save Changes: Don’t forget to hit the Update button! This step is crucial, or your restrictions won’t take effect.
- Test the Setup: Finally, visit your store and test purchasing the product with the restricted attribute. Ensure the rules function as intended.
And there you have it! With these steps, you can effectively manage your product inventory while enhancing customer satisfaction. Happy selling!
5. Using WooCommerce Plugins for Quantity Restrictions
When it comes to managing product quantities in WooCommerce, plugins can be your best friend. They can simplify the process and offer a range of features to customize how your store behaves. You no longer need to dive deep into code; plugins provide user-friendly interfaces that make quantity restrictions a breeze!
Here’s a look at some popular plugins that can help you restrict quantities per product attribute:
- Product Quantity Control – This plugin allows you to set minimum and maximum quantity rules for individual products and variations. You can even apply these rules based on user roles, which can be incredibly handy for wholesale customers.
- Min/Max Quantities for WooCommerce – With this tool, you can set minimum and maximum quantities for your products. You can enforce these limits on the cart page, leading to better customer compliance.
- WooCommerce Bulk Discount – Not only does this plugin allow for quantity restrictions, but it also provides bulk discounts. If a customer buys a certain amount, they could unlock special pricing, making it a win-win.
Using these plugins is often just a matter of installation and configuration. Typically, you’ll find settings under the WooCommerce settings in your WordPress dashboard. Just pick a plugin that fits your needs, install it, and adjust the settings according to your preferred quantity policies.
6. Custom Coding Solutions for Advanced Users
If you’re a bit more tech-savvy or if your needs are particularly unique, diving into custom coding solutions might just be the way to go. Customizing your WooCommerce store through code can allow you to set quantity restrictions exactly how you envision. But remember, this method is best suited for those who are comfortable with PHP and WordPress development!
Here’s a simple overview of how you might go about implementing custom code for quantity restrictions:
- Hook into WooCommerce: You can use WooCommerce hooks like
woocommerce_before_calculate_totalsto apply your custom logic every time the cart is updated. - Validate Quantities: Create a function to check the quantity of items in the cart. If the quantity exceeds your set limit (let’s say, 5 for a particular product attribute), you can display a message or adjust the quantity back to the allowed maximum.
- Implement Error Messaging: Feedback is important! Make sure to let your customers know when they try to exceed your set limit. Using WooCommerce’s error handling functions will help you manage this easily.
Here’s a simple code snippet to get you started:
add_action( 'woocommerce_check_cart_items', 'check_cart_item_quantity' );function check_cart_item_quantity() { if ( is_admin() ) return; global $woocommerce; $cart = $woocommerce->cart->get_cart(); foreach ( $cart as $cart_item_key => $cart_item ) { if ( $cart_item['quantity'] > 5 ) { wc_add_notice( __( 'You can only purchase a maximum of 5 units of this product.', 'your-text-domain' ), 'error' ); $woocommerce->cart->set_quantity( $cart_item_key, 5 ); // Adjust the quantity to 5 } }}While this solution may require a bit more effort, it offers unparalleled flexibility. Make sure to test your customizations thoroughly to ensure everything works as intended!
7. Testing Your Quantity Restrictions
Once you’ve set up the quantity restrictions for your products in WooCommerce, the next crucial step is testing to ensure everything is working as intended. Testing is essential because it helps you confirm that the restrictions you’ve applied are functioning correctly and that customers are experiencing the expected behavior on the front end.
Here’s a simple process to effectively test your quantity restrictions:
- Add a Product to Your Cart: Start by selecting the product that has restrictions. Try to add a number of items that exceeds your defined limits.
- Monitor the Error Message: If you’ve set restrictions correctly, you should see an error message informing you that the quantity exceeds the allowed limit.
- Adjust the Quantity: Next, try entering a valid quantity (within the limits). The product should add to your cart without any issues.
- Check the Cart Summary: Go to your cart page and verify that the quantities reflect your choices and adheres to your restrictions.
- Complete a Test Order: Finally, try to complete the checkout process. Make sure that all quantity restrictions are enforced until the end of the transaction.
By following these steps, you’ll not only ensure functionality but also enhance the shopping experience for your customers. It’s important to do this testing in various scenarios to capture any potential issues before going live.
8. Common Issues and Troubleshooting Tips
While setting up quantity restrictions in WooCommerce can be relatively straightforward, you may encounter some common issues. But don’t worry! Below are a few troubleshooting tips that can help you fix these problems quickly.
- Restrictions Not Showing: If your restrictions aren’t showing up on the product page, double-check your settings to ensure that they are saved. Sometimes, a simple refresh or cache clearing can resolve this.
- Error Messages Not Displaying: If customers are trying to exceed the limits and no error message pops up, make sure your theme or any custom coding isn’t interfering with the default WooCommerce behavior.
- Limit Not Applied at Checkout: If quantities are accepted at checkout even after restriction, ensure that your settings are not just based on the product page but are also enforced during the checkout process.
- Compatibility Issues: Some plugins may conflict with your quantity restriction setup. If you suspect a plugin is causing issues, try disabling them one by one to see which one might be the culprit.
- Testing on Different Browsers: Sometimes, what works in one browser may not work in another. Make sure to test on different web browsers and devices.
By keeping these tips in mind, you can swiftly identify and resolve any quantity restriction issues, ensuring a smooth and user-friendly shopping experience on your WooCommerce site.
Conclusion
Restricting quantity per product attribute in WooCommerce is a valuable strategy for managing inventory, preventing overselling, and enhancing the customer experience. By implementing these restrictions, store owners can smoothly control how many units of a specific product attribute a customer can purchase, allowing for better stock management and more strategic selling.
Here are some benefits of restricting quantity per product attribute in WooCommerce:
- Inventory Control: Helps in keeping track of stock levels and minimizing the risk of overselling.
- Customer Satisfaction: Ensures that multiple customers can access the desired products rather than allowing a single shopper to monopolize stock.
- Promotional Strategies: Useful for promotions or limited-time offers where quantity restrictions create urgency.
- Enhanced User Experience: Makes the shopping process smoother and clearer for users, informing them about limits before checkout.
To implement restrictions effectively, you can utilize plugins that allow for customized settings or use custom code to enhance your WooCommerce functionality. Here’s a simple table summarizing popular methods to restrict product quantity:
| Method | Description | Ease of Use |
|---|---|---|
| Plugins | Use third-party plugins for an easy setup without coding. | Easy |
| Custom Code | Implement custom PHP snippets for tailored restrictions. | Moderate |
| WooCommerce Settings | Adjust settings within WooCommerce capabilities, if available. | Varies |
By evaluating the options available to you, you can effectively manage how much of each product attribute customers are allowed to purchase, thereby optimizing your WooCommerce store’s performance.


