Getting your photos accepted on Shutterstock can feel like a bit of a mystery, especially if you’re new to the platform. But don’t worry—understanding their guidelines is your first step toward success. Shutterstock has specific rules to ensure that only high-quality, relevant images make it onto their site. From technical specs to content standards, knowing what they look for can make the submission process smoother and faster. Think of it as a recipe—you just need to follow the instructions carefully to get that perfect dish. So, let’s dive into what
Preparing Your Photos for Submission
Preparation is key when it comes to getting your photos accepted quickly on Shutterstock. It’s all about quality, consistency, and presentation. Here are some practical tips to help you get your images submission-ready:
- Use High-Resolution Files: Shutterstock prefers images with a minimum of 4 megapixels. Aim for high-resolution files with good detail and clarity to meet their standards and appeal to a broad audience.
- Focus on Technical Perfection: Make sure your photos are in focus, correctly exposed, and free of noise or grain. Use editing tools to adjust brightness, contrast, and sharpness as needed.
- Follow Composition Principles: Good composition makes your photos stand out. Pay attention to framing, rule of thirds, and balanced elements to create visually appealing images.
- Remove Watermarks and Logos: Only submit your original, unwatermarked images. Watermarks or logos will get your submission rejected.
- Crop and Resize Properly: Ensure your images are correctly cropped and resized according to Shutterstock’s recommended dimensions to prevent rejection on technical grounds.
- Metadata Matters: Add accurate and descriptive titles, keywords, and captions. This not only improves visibility but also helps reviewers understand your image’s context quickly.
Before uploading, double-check your files for consistency and quality. Use editing software like Adobe Lightroom or Photoshop to fine-tune your images. Remember, Shutterstock values originality, so avoid overly processed or heavily filtered images. Keeping your photos sharp, well-composed, and technically sound will make the review process much smoother and increase your chances of quick acceptance.
Understanding Shutterstock’s Content Requirements and Standards
Before you start submitting your photos to Shutterstock, it’s super important to get a clear grasp of what they’re looking for. Think of it like preparing for a test—you want to know the rules and expectations so you can ace it! Shutterstock has specific content requirements and standards that help ensure the photos on their platform are high quality, relevant, and legally safe for buyers to use.
First off, Shutterstock prefers photos that are technically perfect. This means your images should be sharp, well-exposed, and free of noise, with proper color balance. Blurry, over/underexposed, or pixelated images are often rejected. So, always double-check your photos before submitting.
Next, Shutterstock has guidelines on content. They generally avoid images that include:
- Brand logos or trademarks unless you have permission
- Violent or inappropriate content
- Content that infringes on copyrights or intellectual property
- Images that feature recognizable people without model releases
Speaking of model releases, if your photo includes identifiable people, you’ll need their signed release forms to sell those images legally. Shutterstock is very strict about this because they want to protect buyers and contributors alike.
Also, Shutterstock prefers images that are relevant and in demand. Check their popular categories—like business, technology, lifestyle, and nature—and aim to create content that fits these themes. Browse their collections regularly to see what’s trending and adjust your shooting accordingly.
Finally, pay attention to their technical specifications. For example, the minimum file size should be 4 megapixels, and images should be in JPEG format with a high-quality setting. Make sure your images meet these standards to avoid unnecessary rejections.
In summary, understanding Shutterstock’s content requirements means knowing the technical standards, legal considerations, and content themes that align with their platform. By doing this homework, you’ll increase your chances of getting your photos accepted quickly and smoothly!
Tips for Improving Photo Quality and Composition
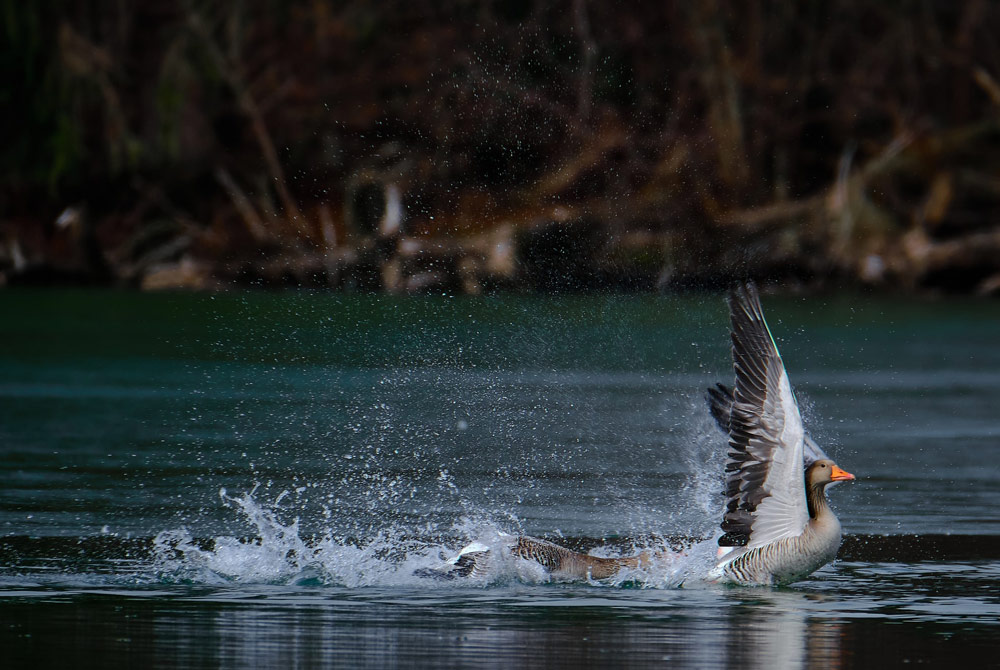
Great photos don’t happen by accident—they’re the result of good technique and a keen eye for composition. If you want your images to stand out and get accepted quickly, investing a little time in improving quality and composition can make a huge difference.
First, focus on lighting. Natural light is your best friend—shoot during the golden hours (early morning or late afternoon) when the light is soft and warm. Avoid harsh midday sun, which can cause strong shadows and blown-out highlights. If shooting indoors, consider using diffused light sources or reflectors to evenly light your subject.
Next, pay attention to your composition. Use the “rule of thirds”—imagine dividing your frame into nine equal parts with two vertical and two horizontal lines. Place your main subject along these lines or at their intersections to create a balanced and engaging shot. Don’t be afraid to experiment with different angles and perspectives; sometimes a little shift can turn a decent photo into a stunning one.
Sharpness is key. Use a tripod if necessary to prevent camera shake, especially in low light. Focus precisely on your subject, and consider using manual focus for better control. Also, shoot in the highest resolution possible to ensure your images are crisp and detailed.
Be mindful of clutter and distractions in the background. A clean, simple background helps your subject stand out and makes the image more appealing to buyers. If needed, use editing tools to crop out unwanted elements or to enhance your photo’s overall look.
Color accuracy is another important aspect. Make sure your colors are true to life—over-saturated images can look unnatural and may be rejected. Use editing software to adjust brightness, contrast, and saturation subtly, aiming for a natural, polished appearance.
Lastly, always review your photos before submitting. Check for any imperfections such as dust spots, sensor spots, or minor blemishes that can be easily fixed in editing. A clean, well-composed image shows professionalism and increases your chances of approval.
Remember, practice makes perfect. Keep experimenting, learn from your mistakes, and don’t hesitate to study images from successful Shutterstock contributors. Over time, your technical skills and eye for composition will improve, making the process of getting accepted faster and more rewarding!
Common Reasons Shutterstock Submissions Are Rejected and How to Avoid Them
Getting your photos accepted on Shutterstock can sometimes feel like a game of chance, but often, rejections come down to a few common issues. Knowing these pitfalls can help you refine your submissions and increase your acceptance rate. Let’s explore some of the most frequent reasons your images might get rejected and simple ways to avoid them.
1. Technical Issues
One of the leading causes of rejection is technical problems with the image files. This includes low resolution, poor quality, or incorrect file formats. Shutterstock typically requires images to be at least 4 megapixels in size, with a minimum of 300 DPI for print quality.
- Solution: Always upload high-quality, well-focused images. Save your photos in JPEG format with RGB color profile and avoid compression artifacts. Use photo editing tools to check the resolution and clarity before submitting.
2. Model and Property Releases
If your photo features recognizable people or private property, Shutterstock expects you to have the appropriate releases signed. Submitting images without these releases is a quick route to rejection.
- Solution: Obtain and keep organized releases for all recognizable individuals and private property. Only upload images with verified releases to avoid delays.
3. Model and Property Releases Not Properly Uploaded
Even if you have releases, failing to upload them correctly or attaching them to the wrong images can cause rejection.
- Solution: Ensure releases are properly linked to the corresponding images during upload. Follow Shutterstock’s instructions for uploading and naming release files.
4. Inappropriate or Misleading Content
Images that contain inappropriate content, such as offensive gestures, hate symbols, or violent themes, will be rejected. Additionally, misleading images that don’t accurately represent the scene or subject can be flagged.
- Solution: Review Shutterstock’s content guidelines carefully. Keep your content respectful, authentic, and accurately represented.
5. Lack of Model or Property Releases When Needed
Even if your image is technically perfect, submitting it without the necessary releases when required will get it rejected. Shutterstock takes model privacy seriously.
- Solution: Always double-check whether your image needs a release. If unsure, it’s better to get the release or avoid uploading that content.
6. Inconsistent Metadata or Keywords
Accurate and relevant keywords help your images get discovered. Spamming keywords or using irrelevant tags can lead to rejection.
- Solution: Use descriptive, specific keywords that genuinely match your photo. Avoid keyword stuffing and review your metadata before submission.
By paying close attention to these common issues and following best practices, you can significantly improve your acceptance rate and get your Shutterstock photos online faster. Remember, quality and compliance are key!
Step-by-Step Guide to Uploading Photos to Shutterstock
Ready to upload your stunning photos to Shutterstock? Don’t worry—it’s a straightforward process once you know the steps. Here’s a simple, step-by-step guide to help you navigate the upload journey smoothly and efficiently.
Step 1: Log Into Your Contributor Account
Start by visiting the Shutterstock Contributor portal and signing in with your credentials. If you’re new, you’ll need to create an account—it’s quick and free!
Step 2: Prepare Your Files
Before uploading, double-check that your images meet Shutterstock’s technical requirements:
- JPEG format
- RGB color profile
- Minimum size of 4 megapixels
- Resolution of 300 DPI (for print)
Also, organize your files and any necessary releases in clearly labeled folders for easy access during upload.
Step 3: Click on ‘Upload Content’
Once logged in, locate the “Upload” button on your dashboard. Click it to start the process. You’ll see options for different content types—select “Photos” to proceed.
Step 4: Select Your Files
Use the file browser to pick multiple images at once or upload them one by one. Shutterstock allows batch uploads, which saves time if you have many images ready.
Step 5: Add Metadata (Titles, Descriptions, and Keywords)
Accurate metadata is crucial for discoverability. Fill in the following:
| Field | Best Practices |
|---|---|
| Title | Create a clear, descriptive title that summarizes the image. |
| Description | Provide detailed context about the photo, including location, subject, and mood. |
| Keywords | Use relevant keywords that accurately describe the image. Think about what keywords a buyer might use to find your photo. |
Be specific and avoid spammy tags. You can add multiple keywords separated by commas.
Step 6: Upload Releases (If Needed)
If your images feature recognizable people or private property, upload the signed releases in the designated section. Make sure they’re correctly linked to your images.
Step 7: Submit for Review
After completing all fields and attaching necessary releases, click “Submit for Review.” Your images will then enter Shutterstock’s approval process.
Step 8: Wait for Approval
Most reviews are completed within a few days, but it can sometimes take longer. Keep an eye on your email or contributor dashboard for updates.
If your images are rejected, review Shutterstock’s feedback carefully, make necessary corrections, and re-upload. Persistence pays off!
Uploading to Shutterstock might seem daunting at first, but following this step-by-step guide makes it manageable. With a little patience and attention to detail, you’ll have your fantastic photos online in no time!
Optimizing Your Images with Keywords for Better Acceptance
One of the often-overlooked steps that can significantly boost your chances of getting your Shutterstock photos accepted is optimizing your images with the right keywords. Think of keywords as the bridge that connects your photos with potential buyers searching for specific content. If your images aren’t properly tagged, they might get overlooked, no matter how stunning they are.
So, how do you choose the right keywords? Here are some practical tips:
- Be Descriptive and Specific: Use clear, descriptive words that accurately depict what’s in your photo. Instead of just “flower,” try “red tulip in spring garden” for better targeting.
- Think Like a Buyer: Consider what someone would type into the search bar to find your image. Use common search terms and phrases.
- Use Relevant Keywords: Only include keywords that genuinely relate to your image. Misleading tags can lead to rejection and harm your reputation.
- Include Variations and Synonyms: Different people search differently. For example, for a beach scene, include “seaside,” “coast,” or “ocean view.”
- Utilize All Tag Slots: Shutterstock allows a certain number of keywords per image. Make full use of this space to maximize discoverability.
Another helpful tip is to research trending keywords within your niche. Browse Shutterstock and see what tags successful images in your category are using. This can give you inspiration and help you stay current with popular search terms.
Remember, well-optimized images don’t just get accepted—they also sell better because they’re easier for buyers to find. Take a few extra minutes to choose the right keywords, and you’ll likely see a boost in your acceptance rate and sales over time.
Final Tips to Increase Your Approval Rate and Grow Your Portfolio
Getting your photos accepted on Shutterstock is a game of consistency, quality, and strategy. Here are some final tips to help you increase your approval rate and build a diverse, appealing portfolio:
- Focus on Quality Over Quantity: Upload only your best shots. Blurry, poorly lit, or over-edited images are more likely to be rejected. Invest time in editing and selecting your top images.
- Follow Trends and Market Demand: Keep an eye on what’s popular. Stock image needs evolve, so staying current can give you an edge. Seasonal themes, current events, or emerging styles can be great opportunities.
- Maintain Consistency and Style: Develop a recognizable style or niche. Whether it’s vibrant lifestyle photos, minimalist designs, or nature shots, consistency helps build your brand and attract repeat buyers.
- Stay Organized and Keep Track: Use folders or a spreadsheet to manage your submissions, keywords, and rejection reasons. Learning from rejections can help you improve future uploads.
- Review Shutterstock’s Guidelines Regularly: Policies and criteria may change. Staying informed ensures your submissions meet current standards, reducing the risk of rejection.
- Engage with the Community: Participate in forums or social media groups for stock photographers. Sharing experiences and tips can provide valuable insights and motivation.
- Be Patient and Persistent: Building a thriving portfolio takes time. Don’t get discouraged by rejections; instead, use them as learning opportunities and keep uploading new, high-quality content.
Ultimately, growing your Shutterstock portfolio is about quality, relevance, and persistence. By consistently applying these tips, you’ll not only increase your acceptance rate but also position yourself as a reliable contributor in the marketplace. Remember, every successful contributor started somewhere, and with dedication, your collection can become a valuable asset that generates steady income.