When it comes to eCommerce, providing a seamless user experience is key to keeping customers engaged and satisfied. One area that often gets overlooked is the “My Account” page in WooCommerce. This page serves as the hub for your customers to manage their profiles, view orders, and interact with your store. Customizing this page not only enhances its functionality but also reinforces your brand identity. In this article, we’ll delve into how you can tailor the “My Account” page to better serve your customers and improve their shopping experience.
Understanding the My Account Page Structure

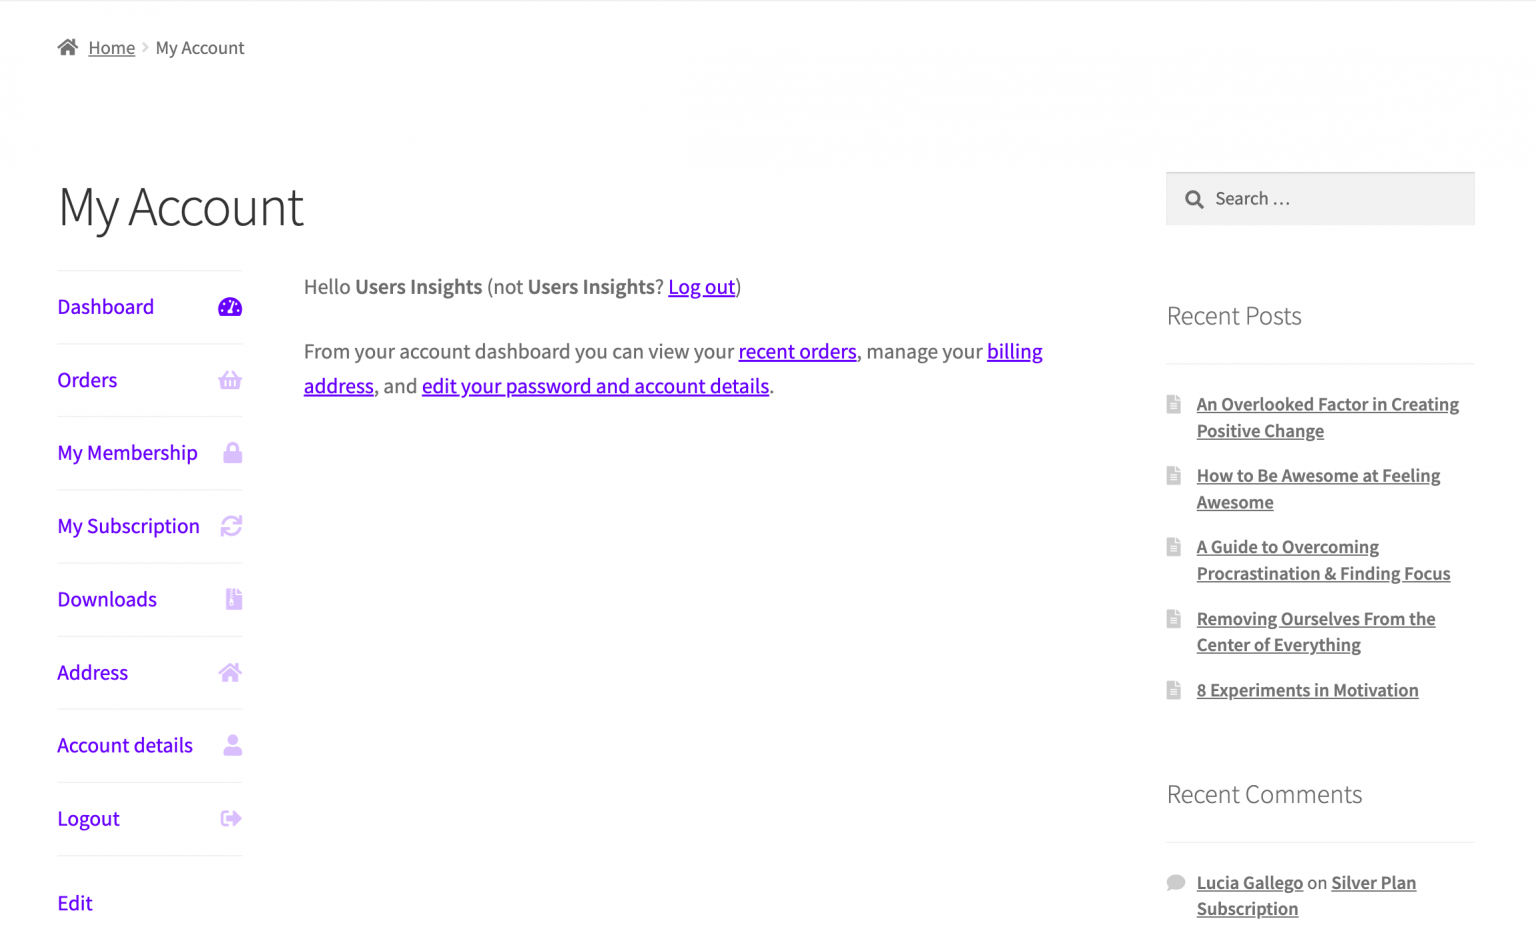
Before diving into customization, it’s essential to grasp how the “My Account” page is structured. This page comprises various sections and endpoints that allow users to navigate their accounts. Understanding this structure will empower you to make effective changes. Here’s a breakdown:
- Dashboard: The landing section where users view a summary of their account activity, including recent orders.
- Orders: A detailed list of past purchases, including order status and tracking info.
- Downloads: If you offer digital products, this tab lets customers access their purchased files.
- Addresses: Customers can manage their billing and shipping addresses here.
- Account Details: A section for users to update their personal information and password.
- Logout: Provides a simple method for users to log out of their accounts.
Additionally, WooCommerce allows you to add custom endpoints for extra functionality. This is where the real magic of customization happens. By keeping these sections in mind, you can create a more tailored experience that aligns with the needs of your customers.
Ready to get started? Let’s explore some exciting customization options!
Accessing the My Account Page Settings
Customizing your WooCommerce My Account page is crucial for enhancing the user experience on your online store. This page acts as a central hub for customers to manage their orders, personal information, and more. To access the settings, follow these simple steps:
- Log into your WordPress Dashboard: Start by logging into your WordPress admin area. This is where all the magic happens!
- Navigate to WooCommerce: On the left-hand sidebar, look for the “WooCommerce” menu. Click on it to expand the options.
- Select Settings: Within the WooCommerce menu, you’ll see a “Settings” option. Click on that to be redirected to the settings page.
- Go to the Accounts & Privacy Tab: Here comes the good part! You’ll find various tabs at the top; click on the “Accounts & Privacy” tab to manage account-related settings.
- Edit My Account Page: On the Accounts & Privacy page, you can customize the default settings for account creation, guest checkout, and privacy options. Review each section carefully to make adjustments according to your store’s needs.
Remember, changes you make here will affect how customers interact with their accounts and the overall flow of their shopping experience. It’s always good practice to double-check settings after making changes to ensure everything is working smoothly.
Customizing Account Navigation Links
Have you ever felt like your My Account page could use a facelift? Customizing the account navigation links can significantly enhance user navigation and make life easier for your customers. Here’s how you can edit those links:
- Use a Plugin: One of the simplest ways to customize navigation links is by using a plugin like “WooCommerce Custom My Account Pages.” This allows for easy drag-and-drop rearrangements, custom link additions, and even the removal of unwanted links.
- Custom Code: For those who are a bit more technically inclined, you can modify the links by adding custom code to your theme’s functions.php file. For example, you can use the `woocommerce_account_menu_items` filter to change menu items:
add_filter('woocommerce_account_menu_items', 'custom_my_account_menu_items');function custom_my_account_menu_items($items) { // Add a new link $items['new-link'] = __('New Link', 'your-text-domain'); // Remove an existing link unset($items['downloads']); return $items;} - Organize Links Logically: When you’re customizing links, think about how customers will use them. It’s best to keep frequently used links at the top and group similar functionalities together. For instance, under a “Orders” tab, you can add links like “View Orders”, “Track Order”, or “Return Order”.
By taking the time to customize your account navigation links, you’ll provide a tailored experience, making it easier for clients to find exactly what they need without confusion. Happy customizing!
5. Modifying Account Endpoints
WooCommerce comes with a set of predefined account endpoints. These are essentially the sections users see when they access their “My Account” page, such as “Orders,” “Downloads,” and “Account Details.” But what if you want to tailor these options to better suit your business’s needs? That’s where modifying account endpoints comes in!
To modify account endpoints, you can take advantage of the WooCommerce filters. This is useful for adding, removing, or renaming sections on the My Account page. Here’s how you can get started:
- Add New Endpoints: Want to create a new section? You can easily do this using the
add_actionfunction in your theme’s functions.php file. - Rename Existing Endpoints: Is “Downloads” not fitting for your products? You can rename it to “Files” or anything you’d like by using the
woocommerce_account_menu_item_titlefilter. - Remove Unwanted Sections: If “Billing” isn’t applicable for your store, you can remove it using
remove_endpoint. Make sure your users are only seeing what they need!
With a little bit of coding, you can shape the My Account page to reflect your brand’s uniqueness. Not only does this enhance user experience, but it also contributes to a coherent brand image. So, dive into those codes, and let’s create a My Account page that’s just right for your business!
6. Adding Custom Content to the My Account Page
Customizing the My Account page isn’t just about tweaking the existing sections; it’s about making it a true reflection of your brand and providing customers with valuable information. Adding custom content is an excellent way to engage users better and offer them a more tailored experience. Here’s how to make that happen:
- Custom Dashboard Widgets: You can create custom dashboard widgets to provide users with pertinent information without overwhelming them. This could include subscription details, recent activity, or special offers.
- Promotional Banners: How about a mini-banner or message that showcases your latest promotions or upcoming events? This can be easily added through shortcodes.
- FAQs or Helpful Tips: Sharing a few FAQs or tutorials on using your products can be incredibly beneficial for enhancing customer experience. Consider how-to guides or quick tips to navigate the website.
To add custom content, you can utilize hooks like woocommerce_account_content or create specific endpoints for unique pages. When you integrate personalized and relevant content, it keeps customers engaged, improves customer trust, and transforms your My Account page into a valuable resource. Dive in, get creative, and tailor your My Account experience!
7. Utilizing Plugins for Enhanced Customization
When it comes to customizing the “My Account” page in WooCommerce, plugins can be your best friend! There are numerous plugins available that make the process simple and enjoyable, even if you’re not particularly tech-savvy. These tools can help you tailor the user experience, making it more aligned with your brand and increasing customer satisfaction. Here’s how you can effectively utilize plugins for enhanced customization:
- Choose the Right Plugin: Start by selecting a plugin that suits your needs. Some popular choices include WooCommerce Custom My Account Pages and Customize My Account for WooCommerce. These plugins give you the power to edit content, change layouts, and more.
- Drag and Drop Interface: Many plugins come with a user-friendly interface that allows you to drag and drop elements. This means you can arrange sections as you like without any coding experience!
- Custom Tabs: Want to add custom tabs? Most plugins offer the option to add new tabs where you can display additional information like rewards, order history, or a FAQ section. This can greatly enhance user experience by providing relevant content right where they need it.
- Styling Options: Many plugins allow you to customize the styling of the My Account page. You can change fonts, colors, and backgrounds to match your brand theme, ensuring a cohesive look throughout your site.
Remember to review the plugin documentation and user feedback before settling on one. Experimenting with different plugins can lead to discovering just what your customers need for a seamless and enjoyable experience on the My Account page!
8. Implementing Custom Code Snippets
If you’re comfortable with coding, implementing custom code snippets is an excellent way to customize the “My Account” page in WooCommerce to suit your specific requirements. This method gives you the ultimate flexibility and allows for a high degree of personalization that plugins may not offer. Here’s how you can effectively implement code snippets:
- Backup Your Site: Before making any changes, it’s crucial to back up your site. This way, if something goes wrong, you can revert back to the original settings without any hassle.
- Use a Child Theme: If you’re going to modify your theme’s files, using a child theme is best. This prevents your changes from being overridden during theme updates.
- Access Functions.php File: Most customization can be done by adding code to the
functions.phpfile of your theme. Here, you can write snippets to add custom tabs, modify your account layouts, or change how information is presented.
For instance, to add a custom tab, you might use the following snippet:
add_filter( 'woocommerce_account_menu_items', 'add_custom_tab' );function add_custom_tab( $items ) { $items['custom-tab'] = __( 'Custom Tab', 'textdomain' ); return $items;}- Test Your Code: After inserting your code snippet, always test it to ensure the new features work correctly and the page displays as intended.
While implementing custom code snippets can seem daunting, it allows you to create unique functionalities tailored to your business needs. Just ensure you take precautions and test thoroughly! Happy coding!
9. Testing Your Customizations
After you’ve made all those exciting customizations to your WooCommerce My Account page, it’s time to ensure everything is working perfectly. Testing your changes is crucial because it helps you identify any issues before your users interact with the page. Here’s how you can effectively test your customizations:
- Create a Test User Account: Sign up as a new user to simulate the user experience. This gives you a real-world perspective on how customers will interact with your page.
- Check All Links and Buttons: Make sure all links and buttons on your My Account page direct to the correct locations. This includes the ‘Logout’, ‘Edit Account’, and ‘Orders’ sections.
- Review the Layout: Ensure that all content is displayed correctly and aligns well. A cluttered or misaligned page can lead to a frustrating user experience.
- Test Functionality: Check that all customized features work as intended. For example, if you added a new section or widget, make sure it loads appropriately.
- Mobile Responsiveness: Don’t forget to test how your My Account page looks on mobile devices. Many users will access your site from their phones, so a mobile-friendly design is essential.
Finally, get feedback from a few trusted users if possible. Their insights can help you spot any awkward navigations or confusing layouts that you may have overlooked. Remember, thorough testing will save you future headaches and help create a seamless customer experience!
10. Troubleshooting Common Issues
No customization process is without its hiccups! If you encounter problems with your customized My Account page in WooCommerce, don’t worry. Here are some common issues and their solutions:
| Issue | Solution |
|---|---|
| Page Not Displaying Correctly | Clear your cache and check for any CSS or JavaScript errors that might be affecting the layout. |
| Custom Fields Not Saving | Make sure your form fields are properly configured in the back end. Double-check settings in any additional plugins you may have used. |
| Changes Not Reflecting | Ensure that you have properly saved your customizations. Also, refresh your browser and clear your site cache if you have a caching plugin enabled. |
| Conflict With Other Plugins | Deactivate other plugins one by one to identify if there’s a conflict, particularly with plugin modifications of user profiles. |
If after trying these solutions you’re still facing issues, don’t hesitate to reach out to community forums or consult the WooCommerce documentation. Troubleshooting can often lead to valuable learning experiences, so hang in there! Your customized My Account page will be worth the effort.
Conclusion and Best Practices
Customizing the My Account page in WooCommerce is a powerful way to enhance the user experience on your eCommerce site. By tailoring this section, you can ensure that customers find essential information quickly and easily, leading to increased satisfaction and retention. Below are some best practices to consider when customizing your My Account page:
- Simplify Navigation: Ensure that customers can easily access important sections such as Orders, Downloads, and Account Details. A clear navigation structure helps in improving usability.
- Use Descriptive Labels: Use clear and concise labels for each section so customers know what to expect when they click through. Avoid jargon or overly technical terms that may confuse users.
- Incorporate Visual Elements: Adding visuals or icons for sections can enhance the aesthetic appeal and make navigation more intuitive.
- Prioritize Responsiveness: Ensure that the My Account page is mobile-friendly. Test across devices to guarantee a seamless experience for all users.
- Regular Updates: Keep your My Account page updated with new features or sections based on customer feedback and behavior analytics to improve engagement continually.
By implementing these best practices, you can create a My Account page in WooCommerce that not only meets the needs of your customers but also supports your brand’s objectives. Happy customizing!


