WooCommerce is a powerful eCommerce platform that allows you to tailor your online store to fit your unique business needs. Among its many features, one of the highlights is the ability to customize attribute quantity rules. These rules enable you to define the quantities of product attributes that customers can purchase, making your inventory management smoother and enhancing the customer shopping experience. In this post, we’ll explore what these rules entail and how you can effectively customize them to suit your store’s requirements.
Understanding Attribute Quantity in WooCommerce
So, what exactly are attribute quantity rules in WooCommerce? At its core, attribute quantity refers to the various options and characteristics you can assign to your products. These attributes can include size, color, material, and more. Each of these attributes can have specific quantities associated with them, which allows for granular control over how customers can interact with your products. Let’s break it down further:
- Attributes: These are the characteristics of your products. For example, if you sell clothing, you might have attributes like “Size” (Small, Medium, Large) and “Color” (Red, Blue, Green).
- Variations: When you pair attributes together, you create variations. For instance, a red, medium-sized shirt would be a different variation than a blue, large-sized shirt.
- Quantity Control: This is where things get interesting! Attribute quantity rules let you set limits on how many units of each variation a customer can purchase, making it easier to manage stock levels and prevent overselling.
Overall, customizing these quantity rules is essential for maintaining control over your inventory while ensuring a pleasant shopping experience for your customers. It’s all about finding that sweet spot that benefits both your business and your shoppers!
Benefits of Customizing Attribute Quantity Rules
When it comes to running an online store using WooCommerce, having precise control over your product variations is crucial for optimizing the shopping experience for your customers. Customizing attribute quantity rules can significantly enhance both your business operations and customer satisfaction. Here are some benefits that come with this customization:
- Improved Inventory Management: By defining specific attribute quantity rules, you can keep better track of your stock levels. For instance, if a product is only available in certain sizes, you can easily manage your inventory based on the variations customers are actually choosing.
- Enhanced User Experience: Customers appreciate clarity and simplicity when shopping online. Custom rules allow you to guide customers towards the right product options without confusion—reducing the chance for errors and abandoned carts.
- Increased Sales Opportunities: When you customize attribute quantity rules effectively, you can create bundled offers or bulk purchase incentives. This can encourage customers to buy more, contributing to a boost in your overall sales revenue.
- Flexibility and Customization: Tailoring these rules means you can fully align your product offerings with your marketing strategies. If you want to launch a special promotion, having the capacity to adjust attribute quantities quickly is invaluable.
- Better Data Insights: By customizing these rules, you gather better data on customer preferences and buying habits. This information is gold when it comes to planning future inventory and marketing campaigns.
Accessing the WooCommerce Settings
To customize your WooCommerce attribute quantity rules effectively, the first step is accessing the WooCommerce settings. Here’s how to do that in a few easy steps:
- Log into Your WordPress Dashboard: Start by logging into your WordPress website. You should see the dashboard when you enter your credentials.
- Navigate to the WooCommerce Menu: Within the dashboard, locate the WooCommerce option in the left-hand menu. Clicking on this will expand a sub-menu with several options.
- Select ‘Settings’: From the WooCommerce submenu, click on Settings. This will take you to a page with multiple tabs that allow you to configure various aspects of your store.
- Explore the ‘Products’ Tab: Once you’re in the settings page, look for the Products tab. This is where you can set up product-specific rules, including attributes and variations.
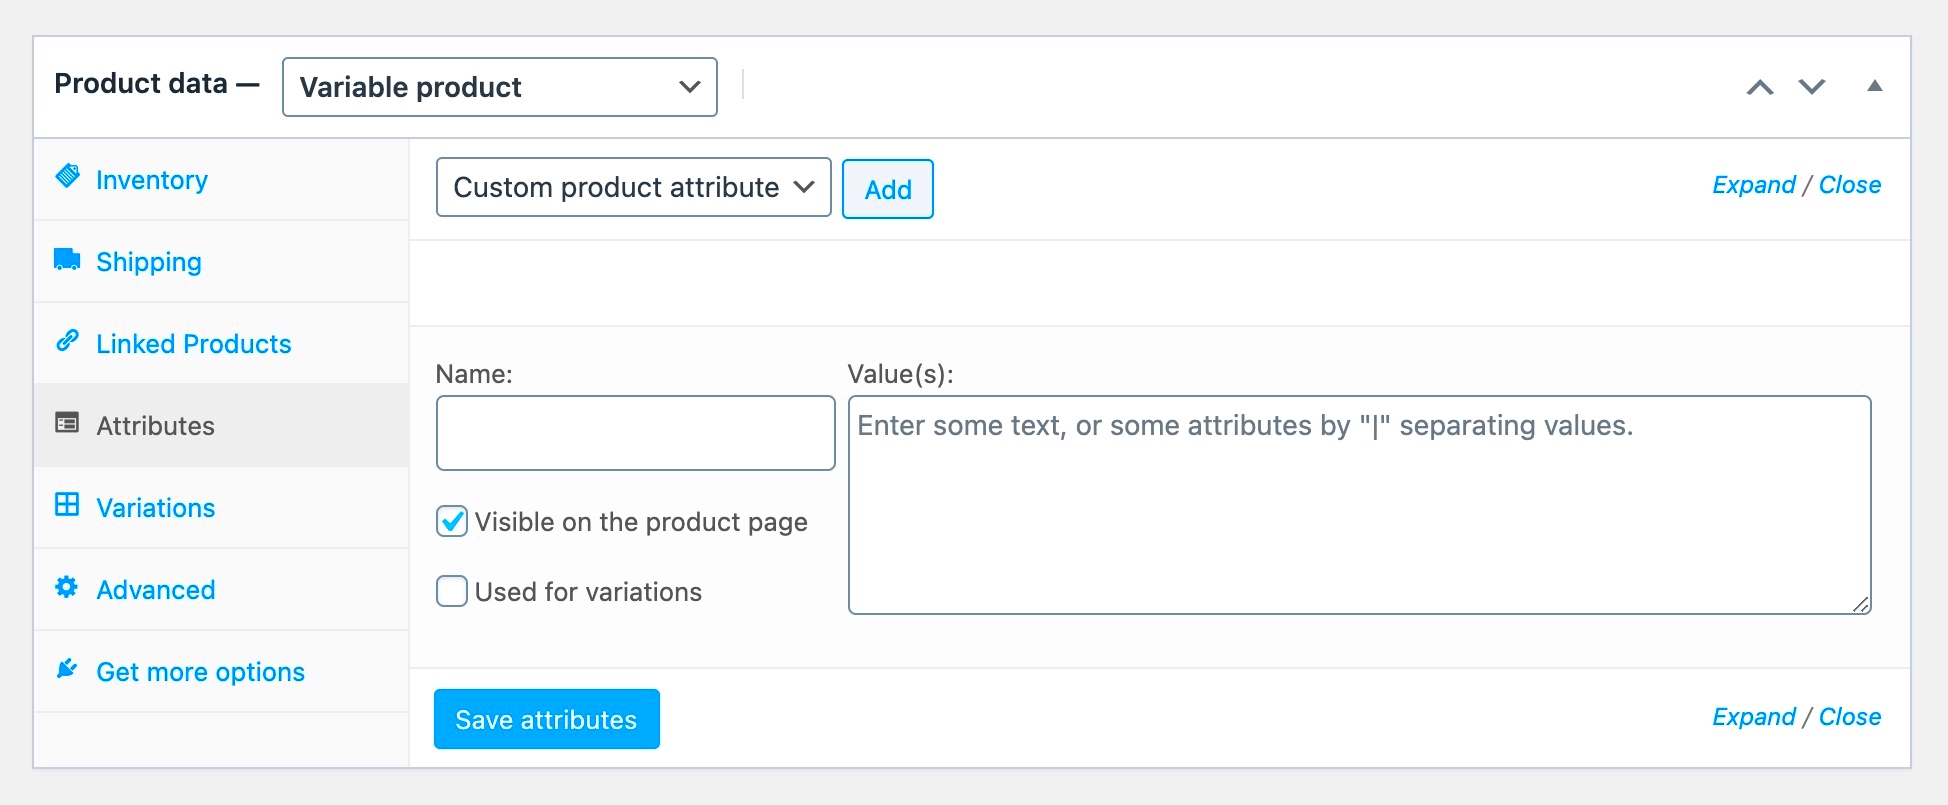
- Open ‘Attributes’ Section: Under the Products tab, you’ll find an option for Attributes. Click on that to see your existing attributes and customize them as needed.
Once you’re in the right section, you’ll be all set to define your custom quantity rules and really take charge of your product offerings. Happy customizing!
5. Identifying Your Product Attributes
Understanding your product attributes is an essential step in setting up your WooCommerce store effectively. Product attributes are characteristics that allow customers to filter and choose products according to their specific preferences. They can include anything from size, color, and material to more complex attributes like style and brand.
So, how do you identify these attributes for your products? Here are some practical steps you can follow:
- Analyze Your Products: Start by listing all the products in your inventory. Take a close look at each item and note the key features that differentiate them.
- Consult Customer Feedback: Customer reviews provide valuable insights. Check for common themes regarding what features customers are interested in or mention frequently.
- Research Competitors: Look at competing stores to see how they categorize and list their products. This can give you ideas on potential attributes you may have missed.
- Study Trends: Stay updated on industry trends and changes. If a new feature becomes popular, consider adding it as an attribute for your products.
Once you’ve identified your potential attributes, it’s crucial to categorize them correctly within WooCommerce. Go to your WooCommerce settings and navigate to the ‘Attributes’ tab. Here, you can add custom attributes, assign them to products, and even use them for variable products. Remember, clear and relevant attributes enhance the shopping experience, making it easier for customers to find what they’re looking for.
6. Creating Custom Quantity Rules
Once you’ve identified your product attributes, the next logical step is to create custom quantity rules tailored to those attributes. Custom quantity rules are crucial for setting purchasing restrictions and improving customer experience. They can help you effectively manage stock levels while ensuring customers can only buy in quantities that fit your business model.
Here’s a simple guide on how to go about creating these rules:
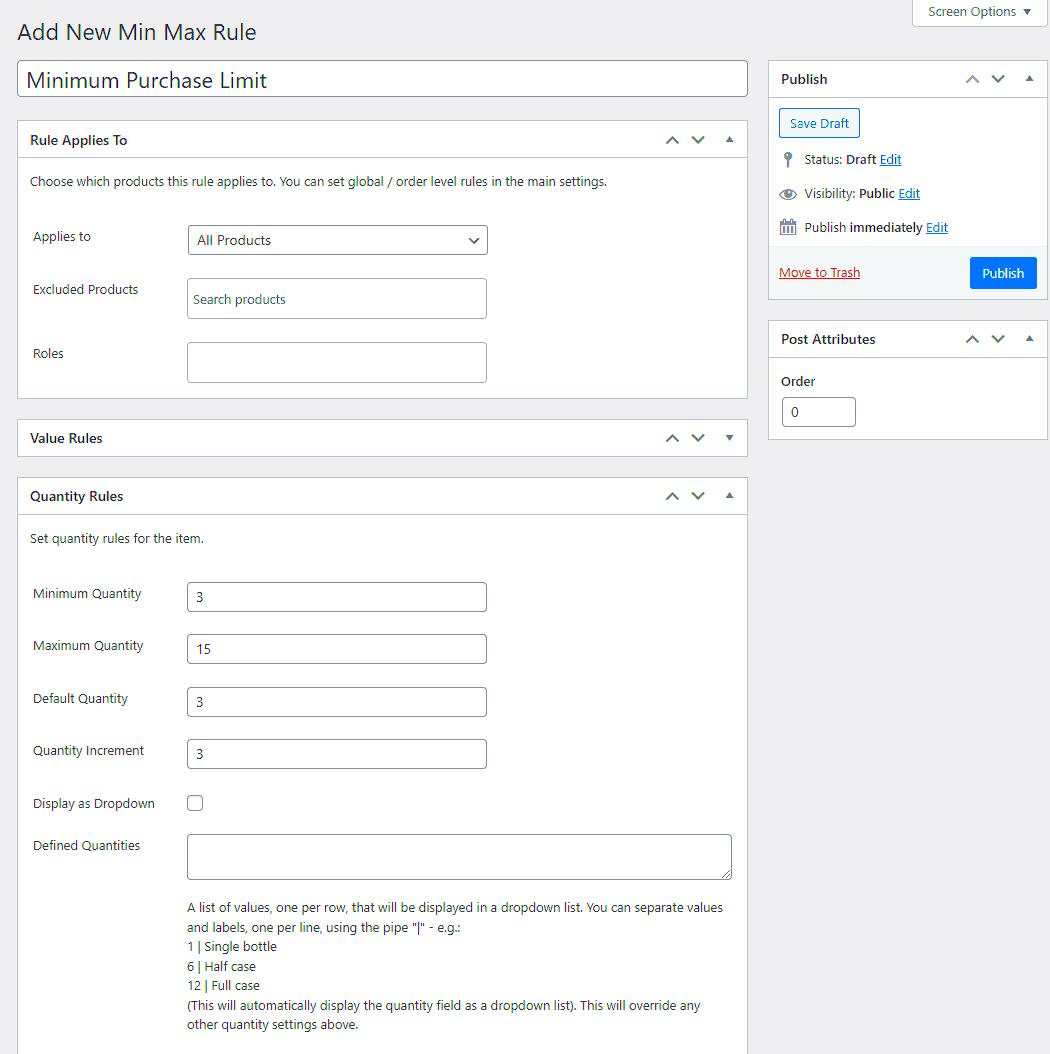
- Choose a Plugin: While WooCommerce has built-in features for quantity management, you might want to consider using dedicated plugins like “Min/Max Quantities” or “WooCommerce Quantity Manager” for more flexibility.
- Set Minimum and Maximum Quantities: Depending on your products, you can set a minimum or maximum limit. For example, if you sell bulk products, you might want to set a minimum quantity of 10 units.
- Define Attribute-Specific Rules: Use the attributes you identified to create rules. For instance, if a particular variable product comes in different sizes, set quantity limits for each size to manage stock effectively.
- Make Use of Conditional Logic: Some advanced plugins allow you to set rules based on the customer’s cart. For example, if they add a specific item, you can require additional quantities or offer discounts.
| Attribute | Minimum Quantity | Maximum Quantity |
|---|---|---|
| Size: Small | 1 | 5 |
| Size: Medium | 1 | 10 |
| Size: Large | 1 | 20 |
Creating these rules not only streamlines your sales process but also empowers your customers to make informed purchasing decisions.
Implementing Conditional Logic for Quantity Rules
One of the best features of WooCommerce is its flexibility. With the help of plugins, you can implement conditional logic that allows you to customize quantity rules based on various factors. This means you can create dynamic pricing and special promotions that engage customers while giving them a tailored shopping experience.
So, what exactly is conditional logic? Well, it lets you set specific rules that trigger actions depending on certain conditions. For example, “If a customer buys more than 3 items, apply a 10% discount.” This can significantly encourage bulk purchases and increase your average order value.
To get started with implementing conditional logic for quantity rules, you can follow these simple steps:
- Choose the Right Plugin: Start by selecting a WooCommerce plugin that supports conditional logic, like “WooCommerce Dynamic Pricing & Discounts” or “WooCommerce Conditional Shipping and Payments.”
- Configure the Settings: Once you’ve installed your chosen plugin, navigate to the settings page. There, you can define the rules based on various parameters such as product categories, user roles, or order totals.
- Create Your Conditions: Set specific conditions that will trigger your quantity rules. Use clear criteria to avoid confusion—this helps ensure a seamless customer experience.
- Preview the Changes: Before going live, preview how your conditions work in a test environment. This way, you can spot any potential issues.
This strategic use of conditional logic not only makes your store more appealing but also builds better customer relationships through personalized offers.
Testing Your Customizations
Once you’ve customized your quantity rules with conditional logic, it’s crucial to test everything thoroughly. Testing is a vital part of the customization process, ensuring that everything functions as intended and that customers have a smooth shopping experience.
Here are some practical steps for effectively testing your customizations:
- Create Test Scenarios: Develop various customer scenarios to assess how your quantity rules react. Include scenarios where customers qualify for a discount, and those where they don’t.
- Check Different Devices: Test your customizations on various devices—like mobile phones, tablets, and desktops. Make sure the user experience is consistent across platforms.
- Run User Tests: Enlist friends or family to navigate your site. Their real-world feedback can reveal any usability issues or confusions that you might have overlooked.
- Monitor Analytics: After implementing your changes, keep a close eye on your store’s analytics. Look for any significant drops in sales or unusual customer behavior that might indicate an issue.
By investing time in testing, you’ll ensure that your customizations meet customer needs while maximizing sales opportunities. Remember, the goal is to offer a seamless shopping experience that encourages repeat business.
9. Common Issues and Troubleshooting Tips
When it comes to customizing attribute quantity rules in WooCommerce, there are a few bumps on the road that you might encounter. Don’t fret! These issues are often easy to fix with a little bit of know-how. Let’s discuss some of the most common problems you might face and how to troubleshoot them effectively.
1. Rules Not Applying as Expected
If your quantity rules aren’t working, the first thing to check is whether your settings are saved correctly. Sometimes, due to a caching issue or a glitch, the new settings may not apply. A quick solution is to clear your site’s cache and refresh the page. Also, double-check that you’ve applied the rules to the correct product attributes.
2. Conflicts with Other Plugins
Incompatibility with other plugins can cause unexpected behaviors. If you notice that your quantity rules are not working after installing a new plugin, consider disabling the plugin temporarily to see if it resolves the conflict. If it does, you may want to reach out to the plugin developer for assistance or look for alternatives.
3. Incorrect User Role Permissions
If specific user roles can’t access the customized quantity rules, ensure you’ve set the permissions correctly. Go to the user roles settings and verify that each role has the right capabilities to interact with the quantity rules you’ve set up.
By keeping these troubleshooting tips in mind, you can swiftly address most issues and ensure that your WooCommerce attribute quantity rules provide a seamless shopping experience for your customers.
10. Conclusion and Next Steps
Congratulations! You’ve journeyed through the ins and outs of customizing attribute quantity rules in WooCommerce. As we wrap things up, let’s recap what we’ve discussed:
- How to set up attribute quantity rules to enhance product management.
- Common issues and how to troubleshoot them effectively.
Now that you have the tools to take control of your WooCommerce settings, what’s next? Here are a few next steps you might consider:
1. Experiment with Different Rules
Try playing around with various attribute settings and quantity rules. Testing different configurations can provide insights into what works best for your store and your customers.
2. Stay Updated
Keep an eye on WooCommerce updates and plugin changes. New features and fixes can improve how you customize your quantity rules. Regularly updating your store ensures you’re leveraging the latest capabilities.
3. Seek Community Support
Don’t hesitate to engage with the WooCommerce community. Forums and user groups can provide valuable feedback and innovative ideas that may inspire further customization.
With these steps, you’ll not only improve your store’s functionality but also enhance your customers’ shopping experience. Happy customizing!

