When it comes to running a successful WordPress site, the performance of the PHP version plays a critical role. Think of PHP as the engine behind your WordPress site—having the right version can lead to improved speed, security, and overall functionality. By optimizing the PHP version, you can ensure that your website runs smoothly and efficiently. So, let’s dive into what optimizing PHP versions means and how it can benefit your
Why PHP Version Matters for WordPress Performance
Have you ever noticed a lag on your WordPress site? It might be time to take a closer look at the PHP version you’re using. Here’s why the PHP version is crucial for your site’s performance:
- Speed: Newer PHP versions come with performance improvements that can significantly speed up your site. For instance, PHP 7 is known to be about twice as fast as PHP 5.6. Faster execution means faster page load times.
- Resource Management: An optimized PHP version can help free up server resources, leading to better management of requests and traffic, especially during peak times.
- Compatibility: Using an updated PHP version ensures compatibility with the latest WordPress updates, themes, and plugins. This often results in fewer bugs and better features.
- Security: Each new PHP version not only enhances performance but also addresses vulnerabilities. Older versions might expose your site to security risks.
To sum it up, selecting the right PHP version and ensuring it is optimized for WordPress can lead to tangible benefits. You’ll enjoy a faster website, improved security, and a better overall user experience!
Checking Your Current PHP Version
Before diving into optimization, the very first step is to check which PHP version your WordPress site is currently using. This is crucial because different versions can significantly affect your website’s performance, security, and compatibility with themes and plugins.
There are a couple of straightforward ways to check your current PHP version:
- WordPress Dashboard: – Log into your WordPress admin panel. – Go to Tools > Site Health. – Click on the Info tab and expand the Server section, where you’ll see the current PHP version listed.
- Using PHP File: – Create a new text file using a code editor and add the following code:
– Save it as phpinfo.php.
– Upload this file to your website’s root directory via FTP.
– Access the file in your browser by going to yourwebsite.com/phpinfo.php, and you’ll find your PHP version in the top section.
Once you know your PHP version, it’s essential to compare it against the recommended versions for WordPress. Keeping your PHP version up to date not only enhances security but also improves site performance. Remember to delete the phpinfo.php file after checking your version to avoid any potential security risks.
Choosing the Right PHP Version for Your WordPress Site
Now that you’ve identified your current PHP version, it’s time to decide if it’s the right match for your WordPress website. Compatibility plays a big role here. WordPress recommends using PHP version 7.4 or later for optimal performance and security, but you may encounter some plugins or themes that require specific versions. Here’s how to make the right choice:
- Evaluate Compatibility: Check the compatibility of your WordPress theme and plugins with various PHP versions. Most developers will list the required PHP version on their product pages.
- Consider Upgrading: If you’re running an outdated version, consider upgrading to 8.0 or 8.1, which offer improved performance and loading speeds. Just ensure that everything is compatible.
- Testing Before Live Changes: If you decide to upgrade, do it on a staging site first. This allows you to test for any issues without affecting your live site.
Here’s a quick comparison of PHP versions:
| PHP Version | Release Date | End of Life | Performance Improvement |
|---|---|---|---|
| 7.4 | November 2019 | November 2022 | Up to 100% over 5.6 |
| 8.0 | November 2020 | November 2023 | Up to 30% over 7.4 |
| 8.1 | December 2021 | December 2024 | Up to 10-20% over 8.0 |
Choosing the right PHP version is essential for the speed and security of your WordPress site. Keeping it updated and compatible can significantly enhance user experience. So take a moment to evaluate what’s best for your site!
How to Upgrade PHP Version on Apache Server
Upgrading the PHP version on your Apache server can seem daunting if you’re not familiar with server management. However, with the right steps, it can be a relatively straightforward process. Here’s how to do it:
- Check Current PHP Version: First, you want to see what version of PHP you’re currently running. You can do this by creating a simple PHP file (e.g.,
phpinfo.php) in your web root directory with the following content:
Access this file via your web browser by navigating to http://yourdomain.com/phpinfo.php. This will show you your current PHP version along with configurations.
- Backup Your Site: Before making any significant changes, always back up your website. This includes your database and all site files. Use tools like UpdraftPlus or Duplicator for WordPress backups.
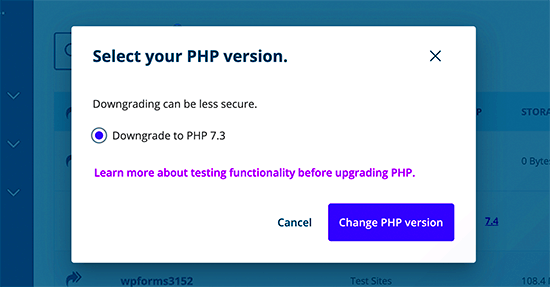
- Update Your Server’s PHP: Depending on your hosting provider, you can update PHP via your hosting control panel (like cPanel or Plesk) or via the command line if you have SSH access. If using cPanel, look for a section labeled MultiPHP Manager or PHP Selector, where you can select your desired PHP version.
- Verify the Update: After updating, revisit your
phpinfo.phpfile to ensure that the version has changed. You should see the new PHP version reflected there. - Test Your Site: Conduct thorough testing to ensure that everything is running smoothly. Check front-end functionality, as well as contact forms, shopping carts, and any other interactive parts of your site.
By following these steps, you can upgrade your PHP version on an Apache server effectively, keeping your WordPress site secure and efficient.
Testing Compatibility of Themes and Plugins with New PHP Version
After upgrading PHP on your Apache server, it’s crucial to ensure that your themes and plugins are compatible with the new version. Running incompatible software can lead to errors and even bring down your site. Here’s a step-by-step guide to help you through the process:
- Check Plugin and Theme Compatibility: Before upgrading PHP, check the documentation or changelog for your installed themes and plugins. Many developers will indicate which PHP versions their products are compatible with. Look for compatibility tags in the WordPress plugin repository.
- Use a Staging Environment: Create a staging site that mirrors your live site. Many hosting providers offer a one-click staging setup. Test the new PHP version on this staging site first, allowing you to identify issues without affecting your live site.
- Enable Debugging: In your
wp-config.phpfile, enable debugging by adding or changing the following lines:
define('WP_DEBUG', true);define('WP_DEBUG_LOG', true);define('WP_DEBUG_DISPLAY', false);
This will help you log errors instead of displaying them on the front end.
- Check Compatibility Using Plugin: Use the PHP Compatibility Checker plugin available in the WordPress repository. It scans your themes and plugins for potential issues with a specific PHP version.
- Test All Site Functionality: With the new PHP version active in your staging environment, test each section of your site. Look for errors in the admin area, functionality of forms, e-commerce carts, and any custom features.
- Rollback if Necessary: If you encounter extensive compatibility issues, you may need to roll back to the previous PHP version until updates for themes and plugins are available. Most hosting providers allow you to switch PHP versions easily.
By carefully testing your themes and plugins against the new PHP version, you can maintain a smoothly running WordPress site, ensuring a positive experience for your visitors.
7. Tools for Monitoring PHP Performance in WordPress
When it comes to ensuring your WordPress site runs efficiently, monitoring PHP performance is crucial. Several tools can help you keep tabs on how PHP interacts with your server and WordPress environment. Here are some of the best tools you might want to consider:
- New Relic: This powerful performance monitoring tool provides detailed insights into your PHP applications. With New Relic, you can monitor response times, track slow transactions, and even get recommendations on optimizing your PHP performance.
- Query Monitor: A must-have plugin for WordPress developers, Query Monitor helps you analyze database queries, PHP errors, and HTTP requests. Its user-friendly interface makes it easy to identify performance bottlenecks and debug your site.
- P3 (Plugin Performance Profiler): This plugin helps you determine the load time of your plugins. It creates a profile of your site’s plugins and shows how much each plugin is slowing down your site, making it a great tool for optimization!
- PHP-FPM (FastCGI Process Manager): If you’re using PHP-FPM with your Apache server, you can monitor its performance with tools like php-fpm-status. This will give you an overview of active processes and resource usage.
- OPcache: Enabling and monitoring OPcache can significantly boost your PHP performance. You can use tools like OPcache GUI to check cache hit ratios and performance metrics.
Each of these tools can give you valuable insights into your PHP performance and help you make informed decisions about optimizations. By keeping an eye on these metrics, you’ll be able to ensure that your WordPress site performs at its best.
8. Troubleshooting Common PHP Version Issues
Working with different PHP versions can sometimes lead to a myriad of issues that can affect your WordPress site’s functionality. Here’s a look at some of the most common PHP version problems and their troubleshooting steps:
| Issue | Possible Cause | Troubleshooting Steps |
|---|---|---|
| White Screen of Death | Incompatibility with the current PHP version |
|
| 500 Internal Server Error | Misconfigured settings or incompatible scripts |
|
| Slow Load Times | Older PHP version or bad optimizations |
|
By being aware of these common issues, you can proactively troubleshoot and improve your site’s performance. Remember, if you’re ever stuck, reaching out to the WordPress community or your host’s support can be incredibly helpful!
9. Best Practices for Maintaining Optimal PHP Performance
When it comes to maintaining optimal PHP performance, a few key practices can make all the difference. Let’s dive into some best practices that’ll help you keep your WordPress site running smoothly, ensuring both speed and reliability.
- Regularly Update PHP: Keeping your PHP version updated is crucial. Each new version comes with performance enhancements and security fixes. Check if your host provides an easy update mechanism.
- Optimize Your Code: Clean and efficient code is pivotal. Eliminate unnecessary functions and libraries. If you’re a developer or you have access to someone who is, refactor the code to make it more efficient.
- Use Caching Solutions: Caching can significantly improve PHP performance. Consider using plugins like W3 Total Cache or WP Super Cache, which can store your dynamic content as static HTML pages, reducing server load.
- Choose the Right Hosting: A hosting provider that specializes in WordPress can offer server configurations optimized for PHP. Look for managed WordPress hosting that ensures performance optimization.
- Limit Plugins: Too many plugins can bog down your site. Review your installed plugins and deactivate or delete any that you don’t need. This not only boosts performance but also enhances security.
- Profile Your Application: Tools like Xdebug or Blackfire can help you identify bottlenecks in your PHP code. Regularly profiling your application helps pinpoint areas for improvement.
Implementing these best practices goes a long way in keeping your PHP environment sharp and your WordPress site in peak condition. Remember, consistency is key!
10. Conclusion: Staying Updated for Better Performance
In conclusion, staying updated with the latest PHP version not only enhances performance but also reinforces security. As technology evolves, so do the tools and features available to us, making it imperative to adapt.
Here are a few takeaways to keep in mind:
- Frequent Updates: Make it a habit to check for PHP updates regularly. New versions may bring performance boosts, so don’t let your site fall behind.
- Monitor and Optimize: Always keep an eye on performance metrics. Use tools like Google PageSpeed Insights to monitor your site’s performance and gain insights on potential improvements.
- Engage with Community: The PHP community is vast and knowledgeable. Engaging with forums or groups can provide you with insights on new practices that can optimize your WordPress site.
Ultimately, a well-maintained PHP environment can lead to faster load times, better user experiences, and even improved SEO rankings. Your WordPress website deserves the best, so stay proactive and enjoy the benefits of a finely-tuned PHP setup!

