If you’ve ever downloaded an EPS (Encapsulated PostScript) file from Shutterstock or another stock image site, you might have noticed a strange checkboard pattern behind the main image. This pattern isn’t part of the actual design; it’s just a visual indicator that the background is transparent. EPS files are popular for their scalability and high quality, especially in professional design work. However, when it comes to working with these files, transparent backgrounds can sometimes be tricky to handle, especially if they display with unwanted checkboard patterns or solid backgrounds in certain programs. In this guide, we’ll explore how to remove that checkboard background and make your EPS files look clean and crisp for your projects.
Understanding the Checkboard Pattern in EPS Files
So, what exactly is this checkboard pattern you see behind your EPS images? Well, it’s not part of the artwork itself. Instead, it’s a visual cue used by many graphic design programs—like Adobe Illustrator or Photoshop—to indicate transparency. Think of it as a placeholder that tells you: “Hey, this area isn’t filled with a color or image; it’s see-through.” The checkboard pattern is helpful because it helps designers quickly identify which parts of the image are transparent and which are opaque.
However, this pattern can sometimes be confusing, especially if you’re new to working with EPS files or if your software isn’t displaying transparency correctly. For example, when you open an EPS in some applications, the checkboard might appear as a background, making it look like there’s a solid pattern or color behind the image. This can be misleading if you want to place the EPS over different backgrounds or add it to a composite design.
It’s important to understand that the checkboard pattern isn’t embedded in the file itself. Instead, it’s a display feature of your editing software. When you export or save your EPS file correctly, the transparent areas are preserved, allowing you to place your image seamlessly over any background without the checkboard showing up in your final output. This understanding helps you troubleshoot display issues and ensures your designs look professional and polished.
Tools and Software Needed to Edit EPS Files
If you’re looking to remove those pesky checkboard backgrounds from your EPS files, the first thing you’ll need is the right set of tools. Not all software can handle EPS files or remove backgrounds effectively, so choosing the right program makes all the difference.
Here’s a quick rundown of the most popular tools you’ll want to consider:
- Adobe Illustrator: The industry standard for working with vector graphics. It offers powerful tools for editing EPS files, including easy background removal features.
- CorelDRAW: Another robust vector graphics editor that supports EPS files and provides options to remove or hide backgrounds.
- Inkscape: A free, open-source vector graphics editor. While it might not have all the bells and whistles of Adobe Illustrator, it’s capable of editing EPS files and removing backgrounds with a bit of finesse.
- Affinity Designer: A more affordable alternative to Illustrator that supports EPS files and provides intuitive tools for background editing.
Additionally, some online tools and converters can help you remove backgrounds or convert EPS files into more manageable formats. However, keep in mind that complex vector backgrounds might require more advanced software to achieve a clean removal.
Before diving into editing, ensure your software can handle transparency. EPS files often contain transparent backgrounds, and you’ll want to preserve that transparency after editing. Most professional vector editors support this feature, but it’s always good to double-check.
Now that you’ve got the right tools lined up, you’re all set to jump into the step-by-step process of removing that checkboard background.
Step-by-Step Guide to Removing the Checkboard Background
Removing the checkboard background from an EPS file might sound intimidating at first, but with a methodical approach, it becomes pretty straightforward. Let me walk you through the process using Adobe Illustrator as an example — but the principles apply to most vector editing software.
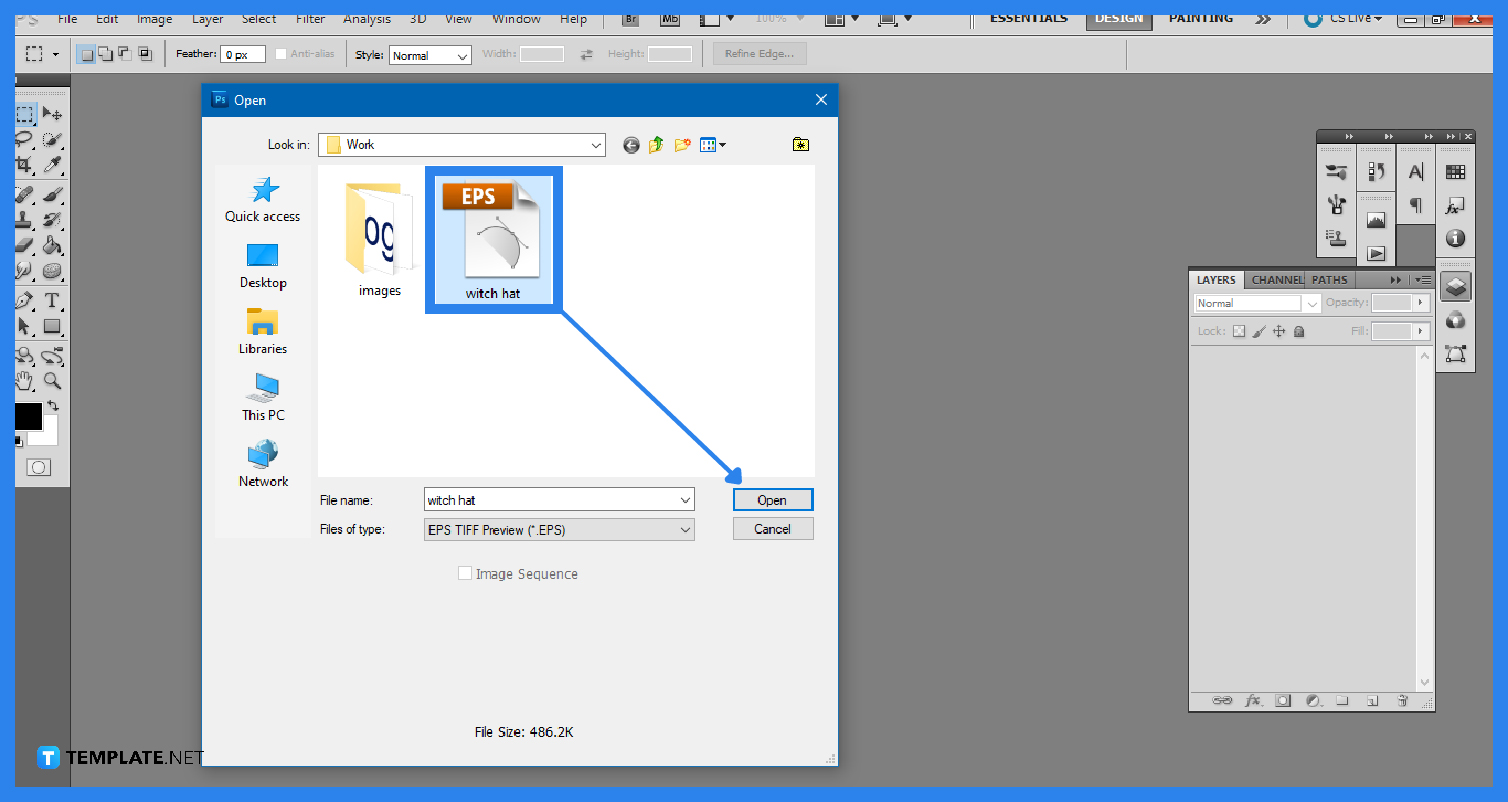
Step 1: Open Your EPS File
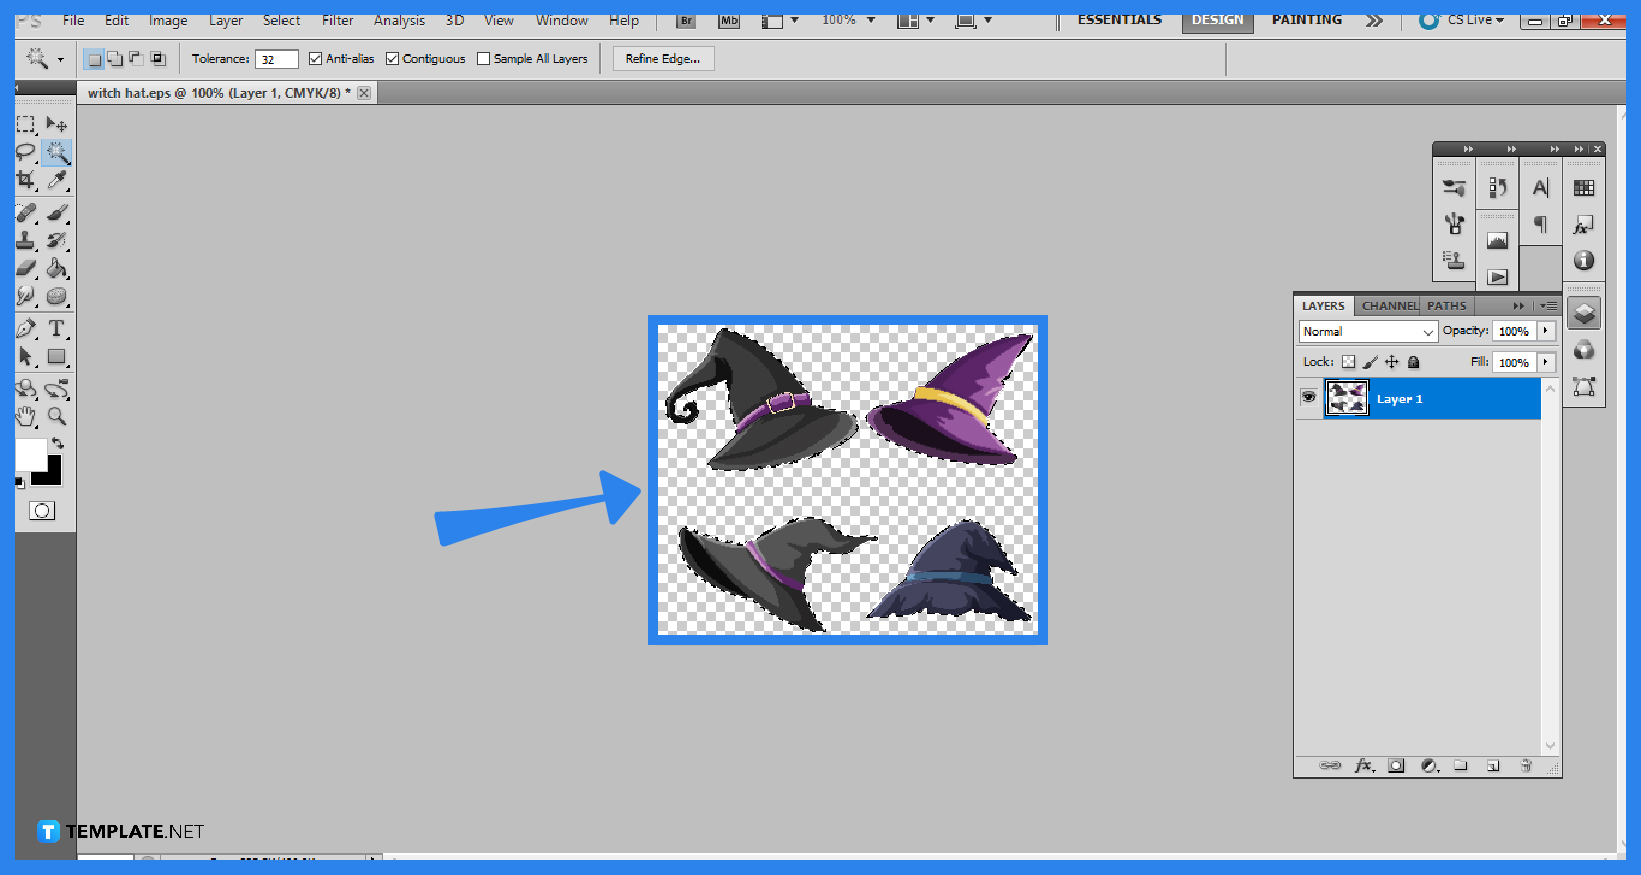
Start by launching your preferred vector editing software. Open your EPS file by navigating to File > Open and selecting your file. Once loaded, you’ll see the graphic with the checkboard background, which indicates transparency.
Step 2: Select the Background Area
If the checkboard is part of the background layer, you’ll need to select it. Use the Selection Tool (V) to click on the background or areas that show the checkboard pattern. Sometimes, the background is perfectly isolated, but other times, it’s merged with the main graphic.
Step 3: Use the Direct Selection Tool
For more precise selection, switch to the Direct Selection Tool (A). Click on individual anchor points or paths that form the background. This way, you can delete or hide only the parts you don’t want.
Step 4: Delete or Hide the Background
Once your background is selected, simply press Delete on your keyboard. If the background is on a separate layer, you can also hide that layer to make the checkboard pattern disappear.
- Tip: If the background is complex, use the Magic Wand Tool to select all similar-colored areas quickly.
Step 5: Clean Up the Edges
After deleting the background, you might notice some rough or leftover edges. Use the Pen Tool (P) or Erase Tool to tidy up these areas for a clean, professional look.
Step 6: Save Your Edited EPS File
Once you’re happy with the removal, save your file. To preserve transparency, choose File > Save As and select the EPS format again. Make sure the transparency settings are enabled, so your background remains clear when you use the graphic elsewhere.
Additional Tips:
- Always keep a copy of your original file before making edits.
- If you’re dealing with complex graphics, consider exporting your EPS to a PNG with transparency for web use.
- Practice patience — some backgrounds are easier to remove than others, especially if the checkboard pattern is mixed with other graphic elements.
And there you have it! With these steps, removing a checkboard background from your EPS files becomes a manageable task. Just take it step by step, and you’ll have a clean, transparent graphic ready for your project.
Tips for Maintaining Image Quality During Editing
Editing EPS files, especially when removing backgrounds like checkboard patterns, can sometimes lead to a dip in image quality if you’re not careful. The key is to work smart and use methods that preserve the crispness and clarity of your graphics. Here are some practical tips to help you maintain the best quality during your editing process.
Use Vector Editing Software: Since EPS files are vector-based, editing them in the right software is essential. Programs like Adobe Illustrator or CorelDRAW are designed to handle vectors seamlessly. They allow you to make precise adjustments without losing resolution, unlike raster-based programs.
Work with Layers: When removing backgrounds, always work with layers. Duplicate your original layer before making any changes. This way, if something doesn’t turn out as planned, you can always revert to the untouched version without quality loss.
Maintain Original Dimensions: Avoid resizing your artwork excessively during editing. Resizing can cause pixelation or blurriness, especially if you convert vectors to raster images at any point. Keep your artwork at its original dimensions to preserve sharpness.
Use High-Resolution Export Settings: When saving or exporting your edited EPS files, choose the highest quality settings available. If exporting as a PNG or TIFF for any reason, select the highest resolution (300 DPI or higher). For EPS exports, ensure that the settings retain vector paths and don’t rasterize your work unnecessarily.
Avoid Over-Editing: Less is often more. Excessive manipulation can introduce artifacts or distortions. Take your time making precise adjustments, and double-check your work frequently to ensure the integrity of your graphics remains intact.
By following these tips, you’ll ensure your edited EPS files stay sharp, professional-looking, and ready for whatever project you have in mind. Remember, patience and using the right tools make all the difference in maintaining high-quality images.
Alternative Methods for Handling Backgrounds in EPS Files
If removing checkboard backgrounds directly from EPS files isn’t working out or seems too complex, don’t worry—there are alternative approaches you can explore. Sometimes, tackling the background removal outside of your main editing software or using different techniques can save you time and preserve quality.
Using Photoshop for Rasterized Background Removal: While EPS files are vector-based, you can open them in Adobe Photoshop if they are rasterized or exported as high-resolution images. Once opened, you can use tools like the Magic Wand or Select Color Range to quickly select and delete the checkboard pattern. Afterward, you can save the image back as a PNG with transparency or re-import it into vector software if needed.
Converting EPS to PNG or SVG: Sometimes, converting your EPS into a different format like PNG (with transparency) or SVG can make background removal easier. Use online converters or software like Adobe Illustrator to export your artwork in these formats. Once converted, you can use simple tools or apps to clean up the background without affecting your main image quality.
Using Online Background Removal Tools: There are several free and paid online tools designed specifically for removing backgrounds from images, such as Remove.bg or Clipping Magic. Upload your EPS file (or its rasterized version), and these tools automatically detect and remove backgrounds, including checkboard patterns. Export the cleaned image and re-import it into your vector software if needed.
Layer Masking Techniques: If you have access to advanced vector tools, consider using layer masks to hide the checkboard areas instead of deleting them. This non-destructive approach allows you to tweak the masked regions later without permanently altering your artwork. It’s especially useful if you’re unsure about removing certain parts entirely.
Recreating the Artwork: If all else fails, and the background removal process compromises your image quality, sometimes it’s best to recreate the artwork with a transparent background from scratch. Use your original files as a template and ensure that transparency is preserved during creation.
Remember, the best method depends on your specific project, the software you have access to, and how complex your artwork is. Exploring these alternatives can often lead to cleaner results and save you the headache of struggling with tricky backgrounds in EPS files.
Finalizing and Saving Your Edited EPS Files
Congratulations! You’ve made it to the final step in your editing journey. Now that you’ve adjusted your EPS file and removed that pesky checkboard background, it’s time to save your work properly so you can use it confidently on Shutterstock or elsewhere. But before hitting that save button, let’s talk about some best practices to ensure your file is polished and ready to go.
1. Double-Check Your Edits — Take a moment to review your EPS file. Make sure all unwanted backgrounds are gone and that your design looks crisp and professional. Zoom in if needed to catch any tiny remnants or artifacts.
2. Choose the Right Save Settings — When saving, opt for “Save As” rather than overwriting your original file. This way, you preserve the original in case you need to revert back later. Most vector editing programs let you choose the EPS version compatibility—select the latest version for broader compatibility unless you have specific requirements.
| Saving Tips | Details |
|---|---|
| File Naming | Use clear, descriptive names to easily identify your file later. |
| Color Mode | Ensure your colors are in CMYK or RGB depending on your final use, and set the color profile accordingly. |
| Embed Fonts | Embed any fonts used in your design to prevent missing fonts when others open the file. |
| Optimize for Use | If you’re uploading to Shutterstock, check their specific file guidelines to make sure your EPS meets their standards. |
3. Save Multiple Versions — Consider saving different versions if you plan to make further edits or need specific formats for different purposes. For example, save an original EPS, a flattened version, and a version with layers intact.
Once you’re satisfied, click “Save” and keep a backup copy in a safe location. Now you’re all set to upload your cleaned-up EPS file to Shutterstock or use it for your project!
Frequently Asked Questions About Editing EPS Files on Shutterstock
Editing EPS files can be a bit daunting if you’re new to vector graphics or Shutterstock‘s platform. To help clear up some common doubts, here are answers to frequently asked questions:
Q1: Can I edit EPS files directly on Shutterstock?
Actually, Shutterstock itself doesn’t offer a built-in editor for EPS files. Instead, you need to download the EPS file and edit it using dedicated vector graphic software like Adobe Illustrator, CorelDRAW, or Inkscape. After editing, you can upload or use the files as needed.
Q2: What software do I need to remove backgrounds from EPS files?
Popular options include:
- Adobe Illustrator: Industry standard for vector editing and background removal.
- Inkscape: Free, open-source alternative suitable for EPS editing.
- CorelDRAW: Another powerful vector graphics editor.
Choose the one that best fits your budget and comfort level.
Q3: Does removing the background affect image quality?
Since EPS files are vector-based, removing the background doesn’t affect the quality of your main design. You can scale your image infinitely without losing clarity. Just ensure you’re working on a copy so your original stays intact.
Q4: Are there any tips for ensuring my EPS file meets Shutterstock’s submission standards?
Yes! Always check Shutterstock’s latest submission guidelines. Generally, ensure your file:
- Doesn’t contain embedded raster images unless specified.
- Has a transparent background if required.
- Is saved in the correct EPS version (usually EPS 10 or later).
- Has appropriate color profiles for your intended use.
Q5: Can I automate background removal for multiple EPS files?
While some advanced software offers batch processing features, automating background removal from EPS files can be tricky, especially if the backgrounds are complex. For multiple files, consider using scripts or plugins designed for vector editing software, or hire a designer for efficient processing.
If you keep these questions in mind, editing EPS files for Shutterstock becomes much more manageable. Remember, patience and practice are key—happy editing!
Conclusion and Best Practices for EPS File Editing
Removing checkboard backgrounds from EPS files can significantly enhance the clarity and professionalism of your design work. By utilizing appropriate tools such as Adobe Illustrator or other vector editing software, you can efficiently eliminate unwanted backgrounds while preserving the integrity of your artwork. Remember to always work on a copy of your original file to prevent accidental data loss.
Here are some best practices to ensure smooth EPS file editing:
- Backup Your Files: Always save a backup before making significant edits.
- Use Layers Effectively: Keep different elements on separate layers for easier editing and background removal.
- Utilize Selection Tools: Use the selection or magic wand tool to precisely select and delete backgrounds.
- Check Compatibility: Ensure your editing software supports EPS files and maintains vector quality.
- Maintain Original Quality: Save your edited files in a lossless format to preserve resolution and detail.
- Review and Clean Up: After removing the background, zoom in to check for residual artifacts or unwanted elements.
In conclusion, mastering the process of removing checkboard backgrounds from EPS files enhances your ability to create versatile and professional graphics. Follow these best practices to streamline your editing workflow and achieve the best possible results in your projects.