Thinking about sharing your photography with a global audience? Shutterstock is a fantastic platform to showcase your work and even earn some extra income. Uploading your photos might sound intimidating at first, but it’s pretty straightforward once you get the hang of it. In this guide, we’ll walk you through the basics of uploading your photos on the Shutterstock app, making the process simple and stress-free. Whether you’re a seasoned pro or just starting out, these tips will help you get your images online quickly and easily.
Preparing Your Photos for Upload
Before you hit that upload button, it’s important to prepare your photos properly to ensure they meet Shutterstock’s quality standards and stand out to buyers. Here’s what you need to do:
- Choose the Right Photos: Select images that are sharp, well-composed, and showcase a clear subject. Avoid blurry, poorly lit, or cluttered shots. Think about what buyers might be searching for and aim to provide high-quality visuals.
- Check the Resolution and Size: Shutterstock recommends a minimum resolution of 4 megapixels, but higher is better. Make sure your images are at least 300 dpi for print quality. Large, high-resolution images are more versatile and likely to be accepted.
- Remove Metadata and Watermarks: Clean your photos of any personal metadata or watermarks. Use photo editing software to crop, resize, or adjust your images. This helps avoid rejection and keeps your photos looking professional.
- Adjust Colors and Exposure: Brighten dark photos, correct color imbalances, and ensure your images look natural. Use editing tools to enhance your photos without overdoing it—aim for a natural, appealing look.
- Save in the Proper Format: Shutterstock prefers JPEG files with sRGB color profile. Save your images in this format, and keep file sizes optimized but high quality.
Taking the time to prepare your photos properly will not only increase your chances of acceptance but also make your images more appealing to potential buyers. Remember, quality always wins in the stock photography world!
Step-by-Step Guide to Upload Photos on the Shutterstock App
Uploading your photos to Shutterstock using their app is a straightforward process, but it helps to know each step to ensure everything goes smoothly. Let’s walk through it together so you can start sharing your work and earning in no time!
Step 1: Download and Install the App
If you haven’t already, head over to your device’s app store (Google Play Store or Apple App Store) and search for “Shutterstock Contributor.” Download and install the app. It’s free and quick to set up.
Step 2: Sign In or Register
Open the app and either log in with your existing contributor account or create a new one. Registration is simple—just follow the prompts, enter your email, create a password, and agree to the terms. Once logged in, you’re ready to start uploading.
Step 3: Prepare Your Photos
Before uploading, make sure your photos are well-edited, high-quality, and meet Shutterstock’s guidelines (more on that later). Save your images in JPEG format with a resolution of at least 4 MP, and keep the file size under 50 MB.
Step 4: Tap the Upload Button
In the app dashboard, look for the upload icon—usually a camera or a plus sign (+). Tap it to start adding photos. You can select multiple images from your device’s gallery or file manager.
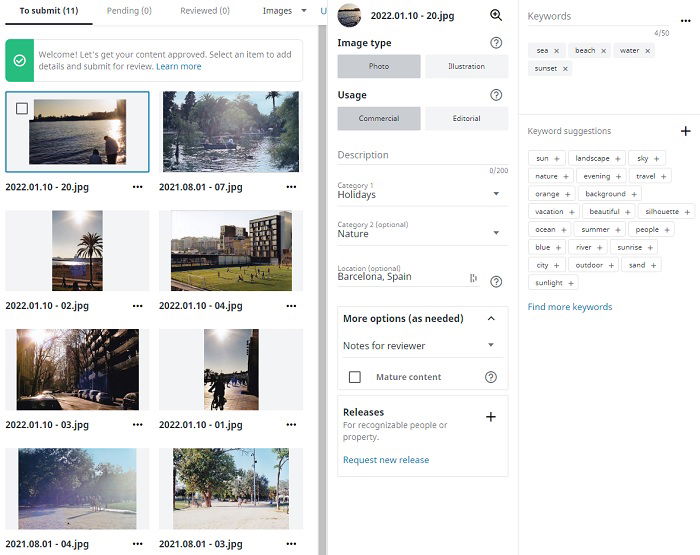
Step 5: Select Photos and Add Details
- Choose the photos you want to upload. You can select several at once.
- After selecting, you’ll be prompted to add relevant details. This includes titles, descriptions, keywords, and categories. Be descriptive—this helps buyers find your images!
Step 6: Set Licensing Options
Decide whether you want to offer your photo under Royalty-Free or Enhanced License. Usually, Shutterstock defaults to Royalty-Free, which is suitable for most contributors.
Step 7: Submit for Review
Once everything looks good, tap the “Submit” button. Your photos will enter Shutterstock’s review process, which typically takes a few days. You’ll get notified once your images are approved and live on the platform.
And that’s it! Uploading via the app is quick once you get the hang of it. Just keep practicing, and you’ll be uploading like a pro in no time.
Tips for Optimizing Your Photos for Better Approval
Getting your photos approved on Shutterstock can sometimes seem challenging, but with a few simple tips, you can improve your chances significantly. Think of it like preparing your best work to impress potential buyers and the review team alike.
1. Focus on Quality
Shutterstock prioritizes high-quality images. Make sure your photos are sharp, well-lit, and properly exposed. Avoid blurry, pixelated, or noisy images. Use good editing tools to enhance clarity, contrast, and color balance.
2. Follow Technical Guidelines
- Resolution: Aim for at least 4 MP (megapixels). Higher resolution images are preferred.
- File Format: JPEG is standard. Save your images in the highest quality JPEG setting.
- File Size: Keep files under 50 MB for easier upload and processing.
3. Be Authentic and Original
Shutterstock values original content. Avoid overused or stocky-looking images. Instead, focus on unique perspectives, compositions, or subjects that stand out.
4. Use Clear and Descriptive Titles and Keywords
Accurate, keyword-rich descriptions help your images get found. Think about what a buyer might search for and include relevant terms. Avoid keyword stuffing—be natural and specific.
5. Comply with Content Guidelines
- Ensure your images don’t contain copyrighted elements, trademarks, or recognizable private property unless you have permission.
- Avoid images with offensive or sensitive content.
- Make sure you have model or property releases if necessary.
6. Edit with Consistency
Maintain a consistent style or theme if you’re building a portfolio. This can help you attract repeat buyers and establish your brand as a contributor.
By following these tips, you’ll increase your chances of approval and get your photos noticed on Shutterstock. Remember, quality and relevance are key, so take your time with each upload. Happy shooting and uploading!
Common Issues and Troubleshooting During Upload
Uploading photos to the Shutterstock app is usually straightforward, but sometimes, you might run into a few hiccups. Don’t worry—most issues are easy to fix once you know what to look out for. Here’s a quick rundown of common problems and how to troubleshoot them:
File Format or Size Errors
One of the most common issues is uploading files that don’t meet Shutterstock’s requirements. Make sure your photos are in accepted formats like JPEG, TIFF, or EPS, and that they are under the maximum file size limits (usually 50MB for JPEGs). If you see an error message, double-check your file format and size. You can do this by right-clicking the image on your computer and selecting ‘Properties’ or ‘Get Info.’
Resolution and Quality Problems
Shutterstock wants high-quality images with a minimum resolution of 4 megapixels. If your photos are blurry or pixelated, they may be rejected or not approved. Always upload images at their full resolution and avoid compressing them too much. To check your image resolution, use photo editing software or built-in tools on your device.
Internet Connection Issues
If your upload stalls or fails, your internet connection might be the culprit. Try the following:
- Pause and restart your Wi-Fi or switch to a different network
- Restart your device
- Ensure your connection is stable and has enough bandwidth
Sometimes, a simple reset of your router can make a big difference. If the problem persists, consider uploading during off-peak hours when internet traffic is lower.
App Glitches or Crashes
If the Shutterstock app crashes or freezes during upload, try these steps:
- Close and reopen the app
- Update the app to the latest version in your app store
- Clear cache or reinstall the app if necessary
Keeping your device’s software updated can also prevent many bugs and improve overall app stability.
Rejection or Review Issues
If your photo is rejected after review, read the feedback carefully. Common reasons include poor image quality, inappropriate content, or lack of relevance. Improve your photo based on the comments, and try re-uploading. Remember, patience is key—most successful contributors keep refining their work!
Conclusion and Best Practices for Uploading Photos on Shutterstock
Uploading your photos to Shutterstock doesn’t have to be intimidating. With a little preparation and attention to detail, you can streamline the process and increase your chances of success. Here are some top tips to keep in mind:
Follow Shutterstock’s Guidelines
- Use high-resolution images (minimum 4 MP)
- Ensure your photos are sharp, well-lit, and free of noise or distractions
- Upload in accepted formats like JPEG or TIFF
- Keep file sizes within the platform’s limits
- Avoid watermarks or logos
Optimize Your Photos for Success
- Write clear, descriptive titles and tags to help buyers find your images
- Choose relevant keywords that accurately describe the content
- Ensure your images are unique and offer value
Stay Consistent and Keep Improving
Uploading regularly can boost your visibility as a contributor. Pay attention to trending topics and popular categories on Shutterstock. Review your rejected uploads to learn what needs improvement, and don’t be discouraged by initial setbacks. Practice makes perfect!
Use the App Efficiently
- Organize your photos into folders for faster uploads
- Keep your app updated for the latest features and fixes
- Check your internet connection before uploading
By following these best practices, you’ll make the process smoother and increase your chances of earning royalties from your photos. Happy uploading!