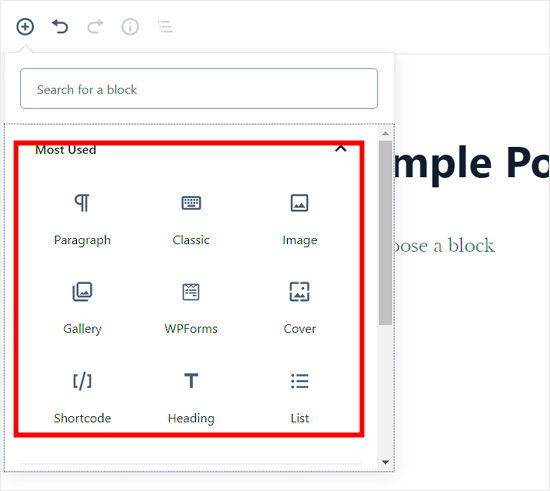
Gutenberg is the default block editor for WordPress, introduced to streamline and enhance the content creation experience. It revolutionizes how users create and arrange their content, moving away from the classic editor’s linear style. Instead, Gutenberg allows you to build posts and pages using a block-based approach, where each section of content (like paragraphs, images, or embedded videos) can be treated as an individual block. This gives users more flexibility and control over their layouts, making it easier to create visually appealing and complex content without needing extensive coding skills. With regular updates, Gutenberg continues to evolve, incorporating new features that help keep your website fresh and engaging.
Why Update Gutenberg?

Keeping your Gutenberg version up to date is crucial for several reasons. Here’s why you should prioritize updating:
- Improved Features: Each update typically brings new features, enhancements, and bug fixes that improve overall functionality.
- Enhanced Security: Regular updates patch vulnerabilities, reducing the risk of hacks and ensuring your site is secure.
- Better Performance: Updates often optimize speed and responsiveness, providing a smoother editing experience and faster loading times for visitors.
- Compatibility: Keeping Gutenberg updated ensures compatibility with the latest WordPress themes and plugins, preventing any conflicts that might occur with older versions.
- User Experience: Updated versions often come with improved user interfaces and features that enhance usability, making it easier for content creators to work.
Incorporating the latest updates not only keeps your site functional but also enhances its capabilities, ensuring you’re not missing out on valuable tools and features. So, stay proactive and make it a habit to check for updates regularly!
Checking Your Current Gutenberg Version

Before you dive into updating your Gutenberg version, it’s important to know which version you’re currently using. This helps you understand what improvements or changes you might be missing out on with the latest update. So, let’s break down how to easily check your current Gutenberg version.
- Log into Your WordPress Dashboard: Start by signing in to your WordPress admin panel. This is typically found at yourwebsite.com/wp-admin.
- Navigate to the Plugins Section: In the menu on the left, click on “Plugins.” This section lists all the plugins currently installed on your WordPress site.
- Find Gutenberg in the List: Scroll through your plugins until you locate “Gutenberg.” You should see the version number displayed next to it.
- View the Gutenberg Editor Directly: Alternatively, you can check your Gutenberg version by opening any post or page in the editor. In the top right corner, click on the three vertical dots (more options) and go to “About.” You’ll see the version number there as well.
Now that you have your current Gutenberg version, it’s time to weigh the benefits of updating. Knowing your current version can help you understand the gap between what you have and what new features await you in the latest version.
Methods to Update Gutenberg
Updating the Gutenberg plugin in WordPress can be done in a few simple ways. Depending on your comfort level with plugins and updates, you can choose the method that works best for you. Here’s a closer look at the various methods to keep your Gutenberg version fresh and loaded with the latest features.
- Automatic Updates: If you have automatic updates enabled for your plugins, then Gutenberg may already be updating in the background. To check if this option is enabled, navigate to Settings > General, and ensure that “Automatic updates” are checked for plugins.
- Manual Update through Dashboard:
- Go to the Plugins section in your dashboard.
- Find Gutenberg in the list of installed plugins.
- If there is an update available, you will see a highlighted message. Click on Update Now to install the latest version.
- Update via WordPress Admin Bar: If you have the admin bar enabled, you can see update notifications directly there. Just hover over the Plugins link at the top and click Update Available.
- Using WP-CLI: For those more technically inclined, you can update Gutenberg via command line using WP-CLI. Just run the command
wp plugin update gutenbergin your terminal.
Regardless of the method you choose, updating your Gutenberg version ensures you’re not missing out on new features and security enhancements. So, go ahead and pick an option that suits you best!
Updating Gutenberg via the WordPress Dashboard
Hey there! Updating the Gutenberg plugin through the WordPress dashboard is one of the easiest methods you can use to keep your site fresh and up-to-date. It’s as simple as a few clicks! Let’s break it down step by step:
- First, log in to your WordPress admin panel. You can usually do this by typing yourdomain.com/wp-admin into your browser.
- Once you’re logged in, head over to the left-hand sidebar and click on Plugins.
- This will take you to a list of all the plugins installed on your site. Look for the Gutenberg plugin in this list.
- If there’s an update available, you’ll see a notification under the plugin’s name. Click the Update now link.
- After you click, WordPress will take care of the rest! You’ll see a progress bar, and in moments, you’ll have the latest version of Gutenberg.
And voila! You’re all set! Regularly updating your plugins is vital for security and functionality, so make this a part of your maintenance routine. Just remember to check for updates now and then, as new features and security patches are always rolling out!
Updating Gutenberg Manually
Alright! So, you might find yourself in a situation where updating Gutenberg through the WordPress dashboard isn’t working, or maybe you just want to do it manually. Fear not! Here’s how you can tackle this like a pro:
- Start by going to the official WordPress Plugin Repository and searching for Gutenberg.
- Download the latest version of the plugin as a ZIP file. You can do this by clicking the Download button on the right.
- Now, log in to your WordPress dashboard again and navigate to Plugins > Add New.
- Here, click the Upload Plugin button at the top. Select the ZIP file you just downloaded and hit Install Now.
- Once the upload is complete, activate the plugin. And just like that, you’re on the latest version!
By updating creatively, you’re not just maintaining functionality; you’re also ensuring you’re utilizing the latest features that make creating content a breeze. Keep your site running smoothly by considering manual updates when needed, especially if automatic updates are turned off!
7. Using WP-CLI to Update Gutenberg
If you’re comfortable with command line interfaces, using WP-CLI to update the Gutenberg plugin can be a real time-saver. WP-CLI, or WordPress Command Line Interface, lets you manage your WordPress installation from the terminal instead of the traditional graphical user interface. This can be particularly handy if you’re managing multiple
To start, you’ll need to ensure that you have WP-CLI installed on your server. If you’re on a managed hosting provider, they usually have this set up for you. Once you’re in the command line, follow these simple steps to update Gutenberg:
- Open Your Terminal: Access your server using SSH or use the terminal if you’re running a local server.
- Navigating to Your WordPress Directory: Enter the command:
cd /path/to/your/wordpress. This points you to the folder where WordPress is installed. - Update Gutenberg: Enter the command:
wp plugin update gutenberg. This command tells WP-CLI to check for the latest version of Gutenberg and install it. - Check for Success: You can confirm the update was successful by typing
wp plugin status gutenberg, which will show you the current version.
And voilà! You’ve updated the Gutenberg plugin using WP-CLI. This method is not only efficient but also reduces the likelihood of running into issues typically associated with browser-based updates.
8. Verifying the Update
Here’s how you can verify the update:
- Check the Plugin Version: Go to your WordPress dashboard and click on “Plugins” > “Installed Plugins.” Locate Gutenberg and check the version number. It should match the latest version listed on the official Gutenberg plugin page.
- Test Gutenberg Editor: Start a new post or edit an existing one. Are all the blocks working? Does the editor load quickly? These are signs of a successful update.
- Review Site Functionality: Spend a few minutes navigating your site’s front end. Check if the formatting of existing posts remains intact. You may want to verify that all key functionalities like menus, widgets, and any custom post types you use are still working properly.
- Check for Errors: Look at the console in your browser’s developer tools for any JavaScript errors. If there are major issues, consider rolling back the update until they’re resolved.
By following these steps, you not only ensure a successful Gutenberg update but also fortify your WordPress site against any unforeseen issues. It’s always better to be safe than sorry! Happy editing!
Troubleshooting Common Update Issues
Updating the Gutenberg version in WordPress should ideally be a smooth process, but like anything tech-related, sometimes things go awry. No worries! Let’s troubleshoot some common issues you might encounter during the update.
1. Compatibility Problems
If you find that your site is malfunctioning after updating Gutenberg, it could be due to plugins or themes that aren’t compatible with the latest version. Here’s what you can do:
- Deactivating Plugins: Temporarily deactivate all your plugins and check if the site functions correctly. If it does, reactivate them one by one to identify the troublemaker.
- Switching Themes: Sometimes, the theme you’re using may not be compatible with the latest update. Switch to a default WordPress theme to see if the issue persists.
2. White Screen of Death
Encountering a blank screen after the update? This dreaded “White Screen of Death” can happen due to code issues or memory limit problems. To fix it:
- Increase Memory Limit: You can increase your PHP memory limit by adding a line to your wp-config.php file:
define('WP_MEMORY_LIMIT', '256M');
3. Server Issues
If your site is still unreliable post-update, it might be a server-related issue. Contact your hosting provider and check for server errors in the logs. They often have tools to help diagnose the problem.
Remember, while it’s important to keep everything updated, you needn’t panic. Troubleshooting is part of the journey, and following these tips will often lead you to a solution!
Conclusion and Best Practices for Regular Updates
Updating the Gutenberg version in WordPress isn’t just a technical requirement; it’s a crucial step in ensuring your site runs smoothly and securely. The benefits are numerous, including better performance, enhanced features, and improved security. But how can you ensure that your update process is seamless? Here are some best practices to keep in mind:
1. Regular Backups
Before any update, always create a backup of your website. This safeguards against potential data loss. You can use plugins like:
- UpdraftPlus
- BackupBuddy
- VaultPress
2. Test on a Staging Site
Whenever possible, perform updates on a staging site first. This allows you to test changes in a risk-free environment. Most WordPress hosting providers now offer staging setups with just a click.
3. Keep Everything Updated
It’s not just about updating Gutenberg; keep your themes and plugins updated as well. Regular updates reduce security vulnerabilities and enhance compatibility.
4. Monitor Your Site Post-Update
After performing updates, closely monitor your site for any unusual behavior. Be proactive in seeking solutions if issues arise.
In conclusion, while updating Gutenberg in WordPress can occasionally present challenges, the rewards of a well-optimized site are well worth it. By following these best practices, you’ll not only keep your site running smoothly but also enhance its overall performance and security. Happy updating!


