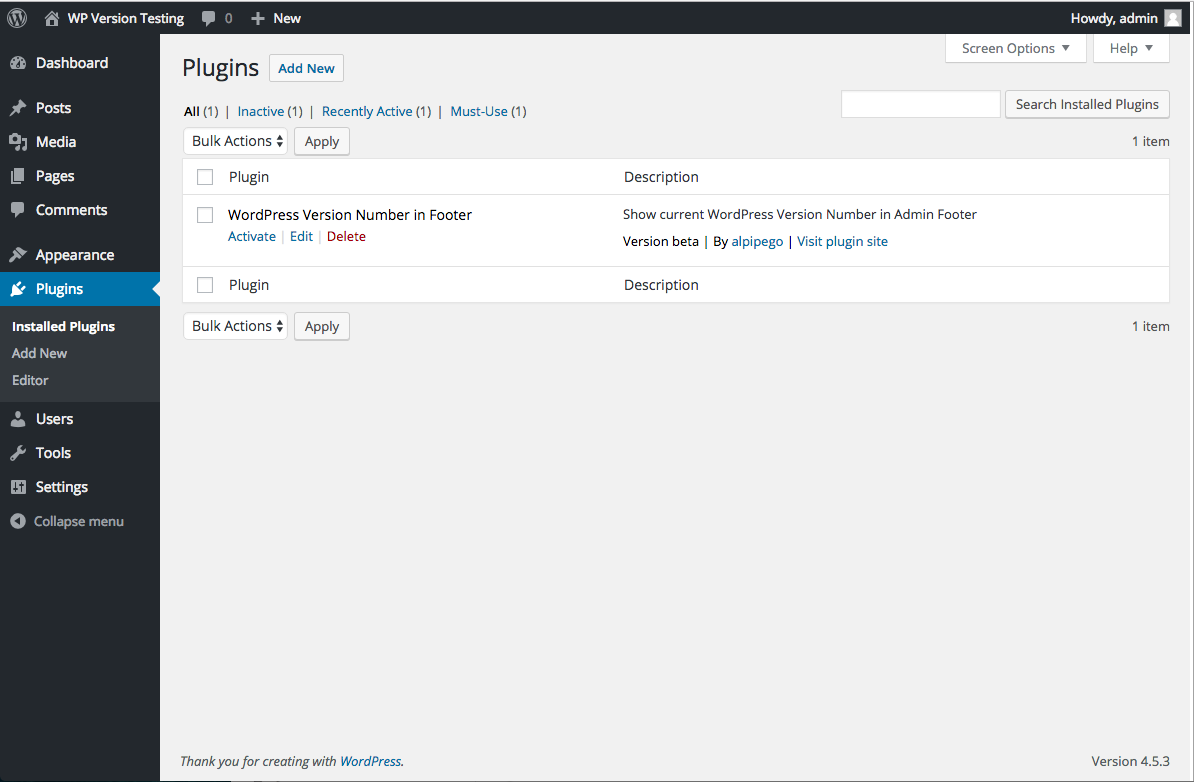
When managing a WordPress site, keeping track of your plugins is crucial. Different plugins can serve various purposes, but knowing their versions is equally important for functionality and compatibility. That’s where the WordPress Plugin Version Display comes into play. Displaying plugin versions ensures users are informed about the latest updates, potential bugs from outdated versions, or even compatibility issues with the WordPress core and otherplugin_row_meta hook, enhancing your site’s management capability.
Understanding the plugin_row_meta Hook
The plugin_row_meta hook is a powerful tool for developers and website owners alike. It enables you to modify the metadata displayed on the plugin management screen in the WordPress admin interface. This hook allows you to add custom text or links, enhancing user experience and providing important information about your plugins. Here’s a breakdown of how it works:
- Location: The hook is executed on the plugin management screen, specifically in the “Installed Plugins” section.
- Parameters: The hook accepts several parameters including:
- $links: An array of existing meta links.
- $plugin_file: The plugin file name.
- $plugin_data: An array containing the plugin’s metadata, including version number.
- Return Value: The hook returns the modified array of links, which will be displayed alongside each plugin.
Here’s a simple example of how to utilize the plugin_row_meta hook:
add_filter('plugin_row_meta', 'add_plugin_version_meta', 10, 2);function add_plugin_version_meta($links, $file) { $plugin_data = get_plugin_data($file); $version = $plugin_data['Version']; $links[] = 'Version: ' . $version; return $links;}By using this hook, you’re not just displaying versions; you’re also improving the overall functionality of your plugin management experience!
3. Setting Up Your WordPress Environment
Before you dive into customizing your WordPress site with plugins, it’s crucial to set up a proper environment. This sets the stage for everything you’ll do moving forward, including displaying plugin versions. Here’s how to ensure your WordPress environment is ready for development:
- Choose a Reliable Hosting Provider: Your web hosting provider plays a significant role in performance. Look for one that specializes in WordPress hosting to get the best support and optimization.
- Install WordPress: If you haven’t already, install WordPress on your server. Most hosting providers have one-click installation options that simplify the process.
- Set Up a Local Development Environment: If you’re planning on testing plugins and custom code, consider using tools like Local by Flywheel or MAMP. This allows you to develop without risking your live site.
- Familiarize Yourself with the Dashboard: Get comfortable navigating the WordPress dashboard. This is where you’ll manage themes, plugins, posts, and settings.
- Enable Debugging: In your wp-config.php file, enable debugging by adding:
define('WP_DEBUG', true);. This will help catch errors while developing your plugin functionalities. - Backup Your Website: Always make sure to have backups of your site before making changes. Use plugins like UpdraftPlus for easy backups.
By ensuring that your WordPress environment is set up correctly, you’ll create a smoother and more efficient development process. Once you’re ready, you can move on to displaying plugin versions seamlessly.
4. Creating a Custom Function for Version Display
Now that your WordPress environment is all set up, it’s time to create a custom function that will enable you to display the version of your plugins using the plugin_row_meta hook. This allows you to present version details directly in the plugins list on your admin dashboard. Here’s a step-by-step approach to accomplishing this:
- Create a Custom Function: You will need to write a function in your theme’s functions.php file or a custom plugin. Here’s a simple template to get you started:
function custom_plugin_version_display($plugin_meta, $plugin_file) { // Get the version of your plugin $plugin_data = get_plugin_data($plugin_file); $version = $plugin_data['Version']; // Append the version to the plugin meta $plugin_meta[] = 'Version: ' . esc_html($version); return $plugin_meta;}- Hook Your Function: Use the
plugin_row_metaaction hook to integrate your function with the WordPress admin interface.
add_filter('plugin_row_meta', 'custom_plugin_version_display', 10, 2);- Test Your Changes: After you’ve added the code, refresh your plugins page in the admin dashboard. You should see the version displayed under each plugin.
By following these steps, you’ll provide valuable information directly in the plugins list, enhancing the user experience for anyone managing plugins on your site. It’s a small touch that can significantly improve clarity and usability!
5. Integrating the Function with plugin_row_meta
Integrating the function for displaying your plugin’s version with the plugin_row_meta filter in WordPress is quite straightforward and a valuable way to enhance your plugin’s visibility. This method allows you to add additional meta links or information directly onto the plugins list table in the admin panel.
First, let’s establish what plugin_row_meta actually does. It’s a filter that provides a way to add custom metadata alongside each plugin that appears in the admin plugins list. By tapping into this filter, you’re able to show your plugin version in a more prominent way, ensuring that users can see it at a glance.
To get started, you need to hook into the plugin_row_meta filter with a custom function. Here is a simple example of how this can be achieved:
add_filter('plugin_row_meta', 'add_version_to_plugin_meta', 10, 2);function add_version_to_plugin_meta($plugin_meta, $plugin_file) { // Check if this is the correct plugin if ($plugin_file == 'your-plugin-folder/your-plugin.php') { $version = get_plugin_data($plugin_file)['Version']; $plugin_meta[] = 'Version: ' . esc_html($version); } return $plugin_meta;}In this code:
- add_filter: This function hooks our custom function to the plugin_row_meta filter.
- get_plugin_data: This function retrieves the plugin data, where we can easily access the version number.
- esc_html: This function safely outputs the version number, preventing any conflicts with HTML rendering.
By implementing this integration, you’ve created a clean and easy way for users to view your plugin’s version directly in the plugin management interface!
6. Styling the Version Display
Now that you’ve successfully integrated the version number display within the plugins list table, it’s time to take it a step further and ensure it looks appealing! Styling enhances visibility and provides users with a better experience when managing their plugins.
You can use a combination of CSS and inline styles to tweak how the version information fits into the overall aesthetics of the plugins table. Here’s how to go about it:
Firstly, utilize the admin_enqueue_scripts action in WordPress to load your custom stylesheet for the admin area:
add_action('admin_enqueue_scripts', 'enqueue_custom_admin_styles');function enqueue_custom_admin_styles() { wp_enqueue_style('custom-admin-style', plugins_url('your-plugin-folder/custom-style.css'));}Next, create a CSS file named custom-style.css inside your plugin folder. Here are some CSS rules you might want to incorporate to enhance the display:
.plugin-version { font-weight: bold; color: #007cba; /* WordPress blue */ padding: 3px 5px; border-radius: 3px; background-color: #f0f0f0; /* Light background */}In your integration code, wrap the version number in a span tag with the class you defined:
$plugin_meta[] = 'Version: ' . esc_html($version) . '';With this setup:
- The version number will appear bold, visually distinct, and easy to read.
- You can further customize the background color and padding to ensure optimal spacing and separation from other plugin details.
By paying attention to both functionality and style, you’re making your plugin not just useful but visually appealing and user-friendly as well! This adds a professional touch that can enhance user confidence in your plugin.
7. Testing the Version Display in the Admin Dashboard
Once you’ve implemented the version display feature using the `plugin_row_meta` function in your WordPress plugin, it’s crucial to test if everything is working as expected. Testing helps ensure that the version display appears correctly and provides a seamless user experience. Here’s how you can go about it:
First, navigate to your WordPress admin dashboard:
- Log into your WordPress admin.
- Click on the Plugins menu on the left-hand side.
- Find your plugin in the list of installed plugins.
At this point, you should see the additional meta information you added, including the plugin’s version number. If everything is functioning correctly, the display will mirror the following table:
| Plugin Name | Version | Other Meta Info |
|---|---|---|
| Your Awesome Plugin | 1.0.0 | Author: Your Name |
If you notice any discrepancies or missing information, double-check your code for any typos or logical errors. It’s essential to ensure the correct information is fetched dynamically from the plugin header.
Also, remember to refresh your browser cache or try accessing your dashboard in an incognito window to see the latest changes. A little patience and thorough testing will prevent future headaches!
8. Troubleshooting Common Issues
While implementing the version display using `plugin_row_meta` is generally straightforward, you may encounter some common issues. Let’s explore these and how to resolve them:
- No Version Display: If the version isn’t showing up at all, recheck your function. Ensure that you’ve hooked it correctly to the `plugin_row_meta` action in your code.
- Incorrect Version: The version number is derived from your plugin’s header. Verify that the version is correctly specified in the plugin file, typically found in the header comment section.
- Formatting Issues: If your version display appears funky, it might be due to incorrect HTML or CSS. Inspect the code closely; a small syntax error can cause layout issues.
- Incompatibility with Other Plugins: Sometimes, other plugins may interfere with the correct display. Deactivate other plugins one by one to identify any conflicts.
For each issue, turning on Debug Mode in WordPress can provide additional error messages that help diagnose problems. Don’t hesitate to consult the WordPress Codex or community forums if you’re still stuck; chances are, someone else has faced the same issue!
Conclusion and Best Practices
In summary, utilizing the plugin_row_meta function effectively can significantly enhance the usability of your WordPress plugins. By displaying essential version information directly within the plugin management area, you facilitate better user experience and awareness of essential updates and features. Below are some best practices to consider when implementing this functionality:
- Keep it Simple: Ensure that the information displayed is clear and concise to avoid overwhelming users.
- Stay Consistent: Use consistent terminology and format for version information to maintain a professional look.
- Update Regularly: Regularly update the version information to reflect the most accurate state of your plugin.
- Test Thoroughly: Make sure to test the display across different browsers and devices to ensure compatibility.
- Engage Users: Use the version display to engage users with links to update logs, changelogs, or additional resources that can enhance their understanding of changes.
Implementing these best practices will not only improve user satisfaction but also encourage plugin adoption and usage. Strive for clarity and accessibility to create a user-friendly experience that makes version tracking efficient.


