Welcome to the world of the WordPress Media Library! If you’re managing a website, chances are you’ve encountered this handy feature designed to streamline media file management. The Media Library holds all the images, videos, audio files, and documents that make your posts and pages come to life. Its user-friendly interface allows you to easily upload, edit, and organize your media assets, helping you enhance your content without breaking a sweat. So, let’s dive in and explore why mastering the Media Library, especially organizing by size, is essential for every WordPress user.
Importance of Organizing Media Files by Size
Now that you have a grasp of the WordPress Media Library, let’s talk about why organizing your media files by size is incredibly beneficial. Here are some compelling reasons:
- Improved Website Performance: Large file sizes can slow down your website. By controlling the size of your media files, you can ensure faster loading times, which is crucial for retaining visitors.
- Better User Experience: A well-organized media library helps you find and insert images or videos quickly. When your media is organized, you can focus on creating instead of searching.
- Ease of Maintenance: Regularly checking media sizes allows you to identify and remove unnecessary large files. This keeps your Media Library tidy and manageable.
- SEO Boost: Search engines favor optimized images and content. Smaller, well-optimized files can improve your site’s SEO, leading to better visibility.
Additionally, arranging media files by size allows you to quickly spot files that may need compression or formatting before uploading them. Establishing this practice not only streamlines your workflow but ultimately contributes to the success of your website. So, let’s get organized!
How to Access the WordPress Media Library
Accessing the WordPress Media Library is a breeze, and once you know how to do it, you’ll find it an invaluable tool for managing your website’s content. Whether you’re uploading images, videos, or documents, here’s how to find your way to the Media Library.
1. Log In to Your Dashboard: Start by logging into your WordPress admin dashboard. This is where you’ll find all the settings and tools necessary to manage your site.
2. Navigate to Media: Once you’re in, look for the *’Media’* tab located on the left sidebar. Clicking on it will take you directly to the Media Library.
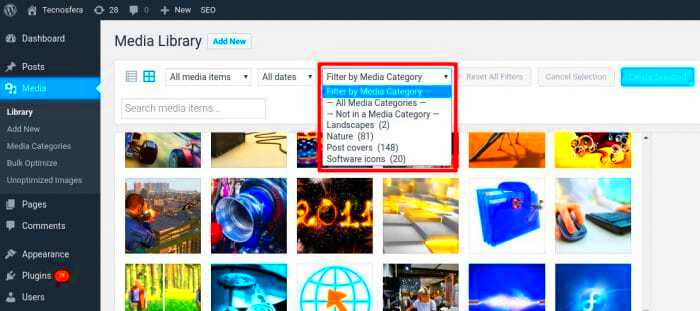
3. Media Library View: You’ll typically see two views here: the Grid View and the List View. The Grid View displays thumbnails of your media files, making it easier to visually scan through your content, while the List View gives detailed information like file name, file type, and upload date.
4. Search and Filter Options: If you have a lot of files, the search bar at the top lets you quickly find specific items by title or keyword. Additionally, you can filter uploads by date and type to find the media you need faster.
5. Upload New Files: If you want to add new media, click on the *’Add New’* button. You can drag and drop files directly into this section or click *’Select Files’* to choose from your computer.
With these simple steps, accessing your WordPress Media Library is quick and efficient, turning what could be a daunting task into a walk in the park!
Understanding File Sizes: What You Need to Know
Understanding file sizes is crucial for managing your WordPress Media Library effectively. Not only does it impact your site’s loading speed, but larger files can also lead to increased hosting costs. So, let’s break it down a bit!
First, let’s clarify what we mean by file sizes. File sizes are measured in kilobytes (KB), megabytes (MB), and gigabytes (GB). For practical purposes on a WordPress site:
- Images: Aim for file sizes below 100KB when possible.
- Audio files: Keep these under 5MB to ensure quick loading.
- Videos: Ideally, compress to under 10MB for smooth playback.
Why does file size matter? Here’s what you should keep in mind:
| Factor | Impact |
|---|---|
| Loading Speed | Large files can slow down your website, leading to higher bounce rates. |
| SEO Rankings | Google prefers fast-loading sites, so optimizing file sizes can boost your SEO. |
| Storage Limits | If your hosting plan has storage limitations, large files can fill up your quota quickly. |
In a nutshell, keeping your file sizes manageable not only streamlines the user experience but also supports better site performance. So, take the time to monitor and adjust your uploads accordingly!
Steps to Organize Media Files by Size
When managing your WordPress Media Library, organizing files by size can greatly enhance your workflow and ensure optimal performance on your website. Here are some straightforward steps to help you get started:
- Access Your Media Library: Log into your WordPress dashboard and navigate to “Media” on the left-hand side. This will take you to your Media Library where all your media files are stored.
- Sort Files by Size: While WordPress doesn’t allow you to sort by size directly, you can use the “List View” option to see the file size displayed next to each media file. To do this, click on the “List” icon in the top right corner of the Media Library page.
- Identify Large Files: Look through the list for large files that may be taking up unnecessary space. Consider your total storage limits and try to identify files that can be deleted or optimized.
- Delete Unused Files: If you come across media that you no longer need, simply select them and click the “Delete Permanently” button. This can help free up space and keeps your library clutter-free.
- Optimize Remaining Files: For files you want to keep, consider using image optimization tools or plugins. This can reduce file sizes without compromising quality, improving your site’s loading speed.
- Regular Maintenance: Set a schedule to regularly check your Media Library. Doing this every few months can help you stay on top of file sizes and keep your library organized.
By following these steps, you’ll not only enhance the performance of your WordPress site but also make managing content a whole lot easier. An organized library means you spend less time searching for files and more time focusing on what you love!
Using Plugins to Manage Media Library Size
Plugins can be a game-changer when it comes to managing your WordPress Media Library, especially for organizing and optimizing files by size. Here’s how you can leverage the power of plugins to streamline your media management:
- Media Library Assistant: This handy plugin helps you manage your media files effectively, allowing you to filter, sort, and search your media library by various attributes, including file size.
- WP Smush: A popular tool for image optimization, WP Smush compresses images without sacrificing quality. This means that even large images can be reduced in size, helping keep your library lean.
- Media Cleaner: This plugin scans your Media Library for unused media files. By identifying and removing those files that aren’t linked anywhere on your site, you can dramatically reduce clutter and save space.
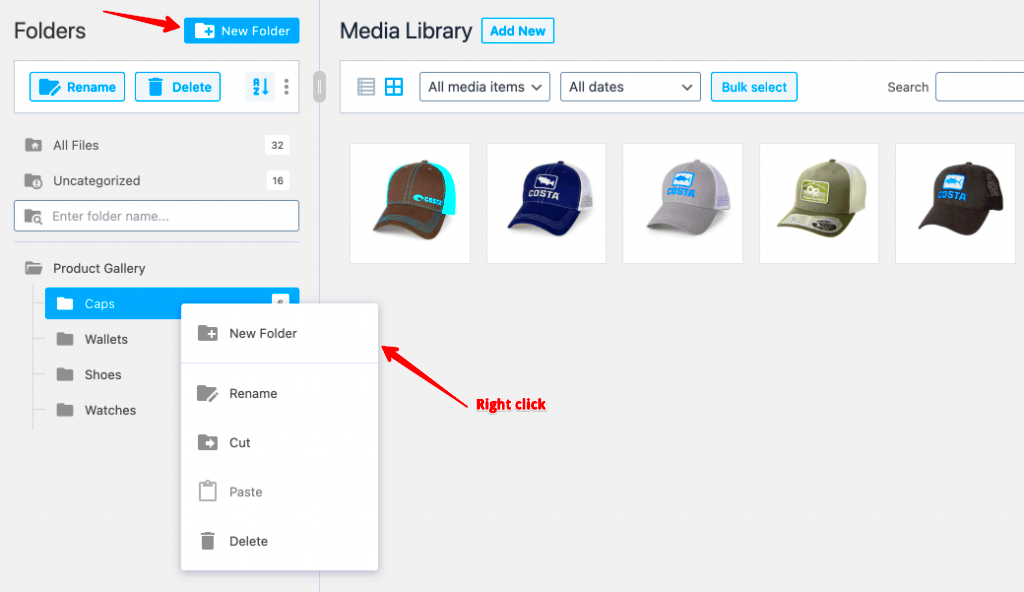
- FileBird: Organizing files into folders can make a world of difference. FileBird allows you to create folders and subfolders within your Media Library, making it easier to categorize files and see what you have at a glance.
- Regenerate Thumbnails: If you’ve resized or changed the dimensions of your images, this plugin can help regenerate your thumbnails, ensuring all file sizes are optimized for performance and visual appeal.
Don’t be afraid to experiment with these plugins until you find a setup that works best for your needs. Utilizing the right tools can not only help maintain an organized media library but also enhance your site’s performance and loading speeds. Plus, focusing on these tasks now can save you a lot of headaches in the future!
7. Best Practices for Uploading and Managing Media Files
Managing your media files effectively in WordPress can save you a massive amount of time and hassle down the road. Here are some best practices to consider when uploading and dealing with your media files:
- Optimize Images Before Uploading: Always resize and compress images before you upload them to save space and ensure your site loads faster. You can use tools like TinyPNG or ImageOptim to help.
- Use Descriptive File Names: Instead of generic names like “IMG_1234”, use descriptive titles like “blue-sky-sunrise.jpg”. This will help with search engine optimization (SEO) and make it easier to find files later.
- Create Folders or Categories: Organize your media into folders or categories. This can be particularly helpful if you have a large number of images or videos, making them easier to find.
- Utilize the Media Library Filters: WordPress allows you to filter your media by type, date, and more. Make use of these filters to quickly locate specific files.
- Regularly Audit Your Media Library: Periodically check your media library for unused files. Removing media that is no longer in use can free up space and keep things organized.
- Use Metadata Wisely: Add alt text and captions to your media. Not only does this improve accessibility, but it can also enhance SEO and user engagement on your site.
- Backup Regularly: Always keep backups of your media files. Whether you use WordPress plugins or manual methods, a backup can save your content from being lost forever.
8. Conclusion: Streamlining Your WordPress Media Library
In conclusion, keeping your WordPress Media Library organized and efficient isn’t just about aesthetics; it’s essential for your website’s performance and user experience. By following the best practices we’ve discussed, you can streamline your media library and make your content management much easier. Here’s a quick recap:
| Practice | Benefits |
|---|---|
| Optimize images | Faster loading times |
| Descriptive file names | Improved SEO and discoverability |
| Organize with folders | Easier navigation |
| Regular audits | Free up space and declutter |
By adopting these strategies, you not only enhance the efficiency of your media library but also improve the overall functionality of your website. Investing a little time into organizing your media content will pay off immensely in the long run, helping you maintain a professional and efficient online presence.

