Welcome to the world of WordPress Gutenberg! If you’re new to WordPress or have been using it for a while, you’ve probably heard of Gutenberg—the innovative block editor that revolutionized how we create and manage content. Launched in December 2018,
Getting Started with Gutenberg
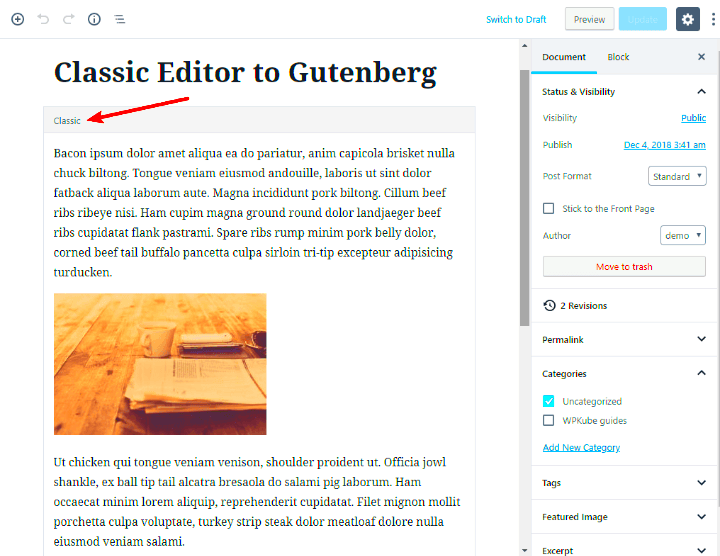
Ready to dive into Gutenberg? Here’s a step-by-step guide to get you started with this powerful editing tool.
First things first, make sure you’re using a version of WordPress that includes the Gutenberg editor. If you have a recent version of WordPress (5.0 or later), you’re good to go!
Here’s a simple breakdown of how to use Gutenberg effectively:
- Creating a New Post/Page:
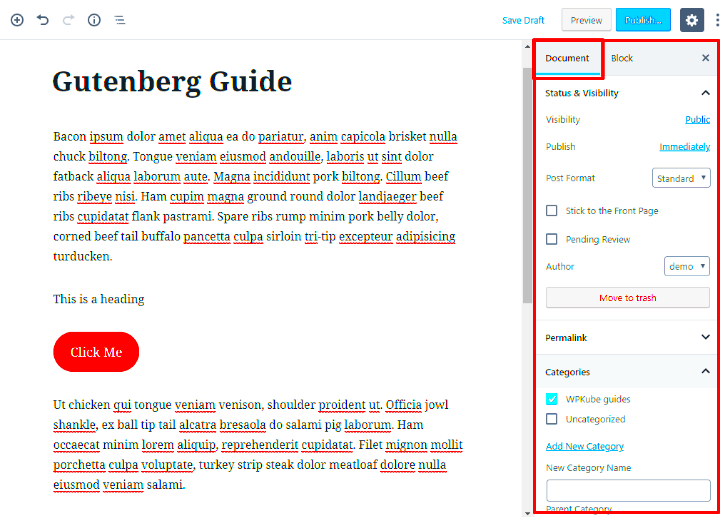
Simply navigate to the dashboard and click on ‘Posts’ or ‘Pages’. Then, select ‘Add New’. You’ll be taken to the Gutenberg editor interface.
- Understanding Blocks:
At the heart of Gutenberg are blocks, which allow you to create different types of content—like paragraphs, images, galleries, or buttons. To add a block, click the plus (+) icon.
- Customizing Blocks:
Each block comes with its unique settings, allowing you to customize the appearance and behavior. You can adjust alignments, colors, and spacing to fit your style.
- Rearranging Blocks:
It’s easy to rearrange blocks; simply drag and drop them to the desired position, making it simple to tweak your layout.
- Preview and Publish:
Before going live, click on the ‘Preview’ button to see your post or page. When you’re satisfied with your creation, hit ‘Publish’.
And there you have it—a quick overview to get started with WordPress Gutenberg! Enjoy the process of creating stunning content with ease!
Exploring the Gutenberg Interface
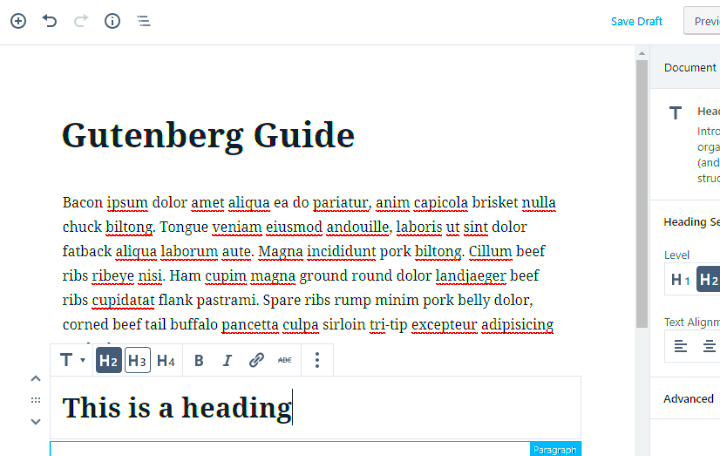
Alright, let’s dive into the Gutenberg interface! When you first open a new post or page in WordPress, you’ll notice a clean and modern layout that favors a streamlined user experience. Here’s a breakdown of the key aspects of the Gutenberg interface:
- The Editing Area: The main editing area is where the magic happens. This is where you’ll write your content and add blocks. It’s designed to be intuitive, allowing for easy navigation and editing.
- The Block Toolbar: When you click on a block, a unique toolbar appears right above it. This toolbar contains various tools specific to that block, such as formatting options, alignment choices, and more. It’s context-sensitive, meaning it changes based on what you’re editing.
- Block Inserter: You’ll find the plus icon (+) at the top-left of the editing area or on the side of each block. Clicking this will open a panel where you can browse and search for various blocks to add to your content.
- Document Settings Panel: On the right side of the screen, you can access document settings. Here you can manage the post’s title, permalink, featured image, categories, and tags. It’s essential for organizing your content effectively.
Additionally, the Gutenberg interface supports a “full-screen mode.” By clicking the ellipsis (three dots) at the top-right corner, you can focus solely on your content without distractions. This feature can be especially beneficial if you’re trying to gain a clearer focus on what you’re writing.
Understanding Blocks in Gutenberg
So, what exactly are blocks? Well, in Gutenberg, everything you create is based on blocks. Think of blocks as building blocks for your content—each one represents a different type of content element.
The most common types of blocks you’ll encounter include:
| Block Type | Description |
|---|---|
| Paragraph | This is the default block for text. Just click and start typing! |
| Image | Easily insert images with options to resize and align them. |
| Heading | Use this block to create headings, which helps with SEO and readability. |
| List | Create bullet or numbered lists to structure your information. |
| Quote | A dedicated block for quotes, allowing for stylized attribution. |
Each block comes with unique settings that you can manipulate to suit your needs. Want to change the background color? Not a problem. Need to adjust the alignment of your text? Just a click away! The flexibility offered by blocks means you can produce visually appealing and well-structured content without much hassle.
Understanding how to use blocks effectively will make your WordPress experience much more enjoyable. The beauty lies in being able to mix and match blocks, so don’t hesitate to experiment until you find the perfect layout for your content!
How to Add and Manage Blocks
Using the Gutenberg editor in WordPress is all about blocks! Think of it like building a webpage with individual pieces, where each piece is a block that holds your content. Adding a block is super simple. Just click the “+” button that appears either on the left side of your editor or right in the empty space where you want to insert it. A menu will pop up showing you a range of available blocks.
Here’s how you can easily add and manage blocks:
- Adding Blocks: Click the “+” sign and search for the type of block you want. You have options like Paragraph, Header, Image, List, and more. Simply click the block name, and voila! It’s added to your post.
- Moving Blocks: Want to reposition a block? No problemo! Just hover over the block until you see the six-dot icon. Drag this icon up or down to move your block around, or use the up and down arrows that appear on the left.
- Deleting Blocks: If you’ve added something by mistake, just click on the block and hit the little “three dots” icon on the toolbar. Choose “Remove Block,” and just like that, it’s gone!
- Managing Block Settings: Each block comes with its own settings menu. Click the block, and then use the toolbar at the top to customize its properties, such as alignment, color, and more.
In short, blocks make it incredibly flexible to create the content you want with just a few clicks. The more you play around with adding and managing blocks, the more comfortable you’ll become!
Customizing Blocks for Your Needs
Personalization is a big deal when you’re crafting your WordPress site! With Gutenberg, each block can be finely tuned to match your vision. Whether you’re looking to change text styles, colors, or even layouts, the options are endless. Here’s how you can customize blocks to fit your specific needs:
- Adjust Block Settings: Once you’ve selected a block, a menu appears on the right side of your screen. This is where you can make a variety of adjustments tailored to that block’s content. For example, with text blocks, you can alter font size, line height, color, and background.
- Advanced Styles: If you want to take customization to the next level, click the “Advanced” section in the block settings. You can add custom CSS classes if you’re familiar with code. This allows for a truly unique style!
- Reusable Blocks: Have a specific block configuration that you love? Save it as a reusable block! Just click on the three-dot menu of the block and select “Add to Reusable Blocks.” This way, you can easily insert the same styled block wherever you need it in the future.
- Experiment with Patterns: Don’t forget about block patterns! These are predefined layouts that save time and effort. Just click on the “+” button, navigate to the “Patterns” tab, and explore all the different designs available. Choose one that speaks to you and tweak it as necessary!
Customizing blocks allows you to create a website that’s not just functional but also visually appealing. So don’t shy away from experimenting – let your creativity shine through!
Using Advanced Features in Gutenberg
If you’re already familiar with the basics of Gutenberg, it’s time to dive into the advanced features that can really elevate your WordPress content creation experience. Gutenberg is packed with tools and functionalities that allow users to create more dynamic and interactive pages. Let’s explore some of these features.
Reusable Blocks: This feature is a game changer for anyone who frequently uses the same type of content. Instead of recreating a block every time you want to use it, you can save any block and turn it into a reusable block. Just click on the three-dot menu in the block toolbar and select “Add to Reusable Blocks.” You can name your block and it’ll be saved for future use.
Block Patterns: If you’re looking for quick design inspiration, block patterns can be your best friend. These are predefined sets of blocks created to help users design pages effortlessly. To access them, click on the “+” button to add a block and navigate to the “Patterns” tab. You’ll find a variety of layouts that can be inserted with a single click.
Custom CSS: For those who have a knack for design and coding, Gutenberg allows you to add custom CSS to individual blocks. Simply go to the block settings and look for the “Advanced” section, where you can input your custom styles. This can help in achieving that perfect look without the need for additional plugins.
Dynamic Content: With development, you can utilize dynamic content blocks. This is particularly useful for displaying data that changes frequently, such as lists of posts or products. The ability to create dynamic content enhances the capability of your website significantly.
By incorporating these advanced features, you can enhance your Gutenberg editing experience and create content that is not only visually appealing but also functional and engaging for your audience.
Creating Complex Layouts with Gutenberg
Complex layouts can seem intimidating, but Gutenberg makes it easier than ever to design stunning pages that grab your visitors’ attention. Whether you’re crafting a multi-column layout, embedding media, or blending text and images, Gutenberg allows you to customize your design seamlessly.
Grid System: Gutenberg includes a powerful grid system that enables you to organize your content into rows and columns. By using the Columns block, you can create side-by-side layouts effortlessly. For instance, you can create a two-column layout by selecting the Columns block and then adjusting the number of columns and their widths as needed.
Group Block: For a more cohesive design, the Group block can be quite useful. This block allows you to group multiple blocks together, so you can apply styling and color settings to the entire group instead of each block individually. This saves time and ensures consistency across your layout.
Cover Block: If you want to add a little flair to your layout, consider using the Cover block. You can use it to create full-width sections with background images or colors. This block not only adds visual interest but also allows text overlays, enabling you to highlight important information.
Nested Blocks: Don’t be afraid to get creative! You can create nested blocks, which enables combining different block types within one another for advanced layouts. For instance, you can place a List block inside a Group block and then add a Button block beside it to achieve a unique design.
With these tools at your disposal, creating complex layouts in Gutenberg can be both thrilling and straightforward. You’ll find that you can build professional-looking pages that are both functional and beautiful, all directly from your WordPress dashboard.
9. Saving and Reusing Blocks with Global Styles
Have you ever worked on a blog post and thought, “I wish I could save this block for later”? Well, with WordPress Gutenberg, you can! This nifty feature allows you to save and reuse blocks across different posts and pages, making your content creation process much more efficient.
To save a block as reusable, simply click on the three vertical dots at the toolbar of the block you want to save. From the dropdown menu, select “Add to Reusable Blocks”. A window will pop up asking you to name your reusable block. Give it a descriptive name so you can easily find it later, and click “Save”.
Once you’ve saved a block, you can access your reusable blocks anytime by clicking on the “Reusable” tab in the block selector. This way, you can sprinkle your saved blocks into your posts without having to recreate them from scratch!
But that’s not all! With Global Styles, you can customize how your reusable blocks look throughout your site. This means that if you change the style of a global block, it automatically updates every instance of that block across your website. Here’s how to do it:
- Go to the Site Editor.
- Select the block you want to customize and adjust its styles.
- Save your changes, and voila! Every instance of that block reflects the new style.
This combination of saving and reusing blocks with Global Styles not only saves time but also ensures consistency in your design, making your content creation experience smooth and enjoyable.
10. Plugins to Enhance Gutenberg Experience
While Gutenberg has significantly improved the WordPress editing experience, there’s always room for enhancements, right? That’s where plugins come into play! A wide variety of plugins can take your Gutenberg experience to the next level by adding extra features and functionalities. Let’s explore some must-have plugins.
| Plugin Name | Description | Key Features |
|---|---|---|
| CoBlocks | A comprehensive collection of content blocks that enhance the Gutenberg editor. |
|
| Stackable | Offers a set of customizable blocks to create stunning layouts without needing to know code. |
|
| GenerateBlocks | Lightweight blocks that allow for simple yet powerful design capabilities. |
|
| Ultimate Addons for Gutenberg | Expanded library of professionally-designed blocks to elevate your content. |
|
Choosing the right plugins can transform your Gutenberg experience, making it more enjoyable and providing you with the tools you need to create stunning content. Experiment with these plugins, and you’ll likely find that they help elevate your website to new heights!
Common Issues and Troubleshooting Tips
Even the most well-designed tools can encounter problems from time to time. When using the WordPress Gutenberg editor, you might run into a few common issues. Don’t worry; these problems are usually straightforward to fix. Let’s take a look at some of the frequent challenges users face and quick tips to resolve them.
- Blocks not loading: If your blocks aren’t loading properly, try refreshing the page or clearing your browser’s cache. Sometimes, a simple refresh can work wonders.
- Conflicts with plugins: Occasionally, certain plugins may conflict with Gutenberg. To troubleshoot this, deactivate all plugins and then reactivate them one by one to identify the culprit.
- Slow performance: If you notice that Gutenberg is running sluggishly, consider reducing the number of installed plugins or evaluating your hosting plan. Poor hosting performance can greatly impact your experience.
- Styling issues: If your blocks aren’t displaying as intended, check your theme’s settings. Some themes may not fully support Gutenberg styles, hence why it’s essential to choose a compatible theme.
- Missing features: Sometimes you might miss features from the classic editor. Explore Gutenberg’s extended options. Don’t forget that many functionalities have been moved or restructured!
For any issues that seem more complex, checking the WordPress support forums can often provide you with guidance and solutions from experienced users. Don’t hesitate to utilize these resources!
Conclusion: Embracing Gutenberg for Better Content Creation
As we wrap up this extensive guide on the WordPress Gutenberg editor, it’s worth taking a moment to reflect on how this tool can revolutionize your content creation process. By adopting Gutenberg, you’re essentially stepping into the future of WordPress—one that emphasizes flexibility, creativity, and ease of use.
With its intuitive block system, you can create visually appealing content with minimal effort. Consider the advantages:
- Enhanced Control: Gutenberg allows you direct control over your layouts, transforming the way you present content.
- Creative Freedom: The ability to add various types of media blocks opens up possibilities for innovative designs that weren’t previously easy to achieve.
- Improved Collaboration: If you’re working with a team, the clarity and separation of content blocks make collaboration smoother and more efficient.
So, whether you’re a seasoned WordPress user or just starting, embracing Gutenberg can significantly enhance your content creation workflow. The more you explore and experiment with its features, the more you’ll discover its potential. Dive in, have fun with your content, and make the most of what Gutenberg has to offer!

