Welcome to the world of WordPress Custom Fields! If you’re looking to enhance your website’s functionality and presentation, understanding custom fields is a crucial step. Custom fields enable you to add additional metadata to your posts and pages, allowing for increased control over how your content appears. Whether you’re a developer or a casual user, this guide will help you grasp the ins and outs of custom fields, making your WordPress experience more robust and personalized.
What are Custom Fields?

Custom fields are like *little containers* for extra information you want to associate with a specific post or page in your WordPress site. They allow you to go beyond the default WordPress fields, giving you the flexibility to include specialized data that suits your content needs. Think of them as a way to attach additional, relevant information to your posts that may not fit into the standard WordPress structure.
Here’s a quick rundown on what custom fields can do for you:
- Add Extra Information: You can include any relevant details about your content.
- Customize Content Display: Modifying how your posts appear based on specific criteria.
- Enhance SEO: Some custom fields can improve your site’s search engine optimization when used properly.
- Integration with Plugins: Many plugins use custom fields to offer extended functionalities.
For instance, you might want to add an “ISBN” number for a book review post or a “Case Study Result” for a project page. The possibilities are nearly endless!
Custom fields usually consist of two parts: the field name (the label) and the value (the information you want to store). With this flexibility, you have the power to tailor your content to meet specific needs.
Benefits of Using Custom Fields

Custom fields in WordPress offer a myriad of advantages that can significantly enhance the functionality and user experience of your website. Let’s break down some of the key benefits of using custom fields:
- Enhanced Content Management: Custom fields enable you to store additional information about your posts or pages, making it easier to manage and retrieve specific data. This can include anything from product specifications to event details.
- Improved SEO: By using custom fields, you can insert meta tags, keywords, and structured data directly into your content. This enhances your site’s visibility on search engines and can lead to increased traffic.
- Customization and Flexibility: Custom fields allow you to tailor your content types to meet your unique needs. For example, if you’re running a recipe blog, you can add fields for cooking time, servings, and ingredients, making your content more user-friendly.
- Efficient Data Organization: With custom fields, you can categorize and organize your content more effectively. This can help in filtering and displaying relevant information based on certain criteria, enhancing the visitor’s navigation experience.
- Dynamic Content Presentation: Custom fields enable you to create dynamic content that changes based on user interaction or environmental factors. For instance, displaying different images or information based on user preferences.
In summary, utilizing custom fields in WordPress is not just about adding extra data; it’s about enhancing your site’s overall functionality, improving user experience, and increasing your content’s search engine optimization.
Types of Custom Fields in WordPress

When it comes to custom fields in WordPress, there are several types you can use to tailor your content. These fields allow developers and content creators to enrich their websites and offer unique functionalities. Here’s a breakdown of the most common types of custom fields:
| Type of Custom Field | Description |
|---|---|
| Text Fields | These allow you to input a single line of text. Great for simple data like titles, URLs, or short descriptions. |
| Textarea Fields | Used when you need a larger text input area, like reviews or longer descriptions. More versatile than text fields. |
| Check Boxes | Checkboxes enable users to select one or more options from a set of choices. Perfect for yes/no questions or features. |
| Select Boxes | A dropdown menu allowing users to select one option from multiple choices. This helps keep forms concise. |
| File Uploads | These fields allow users to upload files, which can include images, documents, or any other type of file. |
| WYSIWYG Editors | What You See Is What You Get editors allow for rich text editing, enabling formatting options like bold, italics, links, and more. |
Each of these custom fields serves a specific purpose and can be utilized based on the requirements of your website. When combined effectively, they can enrich the content and functionality, making your site more appealing to users.
How to Enable Custom Fields in WordPress
Enabling custom fields in WordPress is a straightforward process, but it’s not always obvious, especially for those new to the platform. Custom fields allow you to add additional metadata to your posts and pages, which can be incredibly useful for all kinds of specialized content. Let’s navigate this step-by-step!
First, you’ll want to make sure you’re on the WordPress block editor. If you’re using the classic editor, the process is slightly different, but don’t worry—we’ll cover that too! Follow these steps to enable custom fields:
- Access the Post or Page: Start by navigating to the post or page where you want to utilize custom fields. Simply go to Posts or Pages in your dashboard and select the item you wish to edit.
- Open Options: In the block editor, click on the three vertical dots in the upper right corner of the screen to open the Options menu.
- Select Custom Fields: From the dropdown menu, look for Preferences, then choose Panels. You should see an option for Custom Fields. Make sure to toggle it on.
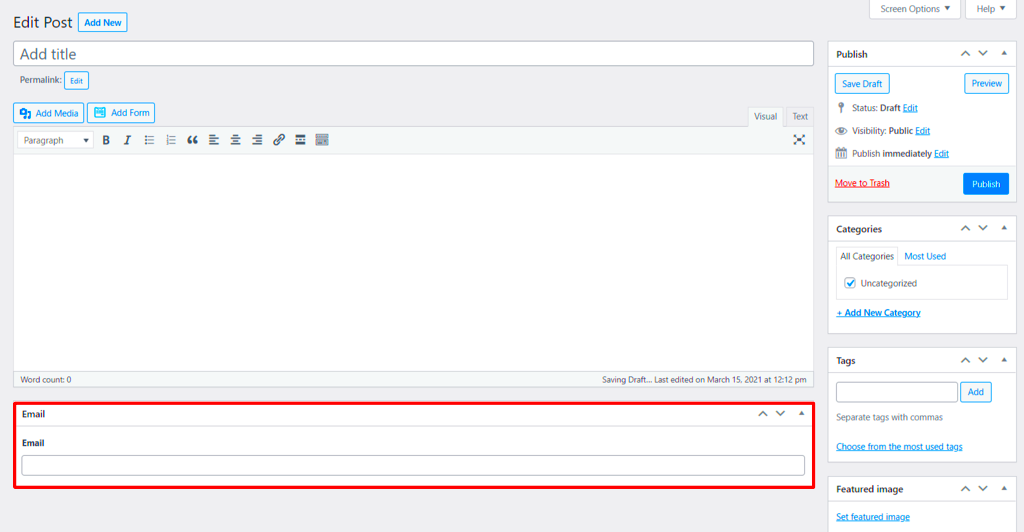
- Add Custom Fields: Now you’ll see a new section below your post content labeled Custom Fields. Here, you can add your custom key-value pairs.
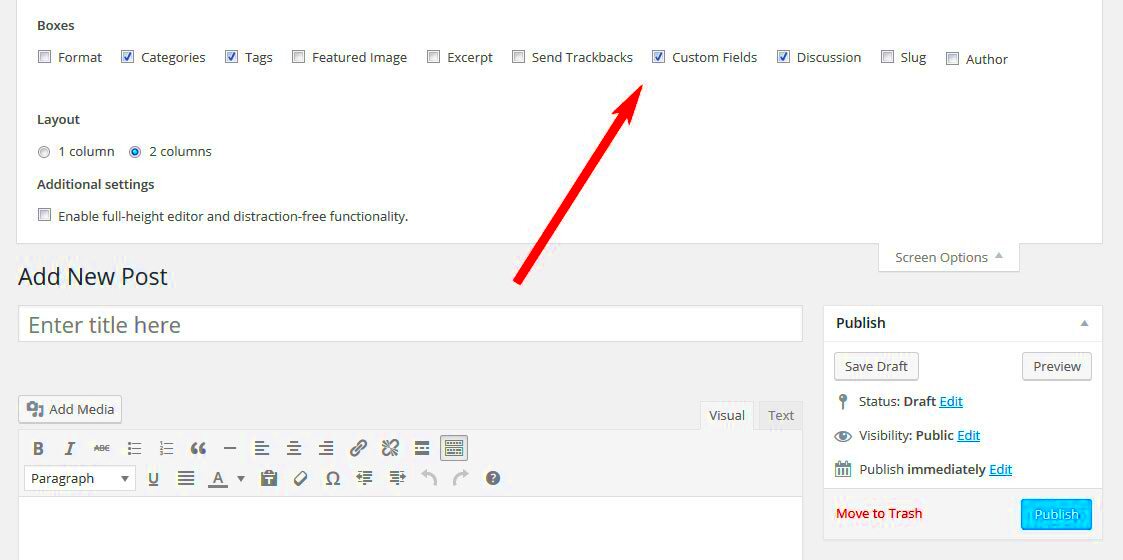
If you’re using the classic editor, you can enable custom fields by going to Screen Options at the top right, and checking the box for Custom Fields. That’s it! You are now set to make the most of WordPress custom fields.
Creating Custom Fields with the WordPress Block Editor
Creating custom fields in the WordPress block editor opens up a realm of possibilities for how you manage and display data. It’s all about enhancing the way information is structured and presented on your site. Ready to dive in? Let’s go!
Once you’ve enabled custom fields, creating them is quite intuitive. Here’s how to add custom fields step-by-step:
- Access Custom Fields Section: After selecting your post or page, scroll down to the Custom Fields area that you previously enabled.
- Add a Key: In the Key field, type the name you want to give to your custom field. This should be unique and descriptive (like Author Rating or Release Date).
- Enter a Value: In the adjacent Value field, enter the content that corresponds to your key. For instance, if your key is Author Rating, you might put in a numerical rating like 4.5.
- Repeat as Needed: You can add multiple custom fields by clicking on the Add Custom Field button. This allows for rich data to be associated with the post.
Remember, custom fields can be accessed and displayed on the front end of your site through templates or shortcodes, which means you’re not just collecting data—you’re also showcasing it. Want to tailor your content experience? Custom fields are the way to go!
7. Using Advanced Custom Fields (ACF) Plugin
When it comes to enhancing your WordPress website with custom fields, the Advanced Custom Fields (ACF) plugin is a game-changer. This powerful tool enables you to create and manage custom fields with ease, allowing for a tailored content management experience. But why should you opt for ACF? Let’s dive into its features and benefits.
- User-Friendly Interface: ACF provides an intuitive interface for creating custom fields. Even if you’re not a developer, you can easily navigate through its features.
- Field Types Galore: Whether you need text fields, images, files, or even complex relationships between posts, ACF has a multitude of field types to choose from.
- Flexible Content Structures: With ACF, you can group fields together in various layouts, creating a flexible editing experience tailored to your project’s needs.
- Conditional Logic: Display fields only when certain conditions are met. This feature makes your editing experience cleaner and more focused.
- Easy Integration: ACF integrates seamlessly with WordPress themes and plugins, making it a versatile choice for any project.
- Community Support: With a thriving community and extensive documentation, if you ever run into trouble, help is just a Google search away.
Overall, using the ACF plugin significantly enhances your ability to customize your WordPress site. Whether you’re a novice or a seasoned developer, ACF arms you with the tools to make your content stand out and engage your audience effectively.
8. Displaying Custom Fields in Your Theme
So, you’ve created custom fields using the Advanced Custom Fields plugin. Now, it’s time to display them on your WordPress theme! While it may seem daunting at first, integrating these fields into your site is quite straightforward. Here’s how you can do it.
First things first, you’ll want to open the theme file where you want to display your custom field data. This is often a single.php or page.php file, depending on where you want your custom content to appear.
Here’s a quick code snippet to help you get started:
<?phpif( have_posts() ) : while( have_posts() ) : the_post(); the_title(); the_content(); $custom_field_value = get_field('your_custom_field_name'); if( $custom_field_value ) { echo '<p>' . esc_html($custom_field_value) . '</p>'; } endwhile;endif;?>In the above code, you should replace your_custom_field_name with the actual name of your custom field. The get_field() function retrieves the custom field value, which you can then display with echo.
To outline the process more clearly, here’s a step-by-step approach:
- Identify the theme file where you want to display the custom field.
- Insert the PHP code snippet where you want the value to appear.
- Check for the existence of the field before displaying it, to avoid errors.
- Style the output with CSS as needed to match your site’s design.
Remember, displaying custom fields not only enhances the user experience but also gives you greater control over how content is presented on your website. Happy coding!
Best Practices for Using Custom Fields
When it comes to using custom fields in WordPress, implementing best practices can make all the difference in how effectively you manage your website’s content. Here’s a rundown of some essential practices you should consider:
- Keep it Organized: Group related custom fields together. Instead of scattering them across the backend, create field groups. This not only makes it easier for you to find them when editing posts but also makes it less overwhelming for other users who may be managing content.
- Use Appropriate Field Types: Make sure you choose the right field type for the data you are capturing. For instance, use drop-down menus for a limited set of options. This not only ensures data consistency but also improves user experience.
- Limit the Number of Custom Fields: While it can be tempting to add a plethora of custom fields, try to keep it concise. Too many fields can lead to clutter and confusion. Aim for essential fields that genuinely add value to your content.
- Validate and Sanitize Data: Always validate and sanitize the input data to protect your site from harmful data and security threats. This is essential for maintaining site integrity and ensuring the safety of your users’ information.
- Document Your Custom Fields: Keep a written record of your custom fields, including their purpose and how to use them. This can be invaluable for future edits, especially if multiple people are involved in managing the site.
- Test Responsiveness: Make sure that the custom fields are responsive and look good on various devices. Testing functionality across mobile, tablet, and desktop can uncover potential user experience issues.
By following these best practices, you can ensure that you’re utilizing custom fields to their fullest potential, making your WordPress site easier to manage and more functional for your users.
Common Use Cases for Custom Fields
Custom fields in WordPress can be a game-changer, offering endless possibilities for content enhancement. Here are some common use cases that you might find beneficial:
| Use Case | Description |
|---|---|
| Product Pages | For e-commerce websites, custom fields can be used to add specific information like size, color, and material for products. |
| Event Management | Custom fields can store details like event date, location, and RSVP links when creating event posts. |
| Team Member Profiles | Add custom fields to include job titles, bios, and social media links for team members on company websites. |
| Testimonials | Add fields for client names, organizations, and testimonials to showcase social proof on your site. |
| Custom SEO Metadata | Use custom fields to enhance SEO by adding unique titles, meta descriptions, and keywords for specific pages or posts. |
These are just a few examples, but the versatility of custom fields means you can adapt them to fit many different needs on your website. The key is to think creatively about how you can use them to improve content structure and user engagement.
Troubleshooting Custom Fields Issues
When diving into the world of custom fields in WordPress, you might encounter a few bumps along the way. Don’t worry; troubleshooting these issues can often be straightforward with a systematic approach.
Here are some common problems and their solutions:
- Custom Fields Not Appearing: This can happen if you haven’t enabled custom fields in your editor. To solve this, go to your post editor, click on “Screen Options” in the upper right corner, and ensure the “Custom Fields” checkbox is selected.
- Data Not Saving: If you enter data into custom fields and it doesn’t save, double-check your post’s status. Sometimes, if a post is in “Draft” mode, it can affect saving. Switching to “Publish” might resolve this.
- Theme Compatibility Issues: If your custom fields are not displaying the way you expect on the front end, it could be a theme issue. Look into your theme’s documentation, or consider switching to a different theme to see if the problem persists.
- Plugin Conflicts: Sometimes, other plugins might interfere with your custom fields. Temporarily deactivate plugins one by one to identify any potential conflicts.
- Custom Fields Not Showing in Admin: If you can’t see custom fields in the admin area, ensure that your user role has the necessary permissions to view custom fields. You might need to adjust user settings or roles.
By following the above steps, you should be able to troubleshoot most issues that pop up with custom fields efficiently. Remember, a systematic approach is often key in resolving these kinds of problems!
Conclusion: Enhancing Your WordPress Experience with Custom Fields
In conclusion, custom fields in WordPress are an incredible tool for enhancing your site’s functionality and user experience. They allow you to add data that is specific to your needs, thereby customizing your posts and pages in a way that out-of-the-box WordPress cannot.
Here are some compelling reasons to embrace custom fields:
- Flexible Content Management: Custom fields give you the flexibility to manage and display content in various innovative ways. Whether it’s adding additional metadata or specific information, custom fields make it easier than ever.
- Enhanced User Experience: By tailoring your content to meet specific needs, you can create a seamless, engaging experience for your visitors. This can lead to longer site visits and improved engagement metrics.
- Better SEO Opportunities: By utilizing custom fields, you can optimize your website for SEO by including additional relevant information that search engines may consider in their algorithms.
- More Efficient Site Management: Custom fields can help streamline content management processes, especially for larger websites or those with multiple contributors.
So, whether you’re looking to improve functionality, enhance user experience, or simply gain greater control over your content, custom fields are the way to go. Dive in, experiment, and watch your WordPress experience transform!


