In today’s digital age, ensuring that everyone can access and interact with your website is more important than ever. That’s where WordPress accessibility comes into play. It refers to the practice of creating websites that are usable by people of all abilities and disabilities. Whether it’s someone who is visually impaired or someone who navigates the web using a keyboard, accessibility ensures that all users can enjoy the content you have to offer. So, let’s dive into some practical tips to make your WordPress site accessible for everyone!
Understanding Alt Text: What It Is and Why It Matters

So, what exactly is alt text? Alt text, or alternative text, is a description that explains the content of an image on your website. It’s not just a nice-to-have; it’s a crucial component of web accessibility and SEO. Here’s why alt text matters:
- Improves Accessibility: Screen readers use alt text to describe images to visually impaired users. Without it, they might miss out on essential info or context that an image provides.
- Enhances SEO: Search engines can’t “see” images the way humans do. Including relevant keywords in your alt text can help improve your site’s search engine ranking.
- Provides Context: If an image fails to load, the alt text will be displayed in its place, giving users an idea of what they’re missing.
- Sets the Tone: Alt text allows you to convey your brand’s voice or mood when images aren’t visible.
When crafting alt text, it’s essential to keep it concise yet descriptive. Aim for 125 characters or less, and try to include specific details about the image that capture its purpose. For example:
| Image Example | Alt Text |
|---|---|
 |
A cute golden retriever playing fetch in the park |
 |
Sunset over a calm lake reflecting vibrant colors |
Remember, better alt text not only helps improve accessibility but also enriches your site’s overall user experience!
How to Add Alt Text to Images in WordPress
Adding alt text to your images in WordPress is a straightforward process, and it’s crucial for ensuring your website is accessible to everyone. Not only does it help those using screen readers understand your content better, but it also contributes positively to your SEO. Let’s break it down step by step!
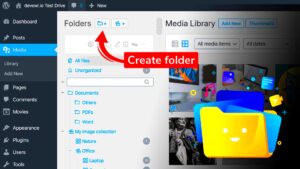
1. Upload Your Image: First, go to your WordPress dashboard and navigate to the media library by clicking on “Media”. You can upload a new image by clicking “Add New” or select an existing image.
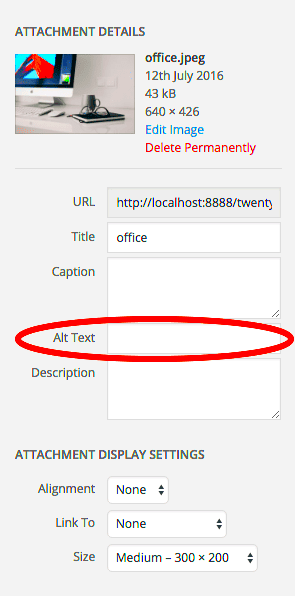
2. Edit the Image: Once you find the image, click on it to open the attachment details. You’ll see a screen with various fields on the right side, including the title, caption, description, and, of course, alt text.
3. Add Alt Text: In the Alt Text field, type a brief description of the image. Make sure your description is concise yet descriptive, providing context to what the image depicts. For example, instead of just “dog,” you could write “a brown Labrador playing in the park.”
4. Update and Save: After you’ve entered the alt text, don’t forget to hit the “Update” button to save your changes. This ensures that your alt text will now be associated with the image on your site.
5. Checking for Accuracy: You can always come back and edit the alt text at any time if you feel it could be improved. Just click on the image again in the media library, and you’ll be back in the editing view.
By following these steps, you can easily add alt text to all your images, enhancing both accessibility and SEO for your website.
Best Practices for Writing Effective Alt Text
Writing alt text might seem simple, but there are some best practices you should follow to ensure your descriptions are effective. Let’s dive into what makes alt text not just good, but great!
1. Be Descriptive and Specific: Your alt text should specifically describe the image. Instead of vague phrases, aim for details. For example, “a smiling woman holding a stack of colorful books” is much better than “a woman.”
2. Keep it Concise: While being descriptive is important, keeping your alt text concise is equally crucial. Aim for a length of around 125 characters. This keeps it digestible for screen readers while still delivering the important information.
3. Use Keywords Wisely: If it fits naturally, incorporate relevant keywords in your alt text. This is beneficial for SEO, but avoid keyword stuffing. It should feel organic, not forced.
4. Avoid Using “Image of” or “Picture of”: Screen readers already announce an image, so there’s no need to begin your alt text with phrases like “Image of.” Get straight to the crucial description.
5. Context Matters: Consider the context in which the image is used. The alt text should reflect the content’s purpose. If the image is purely decorative, it may be appropriate to leave the alt text blank to avoid confusion.
6. Test with Screen Readers: After writing your alt text, test how it sounds using a screen reader to ensure it conveys the right message. This can help you refine your descriptions.
By following these best practices, you can create alt text that not only aids accessibility but enhances the overall quality of your site!
5. Using Accessibility Plugins to Enhance Your WordPress Site
When it comes to making your WordPress site accessible, using the right plugins can be a game-changer. Accessibility plugins can streamline your process and ensure that you cover all bases, making your website more inclusive for everyone. Whether you’re an experienced developer or a newbie, these tools can help enhance your site’s usability and adherence to accessibility standards.
Here are some fantastic accessibility plugins you can utilize:
- WP Accessibility: This plugin adds a variety of enhancements to improve accessibility, including keyboard navigation options and color contrast adjustments.
- Accessible Poetry: A theme that helps you create accessible content easily, making it a breeze to follow accessibility guidelines.
- UserWay Accessibility Widget: This widget provides a suite of accessibility tools such as text resizing, magnification, and color adjustments—all at the click of a button.
- One Click Accessibility: This plugin adds features like skip links, accessible forms, and ARIA landmarks with a simple one-click interface.
When choosing a plugin, consider factors like ease of use, compatibility with your theme, and the specific accessibility needs of your audience. Always remember to test your plugin across various devices and screen readers to ensure it works seamlessly, providing a better experience for all users.
6. Beyond Alt Text: Other Key Accessibility Features in WordPress
While alt text is a foundational element of web accessibility, there’s so much more you can do to ensure your WordPress site is genuinely inclusive. Let’s dive into some essential features and practices that go beyond just adding alt descriptions to images.
Here are some key accessibility features you should consider:
| Feature | Description |
|---|---|
| Semantic HTML | Using proper HTML tags (like headings, lists, and landmark roles) helps screen readers interpret your content correctly. |
| Keyboard Navigation | Ensure that your site can be navigated using a keyboard alone, allowing users who can’t use a mouse to access all areas. |
| Color Contrast | Check that text color contrasts well against background colors to comply with WCAG standards, improving readability for users with visual impairments. |
| Forms Accessibility | Label all form fields clearly and ensure that error messages are understandable, guiding users through the form submission process. |
| ARIA Roles | Implement ARIA (Accessible Rich Internet Applications) roles to provide additional context and information about elements for assistive technologies. |
Incorporating these features can significantly enhance user experience, making your website easy to navigate and understand for everyone. Remember, accessibility is an ongoing process, and continual improvement is key to maintaining an inclusive website.
7. Testing Your Site’s Accessibility: Tools and Techniques
Testing the accessibility of your WordPress site is a critical step in ensuring that everyone, including those with disabilities, can navigate and enjoy your content. There are various tools and techniques available to help you assess and improve your site’s accessibility. Let’s dive into some of the most effective methods.
Firstly, automated tools can quickly identify common accessibility issues. Consider using:
- WAVE: A user-friendly tool that evaluates your web content and highlights accessibility errors.
- AXE: A widely adopted accessibility testing engine that integrates with various browsers and helps pinpoint issues directly in your development workflow.
- Lighthouse: Built into Chrome, this tool provides a comprehensive audit of your site’s performance and accessibility.
However, automated tools have their limitations. It’s also essential to incorporate manual testing methods to capture more nuanced user experience issues. Here are some effective techniques:
- Keyboard Navigation: Attempt to navigate your site using just the keyboard. If you encounter usability issues, it’s a sign you need to improve the keyboard accessibility.
- Screen Reader Testing: Employ tools like JAWS, NVDA, or VoiceOver to navigate your site as visually impaired users would. This testing will reveal how well your content is conveyed.
- User Testing with Diverse Audiences: Include individuals with various disabilities. Their firsthand experiences can provide invaluable insights.
By utilizing a combination of these tools and techniques, you can create a more accessible WordPress site that enhances user experiences for everyone.
8. Conclusion: Embracing Accessibility for a Better Web Experience
As we wrap up our discussion on WordPress accessibility tips, it’s essential to recognize that embracing accessibility isn’t just a legal or ethical responsibility; it’s a pathway to creating a richer web experience for everyone. Making your site accessible means welcoming all users, regardless of their abilities, to engage with your content fully.
Implementing practices like adding alt text to images and thoroughly testing your site’s accessibility ensures that you’re reaching the widest audience possible. It’s about fostering an inclusive online environment that values and respects diversity.
Are you ready to take the plunge? Here are a few steps you can take today:
- Audit Your Site: Use the tools and techniques we discussed earlier to identify areas of improvement.
- Educate Yourself: Stay updated on accessibility standards like WCAG to ensure your site complies and evolves.
- Seek Feedback: Regularly solicit feedback from real users—especially those with disabilities—to refine the experience continually.
In conclusion, by embracing accessibility, you’re not just improving your site’s usability; you’re opening the door to a world of possibilities for countless users. Let’s make the web a better, more inclusive place—together!


