If you’re a WordPress user, you may have heard of Wordfence, a popular security plugin designed to protect your website from various online threats. Wordfence acts like a shield, monitoring your site for malicious activity, unauthorized access attempts, and malware. It offers features like a firewall, malware scanning, and login security, making it a go-to solution for many site owners concerned about their online security. However, there are times when you might need to pause Wordfence temporarily. Let’s explore how that works and why it might be necessary!
Understanding the Need to Pause Wordfence

Pausing Wordfence might sound counterintuitive, especially when your website security is at stake, but there are valid reasons for doing so. Here are some key scenarios where you may need to hit the pause button:
- Uploading Large Files: If you’re trying to upload a substantial file, Wordfence’s active scanning might interfere with the process. Temporarily pausing it can help you avoid frustrating error messages or timeouts.
- Plugin or Theme Installation: When you install new plugins or themes, Wordfence could mistakenly identify the installation as suspicious activity. Pausing the plugin during this time can prevent unnecessary alerts or blocks.
- Routine Maintenance: During site maintenance or updates, there might be various changes happening simultaneously. Pausing Wordfence can allow you to make those adjustments without being hindered by security checks.
- Debugging Issues: If you experience conflicts or errors with your site, pausing Wordfence can help you troubleshoot these issues efficiently without the plugin interfering.
Understanding when and why to pause Wordfence is essential for ensuring that your website functions smoothly while maintaining the necessary security measures in place.
Step-by-Step Guide to Pausing Wordfence

If you need to upload files or make changes to your website, you might need to pause Wordfence temporarily. Here’s a simple step-by-step guide to help you do just that:
- Log into your WordPress Dashboard: Start by accessing your website’s admin area. You’ll usually find it at yourdomain.com/wp-admin.
- Navigate to the Wordfence Plugin: On the left-hand side menu, scroll down until you find the “Wordfence” option. Click on it to expand the menu.
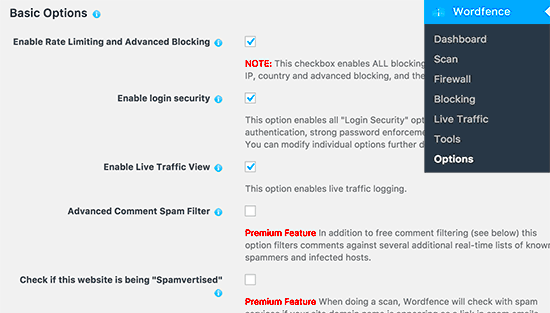
- Go to the Options Page: Under the Wordfence menu, select “Options.” This will take you to a page filled with various settings for your security plugin.
- Find the ‘Web Application Firewall’ Section: Look for the part labeled “Web Application Firewall.” Here, you’ll see an option that pertains to the firewall status.
- Change the Firewall Status: You’ll find a setting that says “Enable/Disable Firewall.” Toggle it to disable the firewall temporarily. Make sure you confirm any prompts that appear.
- Save Changes: Always remember to save your changes at the bottom of the page. Click on the “Save Changes” button to apply the alteration.
- Check Your Site: Once paused, double-check to ensure that Wordfence is indeed disabled. You may want to refresh your site to confirm.
And that’s it! You’ve successfully paused Wordfence, allowing you to proceed with your file uploads without any interruptions.
How to Upload Files Safely While Wordfence is Paused
Now that you’ve paused Wordfence, it’s important to upload your files safely to ensure your site remains secure throughout the process. Here are some essential tips:
- Use secure connections: Make sure you’re using a secure connection (HTTPS) while uploading files. This adds an extra layer of security.
- Scan files before uploading: Before uploading any files, run them through a malware scanner to ensure you’re not introducing any harmful content to your site.
- Avoid large bulk uploads: Instead of uploading multiple files at once, try uploading them one at a time. This minimizes risk and helps you identify any problematic files more easily.
- Check file permissions: Make sure the file permissions are set correctly before uploading your files. Files should generally be set to 644, and directories to 755.
- Keep backups handy: Always have a recent backup of your website before making any changes. This way, if something goes wrong, you can easily restore your site.
Once you’ve completed your file uploads and ensured everything is in good order, don’t forget to resume Wordfence to restore your site’s security features. It’s always better to be safe than sorry!
Reactivating Wordfence After Uploading Files
Once you’ve successfully uploaded your files, the next step is to reactivate Wordfence. It’s as important to turn it back on as it is to pause it, to keep your website secure. Fortunately, the process is pretty straightforward.
To reactivate Wordfence, just follow these simple steps:
- Log back into your WordPress dashboard.
- Navigate to the Wordfence plugin settings, which you can find in the left sidebar.
- Go to Firewall.
- Look for the option to Enable or Reactivate the firewall. This is usually a button at the top of the page.
- Click on it, and voilà! Your security is now back in action.
It’s also worth checking the logs to see if any suspicious activity occurred while Wordfence was paused. Doing this can help you stay one step ahead of threats.
Lastly, don’t forget to recheck all the settings. You might want to review firewall rules or scan preferences to ensure they align with your current security needs.
Best Practices for Managing Wordfence Settings
Maintaining a healthy security setup is crucial for any WordPress site, and Wordfence helps you do just that. Here are some best practices to consider when managing your Wordfence settings:
- Schedule Regular Scans: Regularly scheduled scans can help you catch vulnerabilities before they become a problem. Configure Wordfence to automatically scan your site daily or weekly.
- Watch the Firewall Configuration: Customize your firewall settings based on your business needs. For example, if you’re running an e-commerce site, you’ll want strict security for payment transactions.
- Set Up Alerts: Enable alert notifications for critical issues. This way, you’ll be instantly informed if the plugin detects any malicious activity.
- Update Regularly: Keep both Wordfence and your WordPress installation updated. Updates often patch vulnerabilities and improve security features.
- Review Blocked IP Addresses: Regularly check the list of IP addresses that Wordfence has blocked. Sometimes, legitimate users get blocked; if this happens, you can whitelist them to maintain access.
By following these best practices, you’ll create a robust security environment that gives you peace of mind while you focus on growing your site!
Troubleshooting Common Issues
Even though using Wordfence is relatively straightforward, you might encounter some hiccups while trying to pause it for file uploads. Here’s a list of common issues you may face, along with tips to troubleshoot them:
- Wordfence Does Not Pause: Sometimes when you click to pause, it may not register. Ensure you are logged in as an admin and refresh the page afterward. If that doesn’t work, try clearing your browser cache and cookies.
- File Upload Errors: If uploads are still failing even after pausing Wordfence, it could be another plugin or server setting causing the issue. Deactivate other security plugins and try uploading again. If it works, re-enable the plugins one by one to find the culprit.
- Configuration Change Not Saved: If your settings are not being saved after you pause Wordfence, check if your user account has the necessary permissions, or you may need to disable browser extensions that could interfere with site behavior.
- Unexpected Security Alerts: If you receive unexpected alerts while attempting to upload files, ensure that your firewall rules haven’t changed unexpectedly. Additionally, check your logging settings and thresholds to prevent false alarms during this temporary pause.
If you encounter any of the above issues, consider reading the official Wordfence documentation or reaching out to their support team. Often, a quick consult can save you time and frustration!
Conclusion: Keeping Your WordPress Site Secure
Securing your WordPress site is not just about having a solid plugin like Wordfence; it’s about managing it smartly. After learning how to pause Wordfence for file uploads, you’ve taken a proactive approach to maintain your website while ensuring it remains safe from threats.
Here are a few best practices to keep in mind:
- Regular Updates: Always keep Wordfence and all plugins/themes updated. This helps in patching any vulnerabilities that could be exploited.
- Backup Regularly: Use a reliable backup service. A regular backup can save you from losing your site in case of a security breach.
- Monitor Site Activity: Keep track of any unusual activity. Wordfence provides logs to see if anything suspicious occurs during or after the pause.
- Educate Yourself: Being informed about potential threats and security practices will empower you to make better decisions.
By following these best practices and knowing how to effectively use Wordfence, you can ensure that your WordPress site remains secure while accommodating your workflow. Remember, security is an ongoing process. Stay vigilant!


