Have you ever wondered how businesses manage shipping across different regions effectively? That’s where the WooCommerce Shipping Zone Editor comes into play! This handy tool within WooCommerce allows store owners to define and manage shipping zones easily. It essentially segments your shipping area into various zones, making it simpler to customize shipping rates and methods based on geographic locations.
With the Shipping Zone Editor, you can:
- Create Different Shipping Zones: Set specific zones based on countries, states, or even postal codes.
- Customize Shipping Methods: Define different shipping rates and delivery options for each zone.
- Enhance Customer Experience: Provide accurate shipping costs and delivery times based on a customer’s location.
This tool is vital for any online store that ships to various locations, as it helps ensure that customers receive their orders efficiently and at a cost-effective rate. By using the Shipping Zone Editor, store owners can manage their shipping logistics with precision, catering to the unique demands of each geographical area. In essence, it’s all about tailoring your shipping strategy to maximize satisfaction and efficiency!
Why Use Shipping Zones in WooCommerce?

Now that we understand what the WooCommerce Shipping Zone Editor is, let’s delve into why using shipping zones is essential for your online store. The benefits are abundant, and they all revolve around improving your business operations and customer service.
Here are some compelling reasons to use shipping zones:
- Localized Shipping Rates: Adjust shipping costs based on specific regions. For instance, shipping to nearby areas might be cheaper than to distant ones.
- Custom Shipping Options: Offer tailored shipping methods per zone, such as express shipping or local pickup, giving customers more choices.
- Increased Transparency: Customers appreciate knowing exactly what they’ll pay for shipping. By providing accurate rates based on their location, you build trust.
- Easier Management: Simplifies the process of setting up and adjusting shipping rates, especially if you frequently ship to multiple locations.
- Scalability: As your business grows and expands to new regions, you can easily add new shipping zones to accommodate changes.
Overall, incorporating shipping zones into your WooCommerce store not only streamlines your shipping process but also enhances customer satisfaction, making it an invaluable feature for any eCommerce business.
Accessing the Shipping Zone Editor

Accessing the Shipping Zone Editor in WooCommerce is a piece of cake, even if you’re not a tech wizard. This feature allows you to customize your shipping settings based on geographical areas, ensuring that you can cater to your customers no matter where they’re located. Here’s how to get to it:
- Log into Your WordPress Dashboard: Start by logging into your WordPress admin panel. Make sure you have the correct permissions to make changes to your WooCommerce settings.
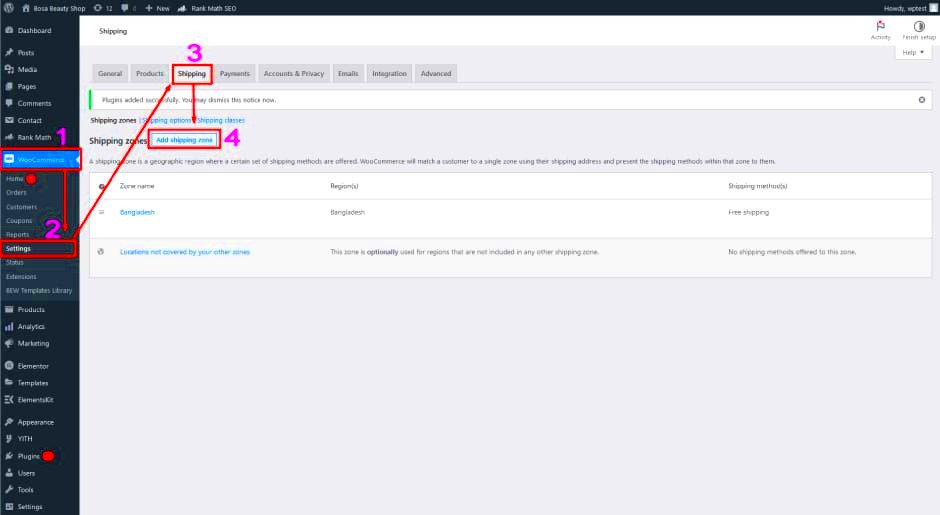
- Navigate to WooCommerce Settings: On the left-hand side, you’ll see a menu. Hover over the ‘WooCommerce’ option and a dropdown will appear. Click on ‘Settings.’
- Select the Shipping Tab: Once you’re in the WooCommerce Settings, look for the ‘Shipping’ tab at the top. Click on it to proceed.
- Access Shipping Zones: After clicking the Shipping tab, you’ll see a section called ‘Shipping Zones.’ Here, you can view existing shipping zones and access the Shipping Zone Editor.
- Edit or Add Zones: To edit an existing shipping zone, just click on the zone name. If you want to create a new one, there’s a button that says ‘Add Shipping Zone’ – this is your golden ticket!
And there you have it! You’ve successfully accessed the Shipping Zone Editor. This powerful tool will allow you to tailor your shipping strategy, making it easier for both you and your customers. So, let’s move on to creating a new shipping zone and really customize your operations!
Creating a New Shipping Zone
Creating a new shipping zone in WooCommerce is like setting up your own little shipping playground. It grants you the flexibility to define how and where you ship your products. Follow these straightforward steps to create your first shipping zone:
- Access Your Shipping Zones: After you’ve navigated to the Shipping Settings, you’ll see a list of existing shipping zones. Ready to create a new one? Click the ‘Add Shipping Zone’ button.
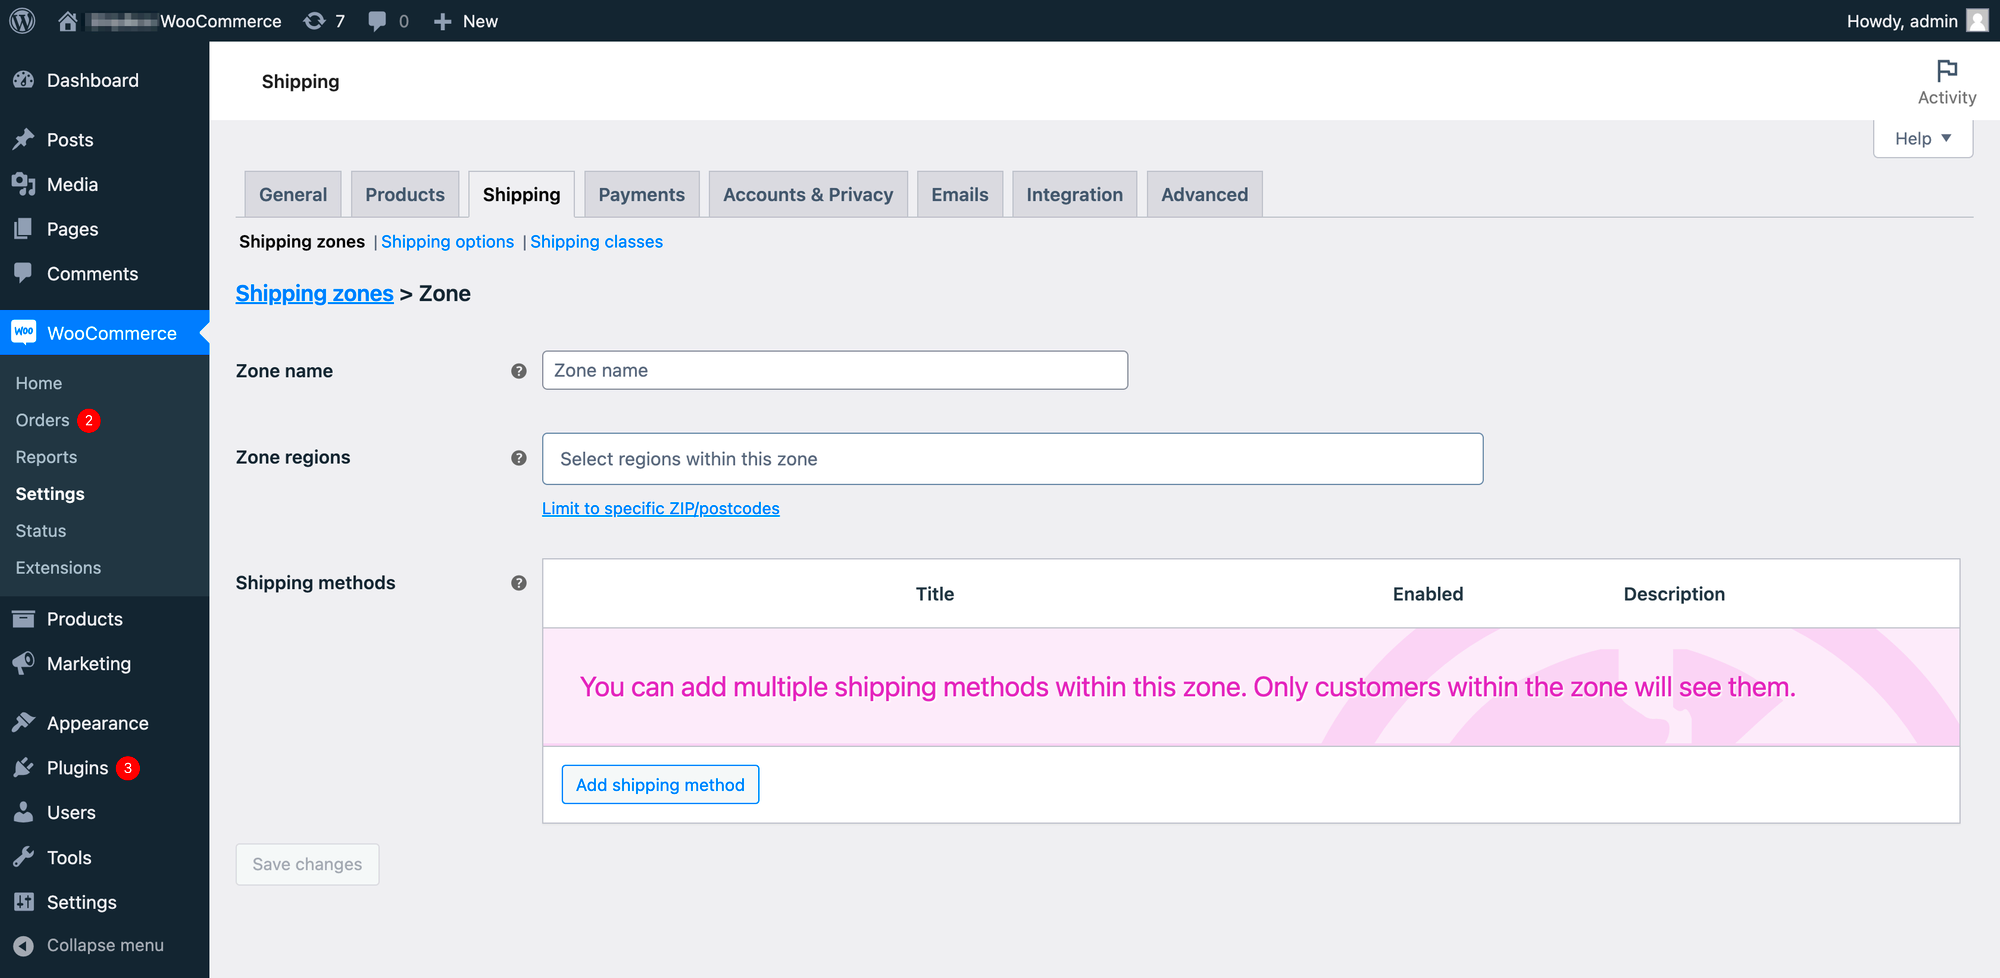
- Name Your Shipping Zone: Give your new shipping zone a catchy name that makes sense to you. This could be something like “North America” or “Europe Shipping.” The name should reflect the geographical area you are targeting.
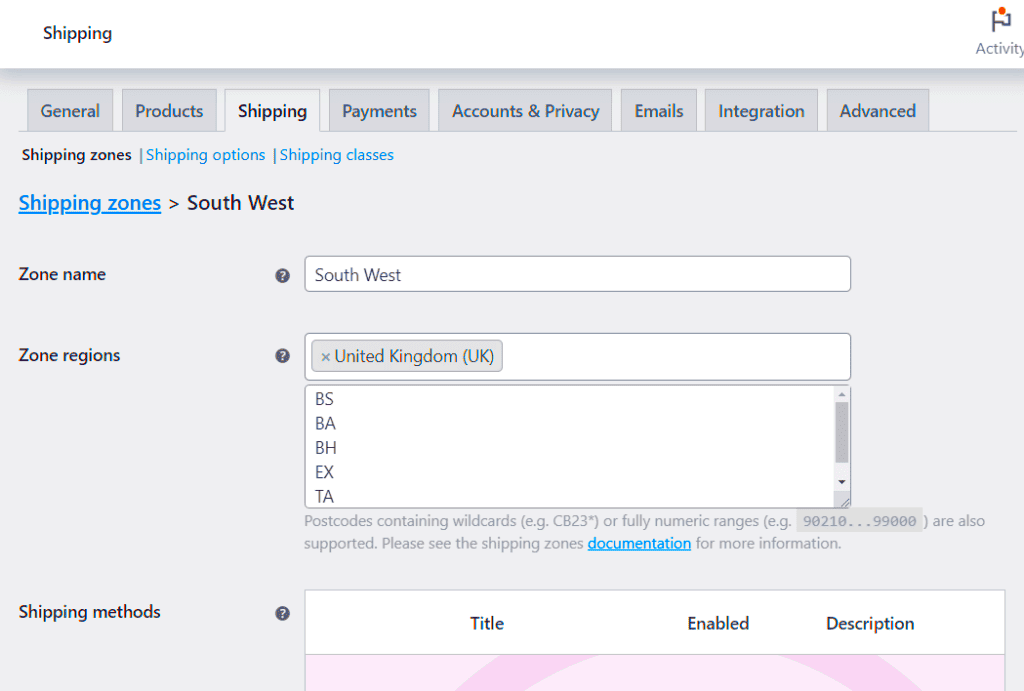
- Select Your Region(s): Under “Zone Regions,” you’ll have the option to specify which countries or states this zone covers. You can add individual countries or entire regions. Just type in the name and select from the dropdown list.
- Add Shipping Methods: Now comes the fun part! After setting your regions, you have to add shipping methods. Click on the ‘Add shipping method’ button, where you can choose from flat rate, free shipping, or local pickup options.
- Configure Your Shipping Method: When you’ve added a method, you can click on “Edit” next to it. Here, you can set prices, define classes, and even add conditions based on cart weight or total cost!
Once you’ve filled out all the details, don’t forget to click ‘Save changes.’ Voilà! You’ve just created a new shipping zone tailored to your business needs. Now, your customers will enjoy a smoother checkout experience based on their geographical location. Happy shipping!
5. Adding Shipping Methods to a Zone
When you’re setting up your WooCommerce store, one of the most important steps is creating a seamless shipping experience for your customers. Adding shipping methods to a zone is a key part of that process. Let’s dive into how to do it smoothly.
First up, you need to access your shipping zones in WooCommerce. To do this, follow these steps:
- Log into your WordPress admin panel.
- Navigate to WooCommerce > Settings.
- Click on the Shipping tab.
- Select the shipping zone you want to edit.
Once you’re in the shipping zone, you’ll see an option to add shipping methods. Click on the Add shipping method button. WooCommerce typically offers a variety of shipping methods, such as:
- Flat Rate: Charge a fixed amount for shipping.
- Free Shipping: Offer no cost on shipping, provided conditions are met.
- Local Pickup: Enable customers to pick up their orders directly from your store.
After selecting a shipping method, you can customize the available options. Don’t forget to click the Save changes button to store your new settings. Adding diverse shipping methods can enhance the shopping experience, so consider your customer base when making these decisions.
6. Configuring Shipping Rates
Now that you’ve added shipping methods to your zones, it’s time to dive into configuring shipping rates. Shipping rates are crucial because they directly affect your bottom line and customer satisfaction. Let’s break down how to set these up effectively!
To configure shipping rates in WooCommerce, start from the shipping method you’ve just added. Each shipping method will have its configuration options. For example, if you selected Flat Rate, doing the following will set your rates:
- Click on the Edit link next to the Flat Rate method in your shipping zone.
- You’ll see fields where you can enter the cost for shipping. You can set a flat fee, a percentage of the total cart, or even define costs based on specific conditions (like products or total weight).
If you offer Free Shipping, it’s crucial to specify the conditions under which it applies, such as:
- A minimum order amount
- A specific coupon code
- Customer’s location (for local deliveries)
Also, consider using the Shipping Class options if your store has varying rates for different types of products. That way, you can create a tailored shipping experience. Be sure to review and save all settings once you’ve configured everything!
Remember, configuring shipping rates accurately can lead to a smoother checkout process, ultimately boosting conversions!
7. Editing Existing Shipping Zones
Editing existing shipping zones in WooCommerce is a straightforward process. Whether you need to modify shipping rates, add new locations, or enhance your customers’ experience, the WooCommerce Shipping Zone Editor provides an intuitive interface to make your changes swiftly. Here’s how you can get started:
- Access the Shipping Zones: Navigate to your WordPress dashboard, select “WooCommerce,” then click on “Settings.” From there, head to the “Shipping” tab. You will find a section for your shipping zones.
- Select the Zone to Edit: You’ll see a list of your existing shipping zones. Identify the zone you want to modify and click on the “Edit” option beside it.
- Adjust Zone Details: Once you’re in the editing interface, you can change various attributes:
- Zone Name: Update this to reflect the changes or new strategy.
- Regions Covered: Add or remove geographic regions, such as countries or specific states.
- Shipping Methods: Modify existing shipping methods or introduce new ones with adjusted rates or services.
- Save Your Changes: After making the necessary adjustments, don’t forget to hit the “Save changes” button at the bottom of the screen. This ensures all your updates are recorded.
Keep in mind that changes in shipping zones can impact customer checkout experiences. It’s a good idea to regularly review your zones, especially during peak seasons or when launching promotions.
8. Deleting Shipping Zones
Sometimes, you might find it necessary to delete shipping zones that are outdated, redundant, or no longer in use. Luckily, WooCommerce makes this process simple and straightforward. Here’s a step-by-step guide on how to delete shipping zones:
- Open Shipping Settings: Similar to editing, begin by going to your WordPress dashboard, selecting “WooCommerce,” and then “Settings.” Click on the “Shipping” tab to access your zones.
- Identify the Zone: Find the shipping zone you wish to delete from the list provided. Take a moment to check that this is indeed the zone you want to remove.
- Delete the Zone: Click the “Delete” option associated with the chosen shipping zone. A confirmation prompt will usually appear, just to ensure you didn’t click on it by mistake. Confirm the deletion.
Important Note: Deleting a shipping zone will permanently remove all settings and methods related to that zone. If there’s any chance you might need this zone in the future, consider editing it to deactivate it rather than deleting it outright.
Once deleted, monitor your shipping processes ensure everything is running smoothly, and consider reaching out to your customers for feedback on their shipping experiences.
Best Practices for Shipping Zones
When it comes to managing your online store, creating efficient shipping zones is crucial. Here are some best practices to ensure that your shipping operations run smoothly:
- Define Clear Geographic Boundaries: Start by identifying the regions you want to serve. Consider state, country, or even postal code options to ensure precise coverage.
- Assess Shipping Costs: Factor in shipping rates when setting up your zones. Use live shipping rates to give customers accurate shipping fees, making your pricing more transparent.
- Offer Multiple Shipping Methods: Different customers prefer different shipping options. Include standard, expedited, and even local delivery methods in your zones to cater to diverse preferences.
- Consider Free Shipping Criteria: If you’re planning to offer free shipping, set a minimum order value specific to each zone to meet profitability criteria.
- Use Testing Tools: Before you finalize your shipping zones, use a testing method to check if the rates are calculated correctly. Consider implementing a staging environment for this purpose.
By following these best practices, you’ll be better positioned to enhance customer satisfaction through efficient shipping experiences. Always keep your zones updated based on shipping trends and customer feedback to maintain relevancy.
Common Issues and Troubleshooting Tips
Even the best-laid plans can sometimes go awry. Here are some common issues you might encounter when working with WooCommerce shipping zones, along with tips on how to resolve them:
| Issue | Description | Solution |
|---|---|---|
| Incorrect Shipping Rates | Customers see different rates than expected during checkout. | Double-check the settings for each zone and ensure that you haven’t accidentally included overlapping zones. |
| Missing Zones | Customers from specific regions cannot check out. | Make sure that all desired geographic areas are included in your shipping zones and adjust as necessary. |
| Conflicting Shipping Methods | Multiple shipping options create confusion during checkout. | Review your shipping methods to avoid duplication and ensure clarity. Simplifying options can enhance user experience. |
| Calculation Errors | Shipping costs do not match what is displayed on the cart. | Clear your cache and refresh any static data. Re-run your shipping calculations to fix this issue. |
If you encounter any persistent issues, don’t hesitate to reach out to WooCommerce support or consult their documentation for further guidance. Ensuring a smooth shipping experience is key to building customer trust and encouraging repeat business!
WooCommerce Shipping Zone Editor: How to Use It
The WooCommerce Shipping Zone Editor is an essential tool for any online store owner who wants to manage shipping effectively. By allowing you to create specific shipping zones, you can streamline your shipping process, cater to different customer needs, and enhance the overall shopping experience. This guide will walk you through the various features of the Shipping Zone Editor and how to utilize them to their fullest potential.
What are Shipping Zones?
Shipping zones are geographical regions where specific shipping methods and rates apply. When setting up your WooCommerce store, you can create different shipping zones based on factors like:
- Country
- State
- Postcode
- City
How to Access the Shipping Zone Editor
To access the Shipping Zone Editor, follow these simple steps:
- Log in to your WordPress admin dashboard.
- Navigate to WooCommerce > Settings.
- Click on the Shipping tab.
- Select Shipping Zones.
Adding a New Shipping Zone
Adding a shipping zone is straightforward:
- Click on Add Shipping Zone.
- Enter the zone name and select regions.
- Add shipping methods for that zone (Flat rate, Free shipping, Local pickup).
- Save your changes.
Managing Existing Zones
To manage existing shipping zones:
- Edit the zone settings.
- Add or remove regions.
- Modify shipping methods as required.
With the Shipping Zone Editor, you have the power to customize your shipping strategy effectively. Tailoring your shipping options to specific locations can help you maximize customer satisfaction and potentially increase conversion rates.
Conclusion: Mastering the WooCommerce Shipping Zone Editor
By understanding and leveraging the WooCommerce Shipping Zone Editor, you can create a seamless and customized shipping experience for your customers, ensuring that they enjoy a straightforward shopping process, which can lead to higher customer retention and satisfaction.


