Welcome to the exciting world of WooCommerce plugin development! If you’re looking to enhance your e-commerce website built on WordPress, you’re in the right place. WooCommerce is a powerful platform that allows you to turn a simple site into a fully functional online store. The ability to develop plugins for WooCommerce means you can customize and extend its functionalities as per your specific needs. In this guide, we’ll take you through the essential aspects to get you started on your plugin development journey.
Understanding the Basics of WordPress and WooCommerce

Before diving into WooCommerce plugin development, it’s crucial to grasp the fundamentals of both WordPress and WooCommerce. Let’s break this down:
What is WordPress?
WordPress is a versatile content management system (CMS) that’s been around since 2003. Here are some key points:
- User-Friendly: It’s easy to use for beginners and has a vast community for support.
- Customizable: Thousands of themes and plugins make it adaptable for any type of website.
- Open Source: WordPress is free, and developers can access its source code to modify it.
What is WooCommerce?
WooCommerce is a popular e-commerce plugin for WordPress that allows you to create and manage online stores. Here’s what makes it stand out:
- Seamless Integration: Easily integrates with WordPress, allowing for a smooth user experience.
- Feature-Rich: Offers essential features like product management, inventory control, payment gateways, etc.
- Extensible: You can build plugins to add specific functionalities tailored to your store.
Understanding these basics will serve as a solid foundation for your venture into WooCommerce plugin development. As you grow more comfortable, you’ll find that the possibilities for customization and creativity are virtually limitless!
Setting Up Your Development Environment
Before diving into WooCommerce plugin development, it’s important to set up your development environment appropriately. This is the foundation that will allow you to build, test, and debug your plugins efficiently. Here’s a simple breakdown of how to get started:
- Choose a Local Server Environment: You’ll need a local server to run your WordPress and WooCommerce installations. Popular options include:
- XAMPP
- MAMP
- Local by Flywheel
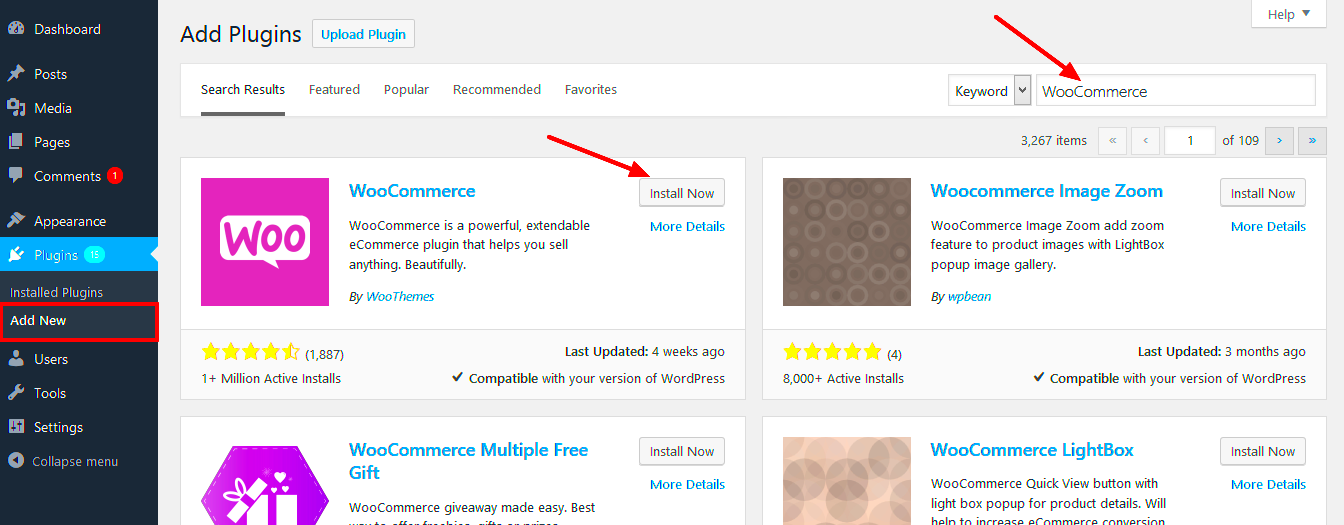
- Install WordPress and WooCommerce: Start by downloading the latest version of WordPress from the official website. Once installed, you can add WooCommerce by navigating to the Plugins section within your WordPress dashboard.
- Get Familiar with a Code Editor: Choose a code editor that suits your style. Some of the top choices among developers are Visual Studio Code, Sublime Text, and Atom. These editors offer features like syntax highlighting and code snippets that make the coding process smoother.
- Create a Version Control System: It’s wise to set up version control using Git. This allows you to track changes and collaborate with others if needed. Websites like GitHub or Bitbucket can help you store and manage your code repositories.
- Set Up Debugging Tools: Consider using debugging tools like Query Monitor or Debug Bar for WordPress. These can help you spot issues during your development process.
By setting up a proper development environment, you’ll be well-equipped to tackle your plugin development journey with confidence!
Creating Your First WooCommerce Plugin
Now that your development environment is primed and ready, it’s time to create your very first WooCommerce plugin! This can be an exciting step in your learning process. Let’s break it down, step-by-step:
- Step 1: Choose a Unique Name: Decide on the name for your plugin. It should be descriptive and unique to avoid conflicts with existing plugins. For this example, let’s call it “My First WooCommerce Plugin”.
- Step 2: Create Plugin Folder: Navigate to the wp-content/plugins directory and create a new folder named
my-first-woocommerce-plugin. - Step 3: Build the Main Plugin File: Inside your plugin folder, create a PHP file named
my-first-woocommerce-plugin.php. At the top of this file, add the plugin header information:<?php / * Plugin Name: My First WooCommerce Plugin * Description: A simple plugin for WooCommerce to get started. * Version: 1.0 * Author: Your Name */ - Step 4: Add Basic Functionality: Let’s add a simple functionality to your plugin. For example, to display a custom message on the WooCommerce product page, you can use the following code:
add_action( 'woocommerce_after_single_product_summary', 'custom_product_message', 5 ); function custom_product_message() { echo '<p>Thank you for checking out this product!</p>'; } - Step 5: Activate Your Plugin: Go to your WordPress admin panel, navigate to Plugins, and you should see “My First WooCommerce Plugin” in the list. Click Activate.
- Step 6: Test and Iterate: Visit a product page on your site and see how your message appears! Continue iterating on your plugin, testing new features as you go.
Congratulations! You’ve taken your first steps into WooCommerce plugin development. Keep experimenting and building to enhance your skills further!
5. Essential WooCommerce Hooks and Filters
When it comes to WooCommerce plugin development, understanding hooks and filters is crucial. These tools allow developers to modify or add functionality without altering the core code, which is super important for maintaining upgradability and compatibility.
So, what exactly are hooks and filters? Let’s break it down:
- Hooks: These are points in the WooCommerce or WordPress code where you can insert your custom code. There are two types:
- Action Hooks: These let you run a function at a specific point during the execution of WordPress. For example, if you want to send a custom email when an order is completed, you might use the
woocommerce_thankyouaction hook. - Filter Hooks: These allow you to alter data before it is sent to the database or displayed on the site. For instance, you can use the
woocommerce_product_titlefilter to change the product title dynamically.
Here are some essential hooks and filters you might want to explore:
| Hook/Filter | Location |
|---|---|
woocommerce_before_main_content |
Before the main content area on the shop page. |
woocommerce_after_main_content |
After the main content area on the shop page. |
woocommerce_cart_subtotal |
Used to modify the cart subtotal. |
Grasping how to leverage these hooks and filters will significantly enhance your plugin development abilities, providing flexibility and power to customize features as needed!
6. Working with WooCommerce Custom Post Types
WooCommerce utilizes custom post types extensively. In fact, every product and order in your store is a custom post type, which gives you a lot of flexibility when developing plugins or themes tailored for WooCommerce.
Understanding custom post types is essential for building effective WooCommerce solutions. Here’s a quick rundown:
- What are Custom Post Types? Custom post types are content types that allow you to create and manage different types of content effectively. In WooCommerce, both products and orders are considered custom post types.
- Why Use Custom Post Types? They help organize your content more efficiently, making it easier to manage product information, reviews, and orders all in one place.
Here’s how you can work with them:
- Register Your Custom Post Type: Use the
register_post_typefunction to define your custom post type. For instance, if you want to create a custom “Events” post type, you would do something like: - Custom Meta Boxes: You can add additional fields to your custom post types to store more information, using the
add_meta_boxfunction.
function my_custom_post_type() { register_post_type('events', array( 'labels' => array( 'name' => __('Events'), 'singular_name' => __('Event') ), 'public' => true, 'has_archive' => true, ));}add_action('init', 'my_custom_post_type');In conclusion, mastering WooCommerce custom post types is a game changer for your plugin development journey. It allows you to expand the functionality of your store significantly, enabling more complex features that can meet a variety of business needs!
7. Managing Plugin Settings and Options
When it comes to WordPress plugins, managing settings and options effectively is crucial. Your users will expect a seamless experience, and a well-structured settings page can make all the difference. So, let’s dive into how you can manage plugin settings and options.
First things first, you’ll want to provide users with a clean and intuitive user interface. Utilize the WordPress Settings API to add your plugin’s settings page. This ensures a consistent look and feel with other plugins. Here’s what you should focus on:
- Group Settings: Organize related options into a single group to avoid overwhelming users.
- Fields for Input: Use various types of fields like text boxes, checkboxes, and dropdown menus to make it easy for users to understand and configure options.
- Validation and Sanitization: Always sanitize user inputs to protect against security vulnerabilities.
- Default Values: Set reasonable default values so that users don’t need to start from scratch.
You might also want to consider utilizing JavaScript for enhanced experiences. Features like collapsible sections for advanced settings can simplify the interface for the average user. Additionally, don’t forget to provide clear instructions or tooltips for each option. Here’s a simple table of common options you might want to include:
| Setting | Description | Type |
|---|---|---|
| Email Notifications | Enable or disable email notifications to admins. | Checkbox |
| Items Per Page | Choose how many products to display on shop pages. | Number Input |
| Custom Message | Set a fallback message when no products are found. | Text Area |
In summary, managing plugin settings and options is about offering a user-friendly interface while ensuring security and functionality. This attention to detail can greatly enhance the user experience and improve your plugin’s reputation.
8. Testing Your Plugin
Now that your plugin is developed and you have managed its settings effectively, it’s time for one of the most critical stages: testing. Testing is essential to identify bugs, usability issues, and overall performance. Think of this as the safety net that ensures your plugin doesn’t crash or cause problems when users install it.
Here’s a straightforward approach to testing your plugin:
- Local Environment Setup: Always test your plugin in a local development environment first. Use tools like XAMPP, Local by Flywheel, or MAMP to create a safe testing ground.
- Use Debug Mode: Turn on WordPress debug mode by adding
define('WP_DEBUG', true);in yourwp-config.phpfile. This will help you spot PHP errors and notices. - Functional Testing: Check all functionalities your plugin offers, from basic setups to more advanced features. Are the settings saving correctly? Do the expected changes reflect in your WooCommerce store?
- Cross-Browser Testing: Ensure compatibility across different web browsers like Chrome, Firefox, and Safari. User experience varies per browser, and you want everyone to have a fantastic experience.
- Performance Testing: Use tools like Query Monitor to track performance. A slow plugin can drive users away.
Furthermore, it’s beneficial to involve others in your testing process. Try to recruit a few beta testers who can provide feedback regarding ease of use and functionality. They might break or find issues you didn’t notice.
In conclusion, thorough testing can save you from significant headaches down the road. It gives your users a smooth experience and builds trust in your plugin. So, roll up your sleeves, and let’s get testing!
Debugging Common Issues in WooCommerce Plugins
Debugging is an essential part of the development process, especially when it comes to WooCommerce plugins. Even the most seasoned developers encounter issues, and knowing how to effectively troubleshoot can save you a lot of time and frustration. Here are some common issues you may face and how to tackle them:
- Conflict with Other Plugins: One of the most frequent issues developers face is conflicts with other active plugins. This can lead to unexpected behavior in your WooCommerce store. To isolate the problem, deactivate all other plugins and activate them one by one to pinpoint the conflict.
- Theme Conflicts: Sometimes, your custom plugin can also clash with the active theme. Switch to a default theme (like Twenty Twenty-One) to see if the issue persists. If it doesn’t, you might need to adjust your plugin’s code to ensure compatibility.
- PHP Errors: Errors in PHP code can cause your plugin to malfunction. Use debugging tools like Query Monitor or enable WP_DEBUG in your wp-config.php file to catch these errors early.
- JavaScript Errors: WooCommerce heavily relies on JavaScript for its frontend functionalities. Use the browser console (accessible via F12) to check for any JavaScript errors that could be affecting your plugin.
- Database Issues: Sometimes, the problem could be related to database queries. Use a tool like phpMyAdmin to inspect your database tables and ensure you’re interacting with them correctly.
To effectively debug your WooCommerce plugins, make use of the logging features WooCommerce offers, as it can provide insights into errors happening during transactions or product updates. Understanding these common pain points can help you create more robust plugins and enhance your skills as a developer!
Best Practices for WooCommerce Plugin Development
Creating a WooCommerce plugin that is efficient, reliable, and secure requires following some best practices. By adhering to these guidelines, not only will you save time during development, but you’ll also ensure that your plugin is high-quality and meets the needs of users. Here are some best practices to consider:
- Follow Coding Standards: Adhering to WordPress coding standards is crucial. This not only makes your code cleaner but also more understandable to others in the community. Be consistent with indentation, naming conventions, and use of comments.
- Utilize Hooks Wisely: WooCommerce is built on WordPress hooks. Make extensive use of actions and filters to modify core functionalities without altering the original files. This approach improves compatibility and makes updates easier.
- Implement Security Measures: Security should be a top priority. Sanitize and validate user inputs to prevent SQL injection and cross-site scripting (XSS). Always use nonces for form submissions to protect against CSRF attacks.
- Optimize Performance: Performance impacts user experience significantly. Optimize your database queries and minimize the use of resource-heavy operations to ensure that your plugin doesn’t slow down the WooCommerce store.
- Maintain Documentation: Proper documentation is key for users and other developers. Provide clear instructions on installation, usage, and troubleshooting. This can significantly enhance user satisfaction and reduce support queries.
- Test Thoroughly: Before releasing your plugin, conduct comprehensive testing. Utilize automated testing, and don’t forget to test in different environments and versions of WooCommerce to identify any compatibility issues.
Incorporating these best practices will not only streamline your development process but also result in a more dependable and user-friendly WooCommerce plugin. Happy coding!
Publishing and Maintaining Your Plugin
Congratulations! If you’ve followed the steps to develop your WooCommerce plugin, you now have something ready to share with the world. However, the journey doesn’t end here. Publishing and maintaining your plugin is just as crucial. Let’s break it down into a few key steps.
First and foremost, preparation is vital. Ensure that your plugin is functioning as expected by conducting thorough testing. Utilize the following checklist to verify its readiness for publication:
- Check for any errors or warnings in the code.
- Test compatibility with different WordPress and WooCommerce versions.
- Ensure your plugin is secure and does not have vulnerabilities.
- Prepare comprehensive documentation for users.
Once your plugin is ready, the next step is publishing it. You can choose between various platforms such as:
| Platform | Description |
|---|---|
| WordPress Plugin Directory | The official repository for free plugins. Great for exposure. |
| GitHub | Ideal for developers who prefer open-source collaboration. |
| Your Own Website | A good option for premium plugins or if you want complete control. |
After publishing, don’t forget about maintenance**. This includes fixing bugs, updating the plugin for compatibility with new WooCommerce updates, and enhancing features based on user feedback. Ask for reviews and engage with your users; this connection can lead to valuable insights that can help you improve your plugin over time.
Conclusion
In the world of eCommerce, a well-developed WooCommerce plugin can be a game-changer. Whether you’re looking to create something unique that enhances the customer experience or adds new functionalities for shop owners, the possibilities are endless. As we wrap up this guide, let’s highlight a few key takeaways:
- Understand the WooCommerce framework thoroughly.
- Focus on clean, efficient coding practices.
- Thoroughly test your plugin before launching.
- Stay engaged with your users for ongoing improvement.
Remember, the development process is an ongoing journey. You won’t just be creating a plugin but also fostering a community around it. Embrace the feedback and keep iterating on your product. As you gain experience, your confidence will grow, and you’ll find that plugin development becomes increasingly exhilarating. So roll up your sleeves, get coding, and share your innovations with the world! You never know—your plugin might just be the next must-have tool for WooCommerce.


