If you’re running a store on WooCommerce, understanding product image sizes is essential for showcasing your products effectively. The right image size not only enhances the visual appeal of your shop but also affects site performance and user experience. In this guide, we’ll walk you through the ins and outs of setting the ideal default product image sizes so you can present your offerings in the best light. Let’s dive in!
Understanding Default Image Dimensions in WooCommerce
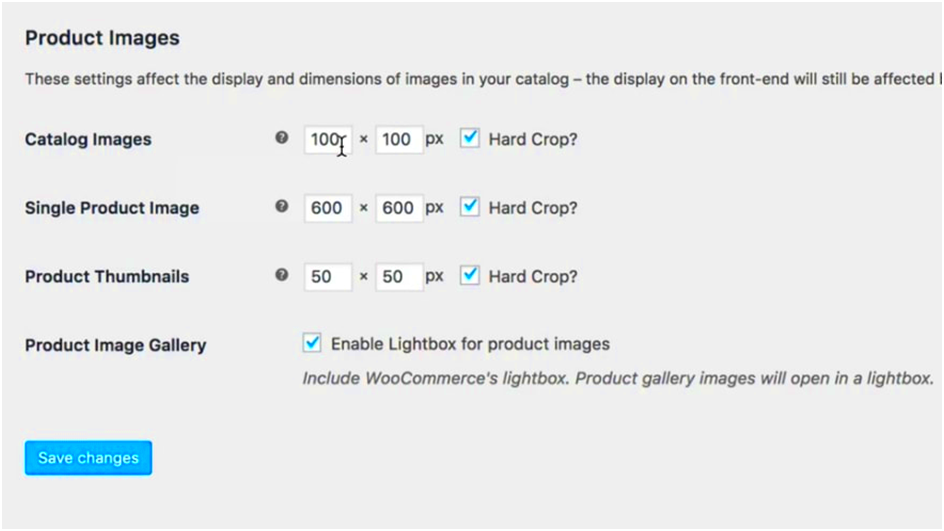
WooCommerce comes with several default image dimensions that help maintain consistency across your online store. These dimensions are divided into three key categories:
- Catalog Images: These images are used on product listing pages and typically display numerous items at once.
- Single Product Images: This size is for the detailed view when a customer clicks on a product to see more information.
- Thumbnail Images: Thumbnails are smaller versions used in various places, including related products and upsells.
Here’s a simple table summarizing the default image sizes:
| Image Type | Default Size |
|---|---|
| Catalog Images | 300 x 300 pixels |
| Single Product Images | 600 x 600 pixels |
| Thumbnail Images | 100 x 100 pixels |
These dimensions ensure that your products look great across various devices. However, you might want to customize these sizes to suit your specific needs or to enhance performance further. Keep in mind that high-quality images boost trust and can lead to higher sales, so make sure to choose dimensions that best represent your products!
Why Image Size Matters for Your Online Store
When it comes to running a successful online store, the size of your product images isn’t just a minor detail; it’s a big deal! Think about it—when shoppers browse your site, they rely heavily on visuals to gauge the quality and appeal of the products you’re selling. So, why does image size matter?! Let’s break it down:
- Load Times: Large images can slow down your website. According to studies, a mere one-second delay in load times can lead to significant drops in conversion rates. Customers are often impatient; if your site takes too long to show product images, they might bounce to a competitor’s site.
- Mobile Responsiveness: More people are shopping on mobile devices than ever before. Having appropriately sized images ensures your website functions perfectly across different screen sizes. Images that are too big can distort or not load properly on smartphones and tablets, leading to a frustrating user experience.
- SEO Benefits: Search engines like Google take into account image optimization when ranking pages. Choosing the right image size and format can help improve your site’s visibility, driving more traffic to your store.
- Professional Appearance: Well-sized images present a polished and professional look to your online store. Blurry or pixelated images can make your business appear untrustworthy. Quality visuals can enhance brand image and credibility.
In short, managing your product image size is crucial for not just aesthetic appeal but also functionality and performance. Investing some time to optimize your images can lead to happier customers and a healthier bottom line. Don’t underestimate the power of picture-perfect product images!
How to Adjust Default Product Image Size in WooCommerce
Now that we understand why image size is so important, let’s dive into how you can adjust the default product image size in WooCommerce. This is a fairly straightforward process, even if you’re not a tech whiz. Here’s how you can do it step by step:
- Navigate to WooCommerce Settings: Start by logging into your WordPress dashboard. On the left-hand side, look for the WooCommerce menu. Click on it, and then select Settings.
- Go to the Products Tab: Once you’re in the settings page, click on the Products tab. This will open up various product-related settings.
- Open the Display Settings: Within the Products tab, navigate to the Display section. Here, you’ll find options for controlling how products are displayed on your site.
- Adjust Image Sizes: Look for Product Images settings. You’ll see fields for adjusting the default image sizes, including the Catalog Image Size, Single Product Image Size, and Thumbnail Size. Input your desired dimensions in pixels. A common sizes to consider are:
- Catalog Images: 300x300px
- Single Product Image: 600x600px or larger
- Thumbnails: 150x150px
- Save Changes: Don’t forget to click the Save Changes button at the bottom of the page!
And you’re done! Adjusting the image sizes is a simple yet effective way to enhance user experience and ensure your store looks its best. Once you’ve made the changes, check your site to see how everything looks—you’re one step closer to an optimized online store!
Using Custom Image Sizes for Different Product Types
When it comes to WooCommerce, not all products are created equal. Some might need a large, high-resolution image to showcase intricate details, while others could do just fine with a smaller thumbnail. That’s where using custom image sizes can really enhance your store’s appearance and functionality!
WooCommerce allows you to set various image sizes for different product types, enabling you to tailor your image presentations for specific needs. Here’s how you can go about it:
- Simple Products: These are your basic items with a single variation. Opt for standard sizes like 300 x 300 pixels for the shop page and 600 x 600 pixels for the product image. This ensures clarity without slow loading times.
- Variable Products: With multiple variations, such as colors or sizes, consider larger images—around 800 x 800 pixels—that allow customers to see each variation beautifully.
- Grouped Products: Similar to simple products but grouped together, you might want each product to have a size of 500 x 500 pixels to maintain a visual consistency.
- External/Affiliate Products: These products lead to an external site; therefore, using a size like 300 x 400 pixels grabs attention while directing to the affiliate link.
By customizing your image sizes this way, you can create a more engaging shopping experience and streamline the loading process, ultimately boosting your store’s performance!
Testing and Optimizing Your Image Settings
Once you’ve set your custom image sizes, it’s crucial to test and optimize them. After all, beautiful images can only do their job if they load quickly and display correctly across all devices.
Here’s a straightforward approach to testing and optimizing your settings:
- Check Load Times: Use tools like Google PageSpeed Insights or GTmetrix to analyze how quickly your product images load. Aim for under three seconds for optimal performance.
- Inspect Device Performance: View your site on multiple devices, including smartphones, tablets, and desktops. Ensure images are responsive and look good on all resolutions.
- Image Formats: Experiment with different image formats. While JPEG is great for photographs, PNG works well for images with transparency, and WebP can dramatically reduce file size while retaining quality.
- Enhanced Compression: Use tools like TinyPNG or Smush to compress images without sacrificing quality. This step can greatly improve load times.
In conclusion, regularly testing and optimizing your image settings enhances user experience and SEO. It’s all about striking the right balance between aesthetics and performance for an engaging shopping experience!
Common Issues and Troubleshooting Tips
When working with WooCommerce, you may encounter some common issues related to product image sizes. Don’t worry; most of these problems can be easily resolved! Let’s explore some frequent hurdles and how to tackle them.
- Image Not Displaying Correctly: This can happen if the image size settings are not configured properly. Ensure you’ve set the right dimensions in the WooCommerce settings.
- Blurry Images: Blurriness often results from improperly sized images. Always upload images that are equal to or larger than the dimensions specified in your WooCommerce settings for optimal quality.
- Images Not Resizing: If your images are not resizing as expected, try regenerating thumbnails. Install the “Regenerate Thumbnails” plugin, and run it to fix any thumbnail issues.
- Slow Loading Times: Large image files can drag your website down. Optimize your images using tools like TinyPNG or WP Smush before uploading them to keep your site speedy.
- Aspect Ratio Issues: Images can look distorted if their aspect ratio doesn’t match what you’ve set in WooCommerce. Always upload images with the same aspect ratio for consistency.
If you run into trouble, try these quick troubleshooting steps:
- Ensure you’ve configured the correct image dimensions in WooCommerce > Settings > Products > Display.
- Check for conflicts with other plugins that might be affecting image loading.
- Clear your cache to make sure you’re viewing the latest version of your site.
With these tips, you should be well-equipped to resolve any image-related issues you might encounter while using WooCommerce!
Best Practices for Product Images in WooCommerce
Quality product images play a crucial role in converting visitors into customers on your WooCommerce website. Here are some best practices to ensure your product images are doing their job effectively.
- Use High-Quality Images: Aim for high-resolution images (at least 800 x 800 pixels). Clear, vibrant images help to attract customers and depict your products accurately.
- Consistent Aspect Ratio: Maintain a consistent aspect ratio across all images. A cohesive look helps create a professional appearance and improves user experience.
- Optimize Your Images: Reduce file sizes without sacrificing quality. Use plugins like WP Smush or Imagify to optimize images before uploading.
- Utilize Multiple Images: Provide multiple angles and views of your products. Allowing customers to see different aspects helps them make informed purchasing decisions.
- Add Alt Text: Don’t forget to add descriptive alt text for each image. This not only improves SEO but also helps visually impaired users understand what your images depict.
Here’s a quick checklist for your product images:
| Checklist Item | Status |
|---|---|
| High-Quality Images | ✔️ |
| Consistent Aspect Ratios | ✔️ |
| Optimized File Sizes | ✔️ |
| Multiple Angles | ✔️ |
| Descriptive Alt Text | ✔️ |
Following these best practices will significantly enhance the appeal of your products and can lead to increased sales in your WooCommerce store!
WooCommerce Default Product Image Size: How to Set It Up
When setting up your WooCommerce store, one of the key factors to consider is the image size of your product listings. Properly sized images not only enhance the visual appeal of your products but also improve the overall user experience. In this guide, we’ll break down how to adjust the default product image size in WooCommerce and why it’s important.
WooCommerce offers default image sizes that can be adjusted to suit your needs. The default image sizes are:
| Image Type | Default Size (px) |
|---|---|
| Single Product Image | 600 x 600 |
| Product Thumbnails | 300 x 300 |
| Catalog Images | 300 x 300 |
To customize these image sizes, follow these steps:
- Go to WooCommerce > Settings > Products > Display.
- Find the section titled Product Images.
- Adjust the pixel dimensions to your preferred sizes.
- Save changes.
- Regenerate thumbnails by going to Tools > Regenerate Thumbnails.
Optimizing your WooCommerce product images can lead to faster loading times, better search engine rankings, and an enhanced visual experience for customers. Properly sized images help in reducing the bounce rate and increasing conversion rates, making it essential for the success of your store.
Conclusion: Enhancing your WooCommerce store’s visual appeal through optimal image sizing not only creates a more attractive shopping experience but also contributes to better performance and engagement ultimately leading to increased sales.


