If you’ve ever struggled to find the perfect font for your web design, you’re not alone. Elementor is a powerful tool that allows web designers to create stunning websites with ease. One of its standout features is the ability to use custom fonts. This means you’re not limited to the default typefaces that come with Elementor or WordPress. Custom fonts can elevate your site’s design, making it unique and aligned with your brand identity. So, let’s take a closer look at what custom fonts are and how you can utilize them effectively in your
Why Use Custom Fonts?

Custom fonts can add a distinct flair to your website, but why should you really consider them? Here’s a breakdown of the compelling reasons to opt for custom fonts in Elementor:
- Brand Identity: Your brand’s personality shines through in every aspect of your website. Custom fonts allow you to express your unique identity more effectively.
- Increased Readability: Some fonts enhance readability better than others. Custom options can help you choose the best fit for your audience.
- Design Consistency: If you’re sticking to a specific aesthetic or style guide, custom fonts can maintain consistency across your web design.
- Stand Out: In a digital landscape filled with similar-looking websites, custom fonts can help set you apart and grab your visitors’ attention.
- Flexibility: With custom fonts, you have a wider range of choices, allowing for more creativity in your designs.
Overall, using custom fonts in Elementor isn’t just about aesthetics. It’s a smart strategy that can enhance user experience and effectively communicate your brand’s message. Now, let’s explore how to implement them seamlessly in your projects!
How to Add Custom Fonts in Elementor

Custom fonts can give your website a unique flair and help you establish a brand identity that stands out. In Elementor, adding custom fonts is a breeze! Here’s how you can do it:
- Step 1: Choose Your Custom Font
Start by selecting the font you want to use. This could be a font you’ve downloaded or one available through a web service like Google Fonts. - Step 2: Upload the Font Files
Navigate to your WordPress Dashboard, then go to Elementor > Custom Fonts. Here, you can upload your font files. Ensure you have the necessary formats, typically .woff, .ttf, or .svg for better browser compatibility. - Step 3: Configure Font Settings
After uploading your font, you can configure settings like font weight, style, and even give it a unique name to use later. - Step 4: Use Your Custom Font in Elementor
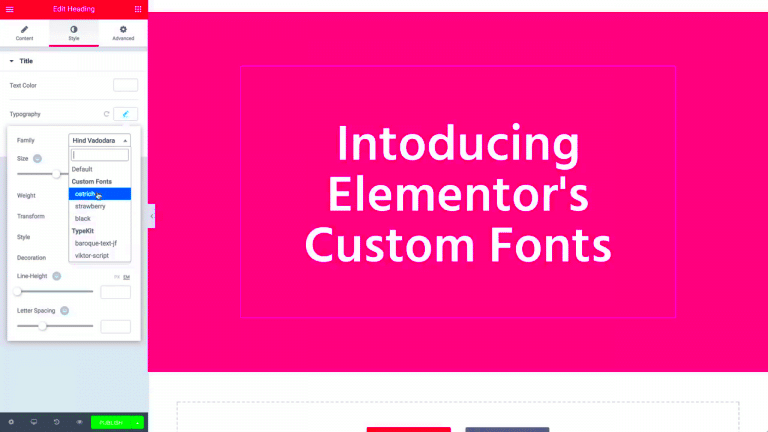
Once your font is uploaded and configured, you can use it in any Elementor widget. Just select the text you want to modify, go to the Style tab, and pick your custom font from the dropdown.
And that’s it! By following these steps, you can easily incorporate custom fonts into your Elementor designs, elevating your site’s visual appeal significantly!
Understanding SVG Files and Their Benefits

Scalable Vector Graphics (SVG) are a widespread graphic format that seamlessly adapts to various screen sizes without losing quality. But what’s the real magic behind SVG files? Let’s dive deeper!
- What are SVG Files?
SVG is an XML-based vector image format. Unlike bitmap images (like JPEG or PNG), SVG files use mathematical equations to represent images, allowing them to be resized infinitely without any pixelation. - Key Benefits of Using SVG Files:
- Scalability: As the name suggests, SVG files can be scaled to any size without losing an ounce of quality.
- Smaller File Size: SVG files are generally smaller than raster graphics, leading to faster load times—essential for user experience and SEO.
- Animation Capabilities: SVG files can be animated with CSS or JavaScript, allowing for creative visual effects.
- Interactivity: SVG files can be interactive, meaning you can use JavaScript to add click events or hover states.
- When to Use SVGs
If you’re dealing with logos, icons, or any graphics that need to scale on different devices, SVGs are your best friend. Keep in mind they’re not perfect for every scenario but shine in web use cases!
In summary, understanding SVG files and their benefits can help you make informed decisions for your web projects, providing a polished and professional look with optimal performance.
How to Use Large SVG Files in Elementor
Using SVG files in Elementor can elevate your design’s aesthetic appeal and responsiveness, but incorporating large SVG files requires some finesse. Before diving in, let’s clarify what SVGs are. SVG stands for Scalable Vector Graphics, and these files are great for logos, icons, and other graphics that need to be scalable without losing quality. Here’s how you can effectively utilize large SVG files in Elementor:
- Upload Your SVG File: Start by navigating to the WordPress dashboard. Go to Media > Add New, and then upload your SVG file. Note that you may need to enable SVG uploads in your WordPress settings if it’s not allowed by default.
- Enable SVG Support: To allow SVG files in Elementor, you might want to install an SVG support plugin. Popular options include “Safe SVG” or “SVG Support.” They ensure that your SVGs are sanitized and safe to use.
- Add SVG to Your Layout: In Elementor, drag-and-drop an Image widget onto your canvas. From the image settings, choose your uploaded SVG file. Voila! Your SVG is now part of your design.
- Customize the Size: Use the Style tab to adjust the dimensions of your SVG to fit perfectly within your layout. Remember, SVGs are scalable, so resizing won’t compromise their quality!
- Check Responsiveness: It’s vital to preview your design on different screen sizes. SVGs should adapt smoothly without pixelation or layout issues.
In summary, using large SVG files in Elementor enhances your website’s design when done carefully. Just ensure you follow the proper steps for uploading and displaying them to maximize their impact!
Best Practices for Optimizing Fonts and SVGs
Optimizing your fonts and SVGs plays a crucial role in enhancing your site’s performance and user experience. Here are some handy tips you can implement:
- Keep SVG Files Lightweight: Whenever possible, simplify your SVGs by removing unnecessary metadata and code. You can utilize tools like SVGOMG for optimization.
- Limit Font Weights & Styles: When using custom fonts, only load the weights and styles you absolutely need. Extra weights can bloat your site’s load time.
- Use Web Fonts Efficiently: When embedding custom fonts, utilize @font-face to load fonts efficiently. It helps lower the number of HTTP requests and speeds up loading time.
- SVG Compression: Compress your SVG files before uploading. Many online tools can drastically reduce file size without sacrificing quality.
- Watch for Unused CSS: Ensure that you’re not loading any CSS associated with fonts or SVGs that aren’t actively being used on your site. Regular cleaning can speed up your site.
- Test Performance: Regularly use tools like Google PageSpeed Insights or GTmetrix to test page performance after making changes. This will help you assess the impact of your optimizations.
By following these best practices, you’ll not only improve your website’s performance but also enhance its visual appeal! Remember, a well-optimized site keeps your visitors happy and coming back for more.
Common Issues and Troubleshooting Tips
When working with custom fonts and large SVG files in Elementor, it’s not uncommon to bump into a few hurdles along the way. But don’t worry! Here, we’ll navigate through those common issues and equip you with effective troubleshooting tips to keep your design journey smooth.
1. Issues with Custom Fonts
If your custom fonts aren’t displaying as expected, consider the following:
- Font File Format: Ensure you’re using web-compatible formats like WOFF, WOFF2, TTF, or OTF. Not all browsers support every format.
- Clear Cache: Sometimes, your browser cache might cling to the old styles. Clear your cache using the browser settings or install a caching plugin.
- Check Font Load Order: Custom fonts should be loaded before they are used in CSS. Verify that your font files are being properly enqueued.
2. Issues with SVG Files
SVG files can enhance your design but can also be a bit tricky:
- File Size: Large SVG files might slow down your site. Use tools like SVGOMG to optimize and reduce file size.
- Security Settings: Some hosting providers might restrict uploading SVG files due to security concerns. Make sure to allow SVG uploads in your WordPress settings.
- Rendering Issues: If your SVG isn’t displaying, double-check that the SVG code doesn’t have any errors, and that it’s properly formatted.
By keeping these tips in mind, you can tackle most issues head-on and enjoy a seamless design process in Elementor.
Conclusion
Incorporating custom fonts and large SVG files into your Elementor projects can significantly elevate your design game. However, it’s important to approach these additions with a solid understanding of the potential challenges you might face. Remember, challenges are part of the journey.
Staying informed about the different file types, sizes, and the necessary settings will save you a lot of frustration. When things don’t go as planned, refer back to the troubleshooting tips outlined above. You’ll find that most issues can be resolved quickly and efficiently.
Ultimately, the creative freedom that comes with custom fonts and SVGs is well worth the extra effort. Don’t be afraid to experiment, and don’t hesitate to reach out to the Elementor community for support. Your next project can be your best one yet, so go ahead and start creating!


