Advanced Custom Fields (ACF) is a popular WordPress plugin that allows users to add custom fields to their posts, pages, and user profiles. These fields are an excellent way to collect and display additional information on your WordPress site. Whether you’re building a blog, a portfolio, or an e-commerce site, ACF provides a flexible and user-friendly way to extend the functionality of
ACF allows you to create custom fields such as text boxes, checkboxes, radio buttons, and more. You can then use these fields to capture specific data from users or add extra details to your content. The plugin is extremely versatile, making it an essential tool for developers looking to tailor their websites to unique requirements. With its intuitive interface, you can easily manage custom fields from the WordPress admin area and customize your site to a level that goes beyond the default WordPress features.
Benefits of Using Advanced Custom Fields for User Registration

ACF can significantly enhance your WordPress website’s user registration process. By adding custom fields to your user registration forms, you can collect more specific data, create more personalized user experiences, and improve the overall functionality of your site.
Here are some key benefits of using ACF for user registration:
- Customization: You can customize user registration forms by adding fields that suit your specific needs, such as additional contact details, preferences, or custom attributes.
- Better User Data Management: With custom fields, you can collect and manage more structured data, making it easier to process and analyze user information.
- Improved User Experience: Providing users with relevant fields makes the registration process smoother and more intuitive, resulting in a better experience.
- Flexibility: Whether you need text fields, drop-down menus, or date pickers, ACF provides a range of field types that you can easily add to your registration form.
Setting Up Advanced Custom Fields Plugin in WordPress

Setting up the Advanced Custom Fields (ACF) plugin is a straightforward process, even for beginners. Follow these simple steps to get started with ACF in WordPress:
- Install the Plugin:
Start by installing the ACF plugin. You can do this by navigating to the Plugins section in your WordPress dashboard. Search for “Advanced Custom Fields” and click “Install Now”. Once the plugin is installed, click “Activate”.
- Create a Field Group:
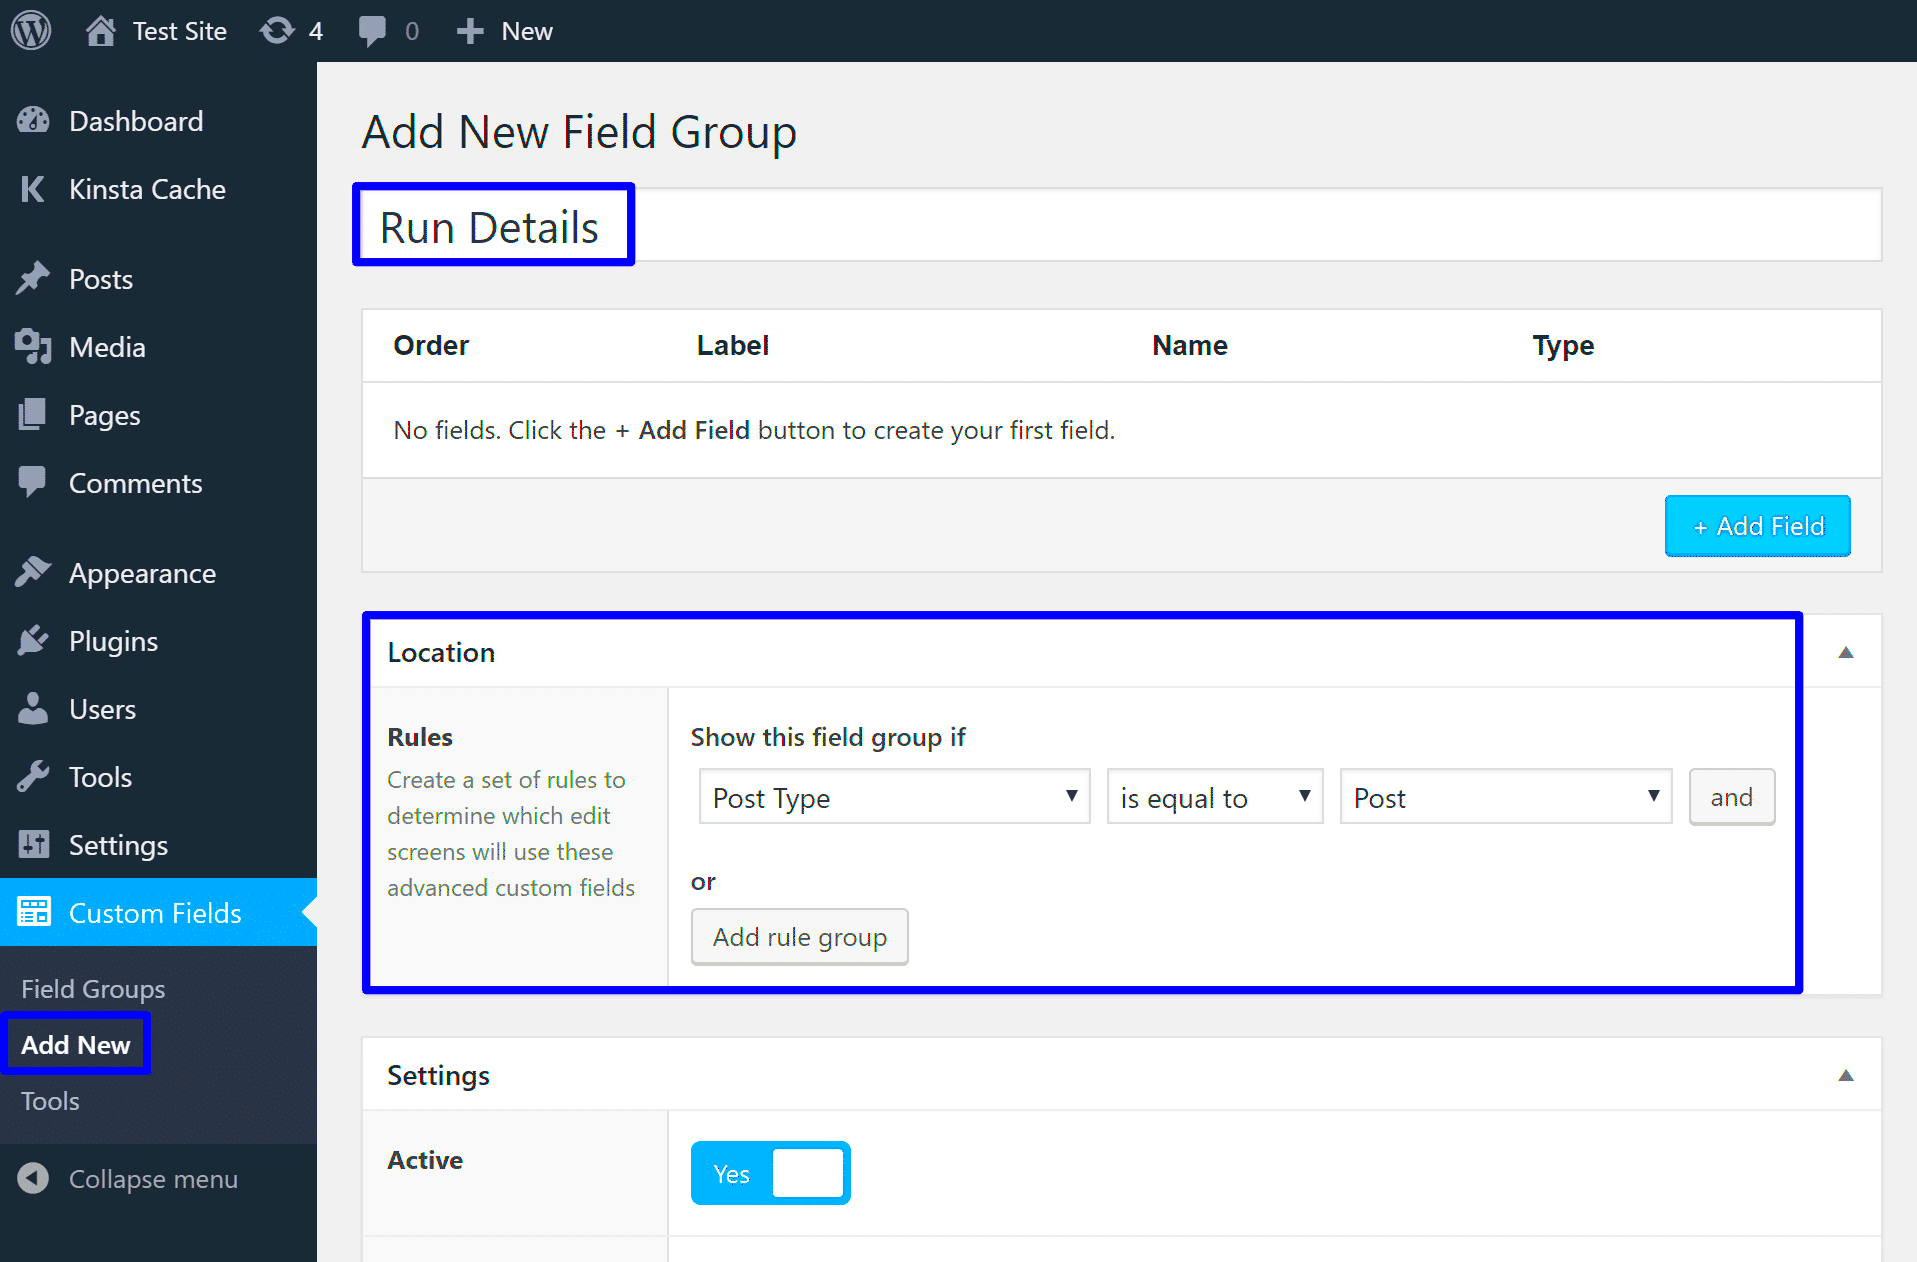
Once ACF is activated, you’ll need to create a Field Group. This is where you’ll add all the custom fields you want to use. To do this, go to Custom Fields > Add New and give your field group a title.
- Add Fields to Your Group:
Next, you’ll add fields to your group. Click the “Add Field” button to start adding different field types like text, number, select, or checkbox. Customize the field settings according to your needs, such as making a field required or adding instructions.
- Assign the Field Group to a Location:
You can choose where your custom fields will appear. For example, you can assign them to user profiles, posts, pages, or even custom post types. This is done by setting the “Location Rules” for your field group.
- Save and Publish:
Once you’ve added all your fields and configured the settings, click “Publish” to make the field group live on your site.
That’s it! You’ve now set up ACF and are ready to start customizing your WordPress site with custom fields.
How to Create Custom User Registration Forms
Creating a custom user registration form is a great way to collect specific information from your users during the registration process. By default, WordPress provides a simple registration form, but with Advanced Custom Fields (ACF), you can easily extend it to capture additional user details that are tailored to your site’s needs.
To create a custom user registration form with ACF, follow these steps:
- Install and Activate the ACF Plugin: First, make sure you have installed and activated the Advanced Custom Fields plugin.
- Create a Custom Field Group: Go to the WordPress dashboard and navigate to “Custom Fields”. Click “Add New” to create a new field group for your registration form. This is where you will define the custom fields that you want to appear in the form.
- Choose Field Types: Add various field types such as text fields, checkboxes, or drop-down menus. Some common fields for registration forms include first name, last name, phone number, and address. Configure each field according to your preferences.
- Assign the Field Group to Users: In the Location Rules section, choose “User” as the location. This will ensure that your custom fields appear in the user registration process.
- Create a Registration Form: Use a custom page template or a plugin like “WPForms” or “User Registration” to display the custom registration form with the ACF fields. You can also use shortcodes to embed the form wherever needed.
- Test the Registration Form: After publishing the form, test it to make sure all custom fields are appearing and working correctly.
By following these steps, you can easily create a custom registration form tailored to your site’s needs and ensure a smooth user experience.
Adding Custom Fields to User Profiles
Adding custom fields to user profiles can help you collect and display additional information about your users. With ACF, this becomes incredibly easy. You can create custom fields that show up on the user’s profile page in the WordPress dashboard or even on the frontend of your site.
Here’s how you can add custom fields to user profiles:
- Create a Custom Field Group: Start by creating a custom field group under the “Custom Fields” menu in the WordPress dashboard. Click “Add New” and give your field group a name.
- Define the Fields: Inside your field group, you can add custom fields like text inputs, checkboxes, or date pickers. For example, you can add fields such as “Biography”, “Profile Picture”, or “Social Media Links”. Each field can be customized with specific instructions or validation rules.
- Assign to User Profiles: Under the “Location” settings, set the location to “User” so that these fields will be displayed in the user profile section in the WordPress dashboard.
- Save and Publish: Once you’ve added the necessary fields, click “Publish” to make them live.
- Display Custom Fields on the Frontend: If you want to display these fields on the frontend of your site (e.g., in a user profile page), you can use ACF’s built-in functions like
get_field()to retrieve the field data and display it where needed.
By adding custom fields to user profiles, you can enhance the information you collect from users and present more personalized content on your site. It’s a simple and effective way to improve user engagement.
Displaying User Data on WordPress Pages
Displaying user data on WordPress pages allows you to show relevant, personalized information to each user. Whether you’re running a membership site, community portal, or e-commerce site, it’s essential to provide users with the option to view their profile information directly on your website.
Here’s how you can display user data on WordPress pages:
- Install ACF and Create Custom Fields: Make sure you have ACF installed, and create the custom fields for user data that you want to display, such as “User Bio”, “Profile Image”, or “Contact Info”.
- Create a Template to Display the Data: You can create a custom page template or modify an existing one to display the user data. For example, you can create a page that displays the logged-in user’s information by using ACF’s
get_field()function. - Use ACF Functions to Retrieve Data: In your template, use the
get_field('field_name')function to retrieve the custom field values associated with the user. For instance, to display a user’s bio, you would useget_field('user_bio')where ‘user_bio’ is the field name you created. - Display Dynamic Data: You can also use WordPress conditional tags like
is_user_logged_in()to ensure that the page only displays the data to logged-in users. This adds a layer of personalization to the user experience. - Show Data in a User Profile Page: Create a dedicated user profile page where users can view and edit their information. You can display a variety of fields, including profile pictures, bios, or contact details, making the page dynamic and relevant.
Displaying user data on WordPress pages gives users an interactive experience and allows them to view or update their information. By following these steps, you can easily personalize your site and make it more user-friendly.
Troubleshooting Common Issues with ACF User Registration
When using Advanced Custom Fields (ACF) for user registration, you may encounter a few common issues. These issues can range from simple configuration mistakes to more complex plugin conflicts. The good news is that most problems are easily solvable with a little troubleshooting. Let’s look at some common issues and how to fix them.
Here are some common issues and solutions:
- Fields Not Displaying on Registration Form: This can happen if the ACF field group isn’t assigned to the correct location. Double-check that you’ve selected “User” as the location in the field group’s settings. Also, ensure that the registration form is correctly integrated into your page or template.
- Custom Fields Not Saving User Data: If custom fields aren’t saving correctly, the issue could be related to user permissions. Make sure that the user role has the necessary permissions to update custom fields. You can also test by disabling other plugins to see if there’s a conflict.
- Plugin Conflicts: Sometimes ACF may conflict with other plugins, especially those related to user registration. If you notice issues after installing or updating another plugin, try deactivating other plugins one by one to identify the culprit.
- Custom Fields Not Appearing in User Profile: If the custom fields are not showing up on the user’s profile, check the field group’s location rules and make sure it’s set to appear in the user profile section. Also, ensure the data is saved correctly in the database.
- Incorrect Field Types or Validation Errors: Make sure the field types you’ve chosen are appropriate for the type of data you expect. For example, if you’re expecting a number, use a number field, and if you need a date, use the date picker field. Additionally, check that validation rules are correctly configured to avoid errors.
By following these tips, you can quickly resolve most ACF-related issues and ensure a smooth user registration experience.
Best Practices for Managing User Data in WordPress
Managing user data efficiently is crucial to maintaining a secure and well-organized WordPress site. Proper management helps ensure that user information is accurate, accessible, and secure, while also complying with privacy regulations such as GDPR. Here are some best practices to help you manage user data effectively.
Follow these tips for effective user data management:
- Use Custom Fields Wisely: Use custom fields to capture additional user information that aligns with your site’s goals. Make sure you only collect necessary data to avoid cluttering your user profiles.
- Regularly Review and Clean Up Data: Over time, your user database can grow and become cluttered with outdated or irrelevant information. Regularly clean up and remove inactive users, duplicate accounts, or outdated information to keep your database organized.
- Implement Strong Data Security: Protect user data with proper encryption and secure login methods. Use SSL certificates for secure communication and enable two-factor authentication (2FA) for additional protection.
- Respect Privacy Regulations: Ensure that you’re following privacy regulations, such as GDPR, when collecting and storing user data. Always get user consent for collecting personal data and provide an easy way for users to access, update, or delete their data.
- Use Plugins for Data Management: Use plugins like “User Role Editor” to manage user permissions and control what data each role can access. You can also use “WP Security” plugins to further protect and monitor user data.
- Backup User Data: Regularly back up your user data to prevent loss in case of a website crash. A reliable backup ensures that all user information can be restored quickly if needed.
By following these best practices, you can ensure that your WordPress site manages user data efficiently and securely, offering a better experience for your users.
Frequently Asked Questions About ACF and User Registration
When implementing Advanced Custom Fields (ACF) for user registration in WordPress, it’s common to have a few questions about how the process works. Below are answers to some of the most frequently asked questions regarding ACF and user registration.
1. Can ACF be used to create custom user registration forms?
Yes, ACF can be used to create custom user registration forms. By adding custom fields to the user registration form, you can collect additional information from users beyond the default fields provided by WordPress.
2. How do I add custom fields to the user profile?
To add custom fields to the user profile, create a new field group in ACF and assign it to display in the “User” location. This will add the fields to the user profile page in the WordPress dashboard.
3. Can I use ACF to show user data on the frontend?
Yes, ACF allows you to display custom user data on the frontend by using functions like get_field(). You can display this data on user profile pages or any other page on your site.
4. Is ACF compatible with all WordPress themes?
ACF is compatible with most WordPress themes. However, depending on your theme’s customization, you may need to tweak template files to display custom fields in the desired locations on the frontend.
5. Can I use ACF to validate user data during registration?
While ACF does not have built-in data validation for user registration forms, you can use additional plugins or custom code to validate user data before it is saved. This can help ensure that only valid data is submitted.
6. How do I troubleshoot if custom fields aren’t saving correctly?
If custom fields aren’t saving, ensure that the correct user permissions are set, and that there are no plugin conflicts. Also, check if the fields are correctly assigned to the user registration form and profile.
These FAQs should help clear up any confusion and provide guidance for using ACF effectively for user registration and data management on WordPress.
Wrapping Up the Guide on Using Advanced Custom Fields for User Registration
In conclusion, integrating Advanced Custom Fields (ACF) for user registration in WordPress can significantly enhance the registration process, providing more flexibility and control over the information collected from users. ACF allows you to add custom fields to user profiles, which helps in tailoring user registration forms to suit your specific needs. Whether you’re running a membership site, eCommerce store, or any other platform requiring user-specific data, ACF offers a simple yet powerful solution.
Throughout this guide, we’ve covered the benefits of using ACF, how to set it up, how to create custom user registration forms, and how to manage the data effectively. We’ve also looked at troubleshooting common issues, best practices for managing user data, and addressed some frequently asked questions about ACF and user registration.
By following the steps outlined here, you should now be able to create a seamless user registration experience with custom fields that suit your specific requirements. As with any tool or plugin, it’s important to regularly test and update your setup to ensure everything is working smoothly and securely.
Remember to adhere to best practices for data security, user privacy, and compliance with regulations such as GDPR to ensure your users’ information remains protected.
By implementing these strategies, you’ll not only improve user engagement but also gather the data you need to create a more personalized experience for your site visitors. ACF offers a great deal of versatility, and once you’ve mastered its features, it will become an essential tool for managing user registration forms in WordPress.


