When it comes to building or redesigning your WordPress website, the menu plays a crucial role in helping visitors navigate through your content. WordPress allows you to create and update menus that control how your site’s pages, posts, and other content are displayed in the navigation bar. These menus are managed through various “menu locations,” which are predefined spaces in your theme where the menus can appear. Understanding these menu locations and how to update them is essential to improving your website’s usability and design. In this post, we will explore why and how you might want to update your
Why You Might Want to Update Menu Locations

Updating your WordPress menu locations can be a simple yet powerful way to improve your website’s layout and user experience. Here are a few reasons why you may want to update the menu locations:
- To improve navigation – A well-organized menu helps users find what they are looking for faster and more easily.
- To align with new content – If you’ve added new pages or sections to your site, you may want to update the menu to reflect these changes.
- To enhance design – Moving your menu to a different location, such as placing it at the top or side of the page, can improve the aesthetic appeal of your website.
- To follow best practices – As web trends evolve, certain menu styles and locations may become more effective in delivering a better user experience.
- To fix theme limitations – Some themes come with limited menu locations, but with customization, you can make your site more flexible.
Understanding the Default WordPress Menu Locations
In WordPress, menu locations are defined by your theme. These locations determine where your menus will appear on your site. Some common default menu locations include:
- Primary Menu – Usually located at the top of the page, often in the header section. This is the main navigation menu that visitors will use to browse your site.
- Secondary Menu – This may appear in the footer or sidebars of your site. It’s used for additional links, such as contact information or social media profiles.
- Mobile Menu – A simplified version of your main menu that appears when your site is viewed on mobile devices.
- Social Menu – Typically used for links to your social media profiles. This menu is often placed in the header or footer of the site.
Each theme can have different default locations, and some may allow you to create custom locations as well. Understanding these locations will help you make decisions on how to structure your menus and optimize user experience.
Steps to Update Menu Locations in WordPress
Updating menu locations in WordPress is a straightforward process, especially when you understand the layout and where to make changes. Whether you’re changing the menu location to better suit your website’s design or simply adding new content, following the right steps will make it easy. Here’s how you can update your menu locations in WordPress:
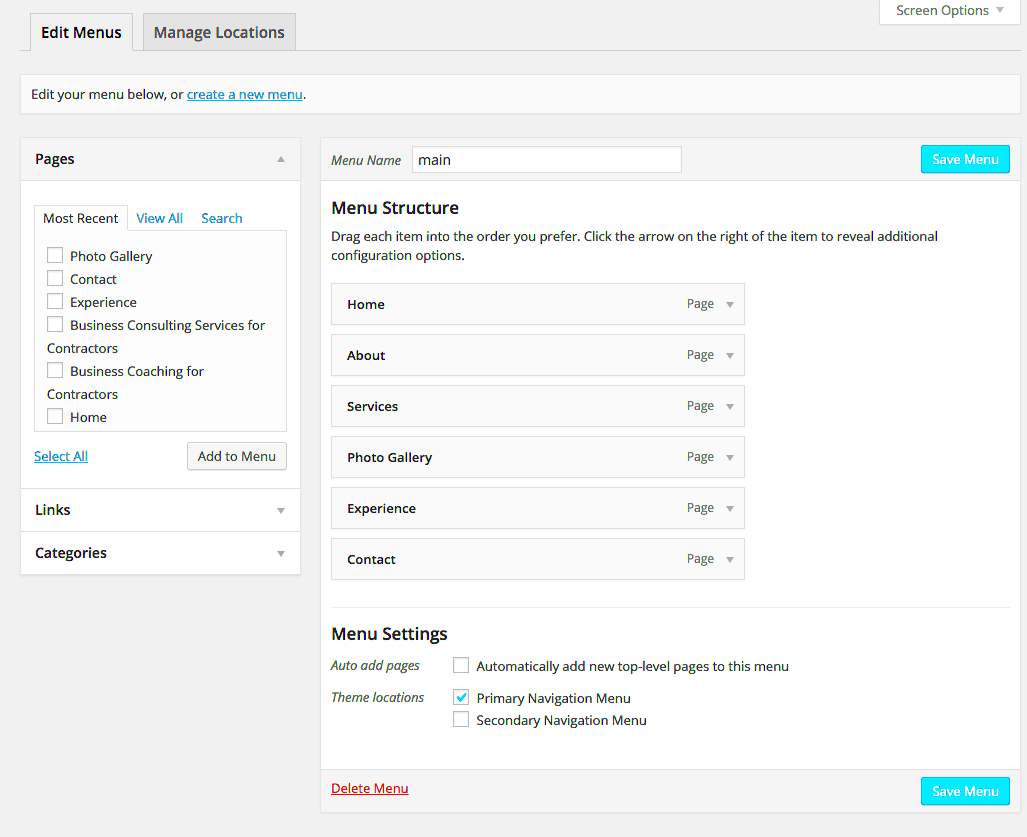
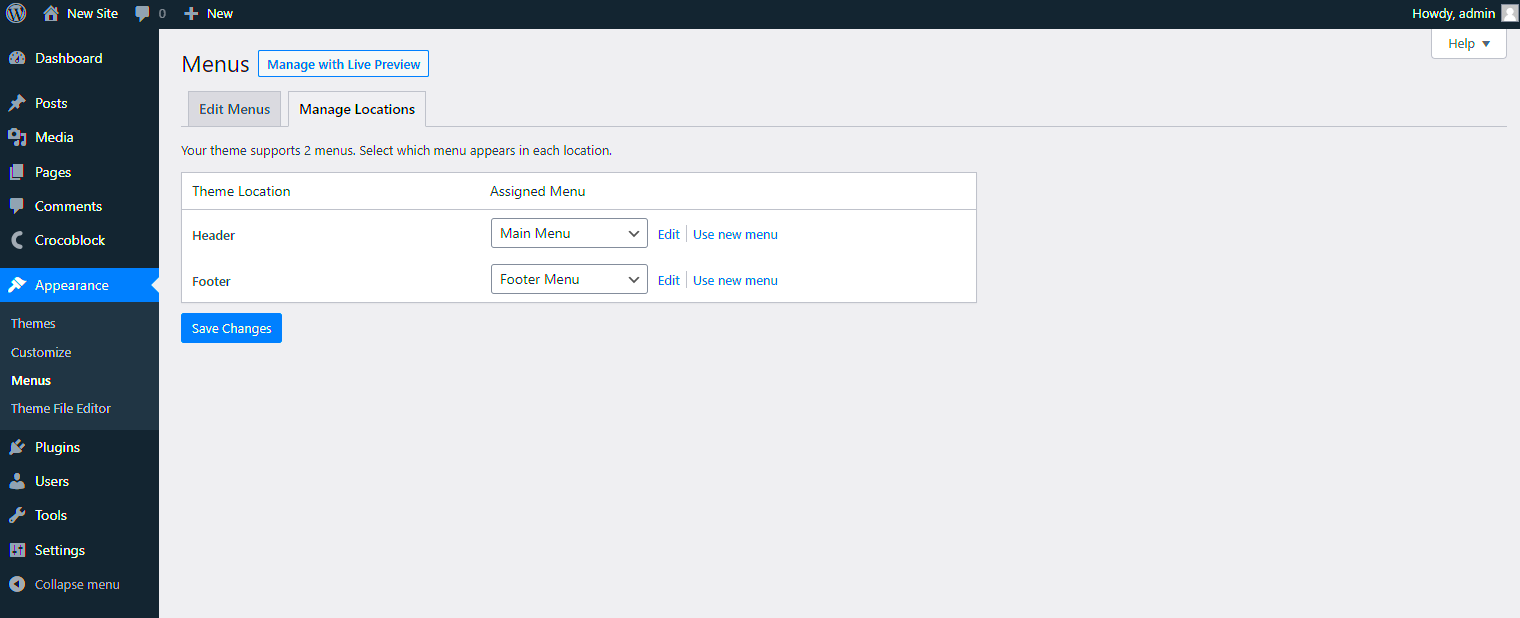
- Access the WordPress Dashboard – Log into your WordPress admin panel. On the left-hand side, you’ll find the “Appearance” menu. Click on it and then select “Menus” from the dropdown.
- Choose the Menu to Edit – If you have multiple menus, select the one you want to update from the dropdown list. You can also create a new menu if necessary by clicking the “create a new menu” button.
- Check Existing Menu Locations – On the menu screen, look for the “Menu Settings” section. Here, you’ll see the available menu locations listed for your theme, like “Primary Menu,” “Footer Menu,” or others.
- Assign Menu Locations – Tick the box next to the location where you want your menu to appear. You can assign the same menu to multiple locations if needed. Click “Save Menu” to finalize the changes.
- Customize Your Menu – If you want to add new items, like pages or custom links, you can use the options on the left side of the menu editor. Simply check the items you want to include, click “Add to Menu,” and save your changes.
That’s it! Updating your WordPress menu locations is easy and only takes a few clicks.
Customizing Menu Locations for Specific Themes
Not all WordPress themes come with the same menu location options, and some may limit your choices. Fortunately, WordPress allows you to customize your menu locations to suit your theme’s design or your preferences. Here’s how you can customize the menu locations for specific themes:
- Check Your Theme’s Menu Settings – Many themes come with predefined locations for menus, which are often displayed in the header, footer, or sidebar. Check your theme’s documentation to see what locations are available.
- Use the Theme Customizer – WordPress provides a Theme Customizer under the “Appearance” tab, where you can modify the appearance of your site. Here, you may find additional options for menu customization, such as moving menus around or adjusting their styles.
- Add Custom Menus in Theme Files – If you’re comfortable with coding, you can add custom menus to specific theme areas. Use WordPress hooks and functions like “wp_nav_menu()” to create custom menu locations. Make sure to add corresponding CSS for the layout adjustments.
- Third-Party Plugins – If you want even more control, consider using a third-party plugin like “Max Mega Menu” or “WP Mega Menu,” which allow you to create more advanced menu structures and assign them to specific locations.
- Override Default Menu Locations – Some themes allow you to override their default menu locations by adding custom locations through the theme’s “functions.php” file. With a little coding knowledge, you can make your theme more flexible.
Customizing menu locations lets you fully personalize your site’s navigation, making it more functional and visually appealing.
Best Practices for Organizing Menu Items
When organizing menu items in WordPress, it’s important to ensure your site’s navigation is intuitive and user-friendly. A well-structured menu makes it easier for visitors to find what they’re looking for and improves overall user experience. Here are some best practices for organizing your menu items:
- Prioritize Important Pages – Place the most important pages at the top of the menu, such as Home, About, Services, and Contact. These are the pages users will likely access the most, so make them easy to find.
- Group Related Pages – If your site has many pages, consider grouping similar items under categories. For example, under a “Products” menu, you could have different categories like “Men’s Clothing,” “Women’s Clothing,” and “Accessories.”
- Use Descriptive Labels – Use clear, descriptive labels for your menu items. Avoid vague terms like “Click Here” or “More Info.” Instead, use labels like “Learn About Our Services” or “View Our Portfolio.”
- Limit the Number of Menu Items – Avoid overwhelming users with too many options. Stick to a maximum of 7-9 main items in the primary menu. If you have more, use dropdowns or submenus.
- Use Dropdown Menus Wisely – Dropdown menus can help organize your content, but use them sparingly. Too many nested items can confuse users. Keep dropdown menus simple and easy to navigate.
- Ensure Mobile-Friendly Navigation – Many visitors will access your site on mobile devices. Make sure your menu items are easy to access and click on smaller screens. Consider using a “hamburger” menu for mobile optimization.
By following these best practices, you’ll create a well-organized menu that helps visitors navigate your website easily, making their experience better and more enjoyable.
Common Issues When Updating WordPress Menus
While updating your WordPress menus is generally a simple task, you may encounter a few common issues along the way. These issues can range from layout problems to navigation issues that can affect the overall user experience of your site. Let’s take a look at some of the most common problems you may face when updating your menus and how to solve them:
- Menu Items Not Displaying – Sometimes, after updating your menu, certain items may not appear on the front end of your website. This could be due to caching issues or the menu being assigned to the wrong location. Try clearing your browser cache or reassigning the menu to the correct location.
- Dropdown Menus Not Working – Dropdown menus may not function properly, especially if they aren’t displaying as expected or the sub-items are not clickable. This is often caused by theme conflicts or JavaScript issues. Make sure your theme is up to date, and check for plugin conflicts that could be causing the issue.
- Menu Styles Breaking – If your theme’s style is not applying correctly after updating the menu, this could be due to CSS issues. Ensure that your custom CSS doesn’t interfere with the default styling or update your theme’s stylesheet to fix this problem.
- Menu Location Not Updating – After updating the menu location, it may still appear in the old spot. This could happen if your theme doesn’t support custom locations or if there’s a caching issue. Check your theme documentation for location support and clear any caching plugins you’re using.
- Incorrect Menu Item Links – Sometimes, after modifying menu items, the links may break or redirect to the wrong pages. Ensure you’re using the correct URLs and recheck the links for accuracy.
If you run into any of these issues, try troubleshooting them by reviewing your theme settings, clearing caches, or disabling conflicting plugins. These steps can usually resolve most menu problems.
FAQ
Here are some frequently asked questions about updating WordPress menus that may help clear up any confusion:
- How can I create a custom menu location? – Creating a custom menu location typically involves editing your theme’s “functions.php” file. You can use the “register_nav_menu()” function to define a new location and then assign it to your menu through the WordPress dashboard.
- Can I have more than one menu in the header? – Yes, many WordPress themes allow multiple menu locations in the header. You can assign different menus to different locations, such as a primary menu on the left and a secondary menu on the right.
- How do I add a new menu item? – To add a new menu item, go to “Appearance” > “Menus,” select the menu you want to edit, and then add items such as pages, posts, categories, or custom links. Once added, click “Save Menu” to update.
- What if my menu isn’t appearing after I update it? – If your menu isn’t appearing after making changes, try checking your theme’s menu location settings, clearing your cache, and ensuring that your theme supports custom menus in the selected location.
- Why are my menu items overlapping? – Menu items may overlap if your menu’s container is not wide enough or if custom CSS is interfering with the layout. You may need to adjust the menu’s container width or fix any conflicting styles in your theme’s CSS file.
Conclusion
Updating and customizing your WordPress menu locations is a simple yet effective way to enhance your site’s navigation and user experience. By following the steps to update menu locations, customizing them for specific themes, and organizing your menu items carefully, you can ensure that visitors can easily find their way around your site. Remember to keep things clear, simple, and easy to navigate, as a well-structured menu will improve both user engagement and satisfaction. If you run into any issues, most problems can be resolved with some basic troubleshooting. With the right approach, your WordPress menus will work seamlessly and complement your site’s design.


