Tracking user logins on your WordPress site can give you valuable insights into user behavior. This feature is not just for keeping tabs on your users but also plays a crucial role in enhancing website security and user experience. By monitoring login activities, you can identify any unusual behavior, prevent unauthorized access, and optimize user engagement strategies.
Whether you run a membership site, an eCommerce store, or a community forum, knowing when users last logged in helps you tailor your content and services to their needs. For instance, if you notice that some users haven’t logged in for a while, you can reach out with personalized emails or special offers to re-engage them.
Ultimately, this feature allows you to build a more secure and user-friendly WordPress site, making it an essential tool for any website owner looking to improve site management and user interaction.
Preparing Your WordPress Site for a New Feature
Before adding any new feature to your WordPress site, it’s essential to ensure that your site is ready for it. A bit of preparation goes a long way in preventing compatibility issues and ensuring a smooth installation process. Here are a few steps to get your site ready:
- Backup Your Site: Always take a full backup of your WordPress site. Use plugins like UpdraftPlus or BackupBuddy to save your database and files.
- Update WordPress Core and Plugins: Make sure your WordPress core, themes, and plugins are up-to-date. This minimizes the risk of conflicts with new features.
- Test on a Staging Site: If possible, use a staging environment to test new features. This ensures that your live site remains unaffected during setup.
- Check User Roles and Permissions: Review your current user roles to make sure they align with the new login tracking feature you’re about to implement.
Once your site is prepared, you can confidently proceed with adding the last user login feature, ensuring it integrates seamlessly with your existing setup.
Choosing the Right Plugin for Last User Login Tracking
Adding a last user login feature to your WordPress site can be done quickly with the help of plugins. However, selecting the right plugin is crucial to get the best functionality without slowing down your site. Here are some popular options to consider:
| Plugin Name | Key Features | Pricing |
|---|---|---|
| WP Last Login | Displays last login data in the user list, lightweight, easy to use | Free |
| Simple History | Tracks user logins, changes, and more, with detailed logs | Free with Pro version |
| Activity Log | Comprehensive user activity tracking, email alerts, and reports | Free with premium add-ons |
When choosing a plugin, consider factors like ease of use, compatibility with your WordPress version, and the level of support offered. If you’re looking for a simple solution, WP Last Login is a great choice, while Activity Log offers more advanced tracking capabilities for those who need detailed user insights.
Once you have selected the plugin that best fits your needs, you can proceed with installation and setup, which we will cover in the next section.
Installing and Activating the Last User Login Plugin
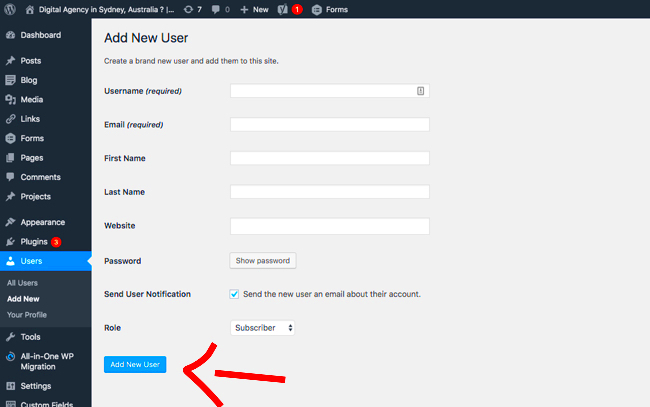
Once you’ve chosen the right plugin for tracking user logins, the next step is to install and activate it on your WordPress site. This process is simple and can be done directly from your WordPress dashboard. Here’s how you can do it:
- Log in to Your WordPress Admin Area: Go to your website’s admin dashboard by entering
/wp-adminat the end of your site’s URL. - Navigate to Plugins: Click on Plugins in the left-hand menu and select Add New.
- Search for the Plugin: In the search bar, type the name of your chosen plugin, such as WP Last Login or Activity Log.
- Install the Plugin: Once you find the plugin, click on the Install Now button. Wait a few moments for WordPress to download and install the plugin.
- Activate the Plugin: After installation, click Activate to enable the plugin on your site.
That’s it! You’ve successfully installed and activated the last user login plugin. You’ll now see a new menu item or settings option related to the plugin in your dashboard, depending on which one you chose.
Remember, always check the plugin’s documentation for any additional setup instructions to ensure optimal performance. Most plugins come with easy-to-follow guides that can help you get started quickly.
Setting Up the Plugin for Tracking User Activity
After installing and activating the plugin, it’s time to set it up to start tracking user activity. This configuration process varies slightly depending on the plugin you chose, but most follow a similar pattern. Here’s a general guide to get you started:
- Go to the Plugin Settings: Navigate to the plugin settings, usually found under Settings or as a separate menu item in your WordPress dashboard.
- Enable Login Tracking: Look for an option to enable user login tracking. Check the box or toggle the switch to activate this feature.
- Customize Tracking Preferences: Some plugins allow you to customize what information is tracked. For example:
- IP Address: Track the IP address of users when they log in.
- Login Time: Record the exact time and date of each login.
- User Roles: Choose to track specific user roles, like administrators, editors, or subscribers.
- Save Changes: Don’t forget to save your settings after making adjustments. Look for a Save or Update button at the bottom of the page.
Once you’ve configured these settings, your plugin will start tracking user login activities automatically. This data can be very useful for security audits, engagement analysis, and improving your overall website management.
Displaying Last User Login Information in the WordPress Dashboard
One of the best features of these plugins is their ability to display user login information directly in your WordPress dashboard. This allows you to quickly check the last login time of any user without having to dig through logs. Here’s how you can view this data:
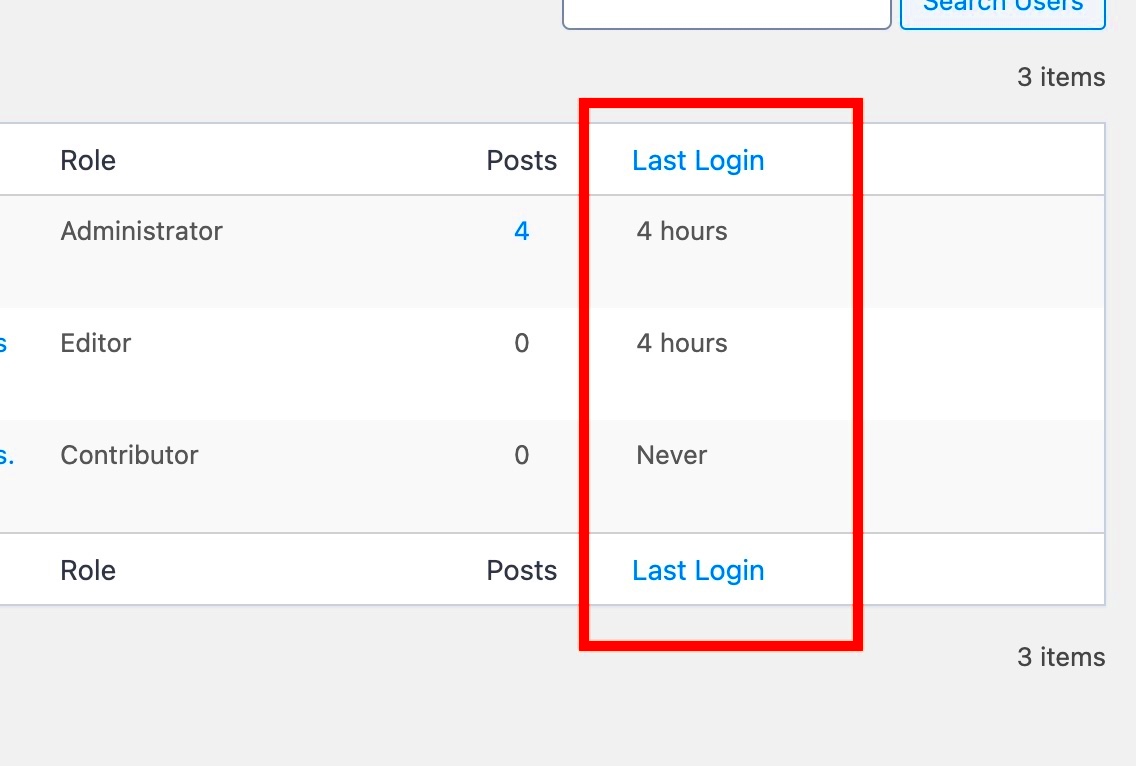
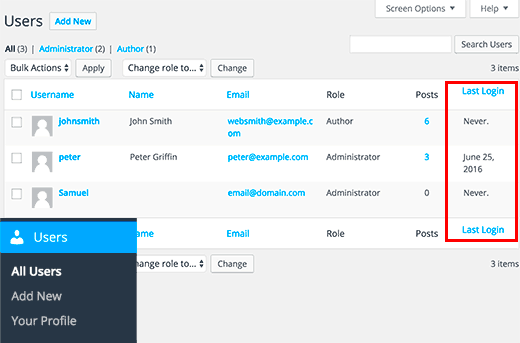
- Go to the Users Section: Navigate to Users in your WordPress dashboard. You will usually see an additional column labeled Last Login added by the plugin.
- Check the Login Data: The new column displays the date and time of the last login for each user. This is especially useful for monitoring user activity at a glance.
- Access Detailed Reports: Some plugins offer detailed reports. Look for a Reports or Activity Logs section where you can view more comprehensive data, including login history and failed attempts.
If you want to display this information on the front end of your website, some plugins provide shortcodes or widgets. These can be added to pages, posts, or sidebars to show user activity information to logged-in users or site admins.
Having this feature integrated into your dashboard not only improves site management but also helps in enhancing the security and engagement of your WordPress site.
Advanced Customization Options for User Login Data
Once you’ve got the basics of tracking user logins set up, you might want to explore advanced customization options to get even more out of this feature. Many plugins come with powerful settings that let you fine-tune how login data is collected, displayed, and utilized. These customizations can help you align the feature with your specific website needs. Let’s explore some of the popular options:
- Custom User Roles: If your website uses custom user roles (like “VIP Member” or “Premium Subscriber”), you can choose to track logins specifically for these roles. This is great for membership sites and online communities.
- Email Notifications: Get automatic email alerts whenever certain users log in. This is particularly useful for monitoring admin or high-level accounts for security purposes.
- Data Export: Export user login data to CSV or Excel files for detailed analysis. This can be helpful for auditing, reporting, or sharing data with team members.
- Restrict Login Access: Set up rules to restrict access based on login frequency or inactivity. For example, you can lock accounts that haven’t logged in for over 30 days.
- Integrate with Analytics Tools: Some advanced plugins allow integration with third-party analytics tools like Google Analytics, enabling you to track user behavior beyond login times.
These advanced features not only enhance the functionality of your WordPress site but also give you greater control over user management and security. By leveraging these options, you can ensure that your site runs smoothly and efficiently.
Frequently Asked Questions About Last User Login Feature
As you start using the last user login feature, you might have a few questions. Here are some common queries that website owners often have, along with their answers:
- Can I track logins without a plugin?
Yes, you can add custom code to your theme’sfunctions.phpfile, but using a plugin is a safer and more reliable option, especially for beginners. - Will tracking logins slow down my site?
Most modern plugins are optimized for performance, so they shouldn’t noticeably affect your site’s speed. However, always test new plugins on a staging site first. - Can I see failed login attempts?
Yes, some plugins offer detailed logs of both successful and failed login attempts, which is helpful for identifying potential security threats. - Is it possible to hide the login data from certain users?
Absolutely! You can control who sees login information by setting permissions. This is useful if you have multiple admins or editors on your site. - How often is the login data updated?
Login data is usually updated in real-time. As soon as a user logs in, their details are recorded and reflected in the dashboard.
If you have any other questions, it’s always a good idea to refer to the plugin’s official documentation or support forums for specific guidance.
Final Thoughts on Enhancing Your WordPress Site
Adding a last user login feature to your WordPress site is a smart way to improve security, user engagement, and overall site management. This feature is easy to set up, especially with the help of plugins, and can provide you with valuable insights into your users’ behavior.
By tracking when users last logged in, you can better understand their interaction with your content, optimize your outreach efforts, and enhance the overall user experience. Plus, it’s a great way to boost the security of your website by keeping an eye on any suspicious login activities.
Whether you’re running a small blog, a bustling online store, or a thriving membership site, integrating this feature can bring added value. So, take the time to explore the plugins and customization options available, and watch how this small change can make a big difference to your site’s performance and security.
Remember, keeping your WordPress site updated and secure is an ongoing process, and adding features like user login tracking is just one of many ways to stay ahead. Happy WordPressing!

