When it comes to online shopping, the first thing that catches a buyer’s eye is the product image. In WooCommerce, these images are crucial for showcasing your products effectively. They not only provide a visual representation but also play a vital role in conveying your brand’s message. Setting the right image size ensures your products look great on any device, from desktops to smartphones. Understanding how to manage these images can make all the difference in creating an appealing shopping experience for your customers.
Importance of Default Image Size in E-commerce

So, why is the default image size so important in e-commerce? Let’s break it down into a few key reasons:
- Professional Appearance: High-quality, appropriately sized images offer a professional look, elevating your brand’s reputation.
- User Experience: When images load quickly and display correctly, customers enjoy a seamless shopping experience, increasing the chance of a sale.
- SEO Benefits: Properly sized images can improve your website’s optimization, helping search engines index your pages more efficiently.
- Consistent Branding: Uniform image sizes across your store create a cohesive look, reinforcing your brand identity.
- Mobile Responsiveness: With more shoppers using mobile devices, responsive image sizes ensure that your products are displayed beautifully, regardless of screen size.
| Aspect | Impact of Default Image Size |
|---|---|
| Loading Speed | Faster site load times enhance user satisfaction. |
| Conversion Rate | Well-sized images can lead to higher sales. |
| Maintenance | Consistent image sizes simplify website management. |
In summary, setting default product image sizes in WooCommerce is not just a technical task. It’s an essential aspect of your online business that influences user experience, professional perception, and overall sales performance. So, take the time to get it right!
Understanding WooCommerce Image Settings

Hey there! If you’re diving into the world of WooCommerce, one of the first things you’ll notice is how crucial images are to your online store. After all, a picture speaks a thousand words, right? In WooCommerce, managing your product images isn’t just about uploading pretty pictures; it’s about optimizing them for the best display and performance. Let’s break down the key image settings you’ll encounter.
First off, let’s talk about the different types of images you’ll be working with:
- Thumbnail Image: This is the small image that appears in product categories and archives. It should be visually appealing and represent your product well.
- Main Product Image: This is the hero image that grabs your customers’ attention on the product detail page. You want this to shine!
- Product Gallery Images: These are additional images that showcase your product from various angles. They can help customers get a better grasp of what they’re buying.
Now, each of these images has specific dimensions, and setting them correctly is essential for maintaining a uniform look across your online shop. WooCommerce offers a range of settings where you can adjust the size of these images easily. The key here is to find a balance between quality and loading speed. Large images can slow down your site, which isn’t great for user experience.
To make it easier, WooCommerce has a built-in feature that automatically crops and resizes images. However, you still need to know how to optimize these settings for your specific theme. So, let’s get into how to set that default product image size to make your store look absolutely stunning!
How to Set Default Product Image Size in WooCommerce
Ready to spruce up your product images? Adjusting the default product image size in WooCommerce is a straightforward process, and you don’t need to be a tech wizard to do it. Just follow these simple steps, and you’ll be on your way to a more polished online store.
1. Access Your WooCommerce Settings: – Start by logging into your WordPress dashboard. Navigate to WooCommerce > Settings. – Once in the settings menu, click on the Products tab, and then select Display or Image (depending on your version).
2. Modify Image Dimensions: – Look for the section labeled Product Images. Here, you’ll find fields for the Main Image, Thumbnail, and Gallery image sizes. – Adjust the pixel dimensions as you see fit. For instance, a common size for thumbnails is 300 x 300 pixels, while main product images often require 600 x 600 pixels or more.
3. Regenerate Thumbnails: – After setting your preferred sizes, you might need to regenerate your thumbnails. This is super easy! Install the plugin Regenerate Thumbnails from the WordPress plugin directory. – Once activated, go to Tools > Regen. Thumbnails and hit the button to regenerate your images with the new settings.
And that’s it! Your WooCommerce store will now display product images with the size you’ve set, ensuring everything looks clean and attractive. Remember to keep an eye on loading speeds and image quality. Happy selling!
5. Step-by-Step Guide to Change Image Sizes
Changing the default image sizes in WooCommerce is pretty straightforward, and you don’t need to be a coding whiz to do it. Let’s break it down into easy steps so you can get it sorted quickly!
- Access the WordPress Dashboard: Log in to your WordPress site and navigate to the dashboard.
- Go to WooCommerce Settings: From the dashboard, find ‘WooCommerce’ in the left-side menu and click on it. Then select ‘Settings’ from the dropdown menu.
- Navigate to the Products Tab: In the settings menu, click on the ‘Products’ tab. This is where all product-related settings can be managed.
- Open Display Settings: Within the Products tab, select ‘Display’ or ‘Product Images’, depending on your version of WooCommerce. This section is where you can find options for image sizes.
- Adjust Image Sizes: You will see three main image size options: ‘Thumbnail width’, ‘Single Product Image’, and ‘Product Gallery Thumbnail’. You can enter your desired values here. For instance:
| Image Type | Recommended Size |
|---|---|
| Thumbnail | 200 x 200 pixels |
| Single Product Image | 600 x 600 pixels |
| Product Gallery Thumbnail | 100 x 100 pixels |
Feel free to adjust these numbers according to your theme and needs. Once you’ve made your changes, don’t forget to click the ‘Save Changes’ button at the bottom of the page.
6. Customizing Image Sizes for Different Device Resolutions
In this day and age, we live on our devices! Therefore, ensuring your product images look great on all devices—from desktops to smartphones—is crucial. Tweaking image sizes for different devices not only optimizes the user experience but can also improve load times—helping with your overall SEO rankings. So, how do you go about customizing these sizes?
- Responsive Design: Ensure your theme is responsive by default. Most modern WooCommerce themes usually are. This will automatically help adjust image sizes based on device screen size.
- Implement CSS Rules: Use custom CSS to create specific image sizes for different devices. Here’s an example:
- Use the WordPress Customizer: Go to ‘Appearance’ > ‘Customize’. You can also configure additional settings related to image sizes for mobile displays here.
- Consider Using a Plugin: If you want to take customization further, plugins like ‘WP Smush’ or ‘Regenerate Thumbnails’ can help by adjusting and compressing images for different resolutions.
@media (max-width: 768px) { .woocommerce-product-gallery__image img { width: 100%; height: auto; }}
By following these steps, you’ll ensure that your product images look fantastic on every device, making for a seamless shopping experience and keeping your customers happy! Remember, engaging visuals can lead to better conversions, so it’s worth the effort!
7. Regenerating Thumbnails After Changing Image Sizes
So, you’ve changed the default image sizes for your WooCommerce products, and now you’re wondering, “What’s next?” Well, if you want those newly set dimensions to actually apply to your existing images, you’ll need to regenerate your thumbnails. It might sound technical, but don’t worry—it’s quite straightforward!
When you alter the image sizes in WooCommerce, any previously uploaded images won’t automatically adjust to fit the new dimensions. That’s where thumbnail regeneration comes into play. It essentially goes back through all your existing product images and resizes them to the new specifications. Here’s how to do it:
- Install a Regeneration Plugin: Go to your WordPress dashboard, navigate to Plugins > Add New, and search for “Regenerate Thumbnails.” The Regenerate Thumbnails plugin by Alex Mills is a popular choice.
- Activate the Plugin: Once you’ve installed the plugin, activate it to make it available in your site’s tools.
- Regenerate Thumbnails: Head to Tools > Regenerate Thumbnails. Here, you can choose to regenerate all thumbnails or select specific images.
Wait for the process to complete, which might take a little time depending on how many images you have. You’ll receive a notification when it’s done. And just like that, your WooCommerce store will showcase the best version of your product images!
8. Best Practices for Product Images in WooCommerce
Product images are often the first thing your customers notice when they land on your WooCommerce site. So, it’s critical to make them as appealing as possible! Here are some best practices that can elevate your product images and enhance your overall shopping experience.
- High-Quality Images: Start with high-resolution images. It’s better to have a larger, clearer image that can be resized down rather than a blurry one. Aim for at least 800 x 800 pixels for your product images.
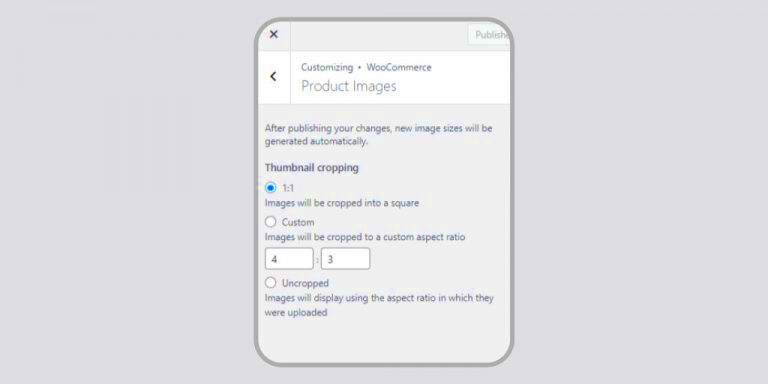
- Consistent Aspect Ratio: Maintaining a consistent aspect ratio across your product images helps keep your site looking professional. Choose a standard size, like 1:1 (square), for uniformity.
- Multiple Angles: Show your products from different angles. Include images of any important features or details. A combination of standard and zoomed-in shots can give customers a better idea of what they’re buying.
- Backgrounds Matter: Keep backgrounds simple and clean. A plain white or light-colored background can make the product stand out more and reduce distractions.
- Image Optimization: Don’t forget to optimize your images for web use! Compress them to reduce file size without sacrificing quality, which improves your site’s load time.
- Alt Text: Use descriptive alt text for each image. Not only does this improve accessibility, but it also helps with SEO, making your products more discoverable.
By following these best practices, you’ll not only enhance the aesthetic appeal of your WooCommerce store with stunning visuals but also improve user experience and potentially increase conversions!
Troubleshooting Common Image Issues in WooCommerce
When running a WooCommerce store, images are a crucial part of your product presentation. However, there are times when issues crop up, causing frustration. Let’s explore some common image problems you may encounter and how to fix them effectively.
1. WordPress Image Upload Errors: Sometimes, uploading images can lead to errors. This could be due to file size exceeding your server limit or unsupported file formats. To address this:
- Check your image file size and reduce it, if necessary, using an image compression tool.
- Ensure you’re using supported formats (e.g., .jpg, .png).
- Increase the maximum upload size via your hosting control panel or by modifying the
php.inifile.
2. Images Not Displaying Properly: If your images aren’t appearing on the front end:
- Clear your browser cache.
- Disable any caching plugins on your site temporarily to see if they’re causing the issue.
- Double-check the image URL in your product settings; make sure it’s correct!
3. Image Cropping Problems: If your images look different on the product page than expected, it might be due to resized thumbnails or cropping options in your WooCommerce settings:
- Go to
WooCommerce > Settings > Products > Displayand adjust your image settings. - Regenerate thumbnails using a plugin like Regenerate Thumbnails to fix any resolution issues.
By addressing these common issues, you can ensure that your product images look their best, enhancing your customers’ shopping experience.
Conclusion and Final Thoughts
Setting the default product image size in WooCommerce is a vital step in ensuring your eCommerce store is visually appealing. It can significantly affect user experience, loading times, and even SEO. So, let’s wrap up with some final reflections!
To keep your store looking professional:
- Always use high-quality images—don’t compromise on quality!
- Regularly revisit your image settings and optimize them as needed, especially after major updates.
- Utilize browser tools or plugins to compress images, keeping your website speedy.
Remember, customers are more likely to engage with products that are showcased well. If you ever run into challenges:
- Refer back to the troubleshooting tips we discussed.
- Seek help from the vast WooCommerce community online—there’s a lot of support available!
- Experiment with different sizes and layouts to find what works best for your unique products.
In the end, the right image size not only enhances the aesthetic appeal but also builds trust with potential buyers. So go ahead, give your products the visual they deserve, and watch your conversions soar!


