Welcome to the world of Elementor, where you can bring your creative visions to life with just a few clicks! One fundamental aspect of web design is knowing how to use HTML tags effectively. But don’t worry—understanding HTML in Elementor doesn’t require you to be a coding expert. With a user-friendly interface,
Understanding the Importance of Descriptions

Descriptions play a crucial role in web design and content strategy. They provide context, engage readers, and enhance accessibility. Here’s why you should prioritize them:
- Clarity and Context: A well-crafted description gives your audience a clear understanding of what to expect. It enhances their overall browsing experience.
- SEO Benefits: Search engines love descriptive content! Incorporating relevant keywords in your descriptions helps improve your site’s visibility and search ranking.
- User Engagement: Eye-catching descriptions can grab attention and encourage users to interact with your content, leading to lower bounce rates and higher conversions.
- Accessibility: Descriptions can improve the accessibility of your site for users with disabilities, making it easier for them to understand your content.
So, the next time you’re designing with Elementor, take a moment to think about your descriptions. Are they clear, engaging, and optimized for search engines? If not, it might be time for a little makeover!
3. Common HTML Tags for Descriptions

When you’re creating descriptions in Elementor, knowing the common HTML tags is crucial. These tags play an essential role in structuring your content and improving SEO. Let’s discuss some of the most frequently used HTML tags that can help you create compelling descriptions.
- <p> (Paragraph): This tag is used to define a paragraph of text. It’s perfect for general descriptions where you want to provide a block of information.
- <h1> to <h6>: These heading tags indicate the hierarchy of your content. The <h1> is typically the most important, perfect for main titles, while <h2> to <h6> can be used for subheadings. Using these effectively can enhance readability and SEO.
- <ul> (Unordered List) & <ol> (Ordered List): When you want to break your text into bullet points or numbered lists, these tags come in handy. They help your readers absorb information quicker.
- <strong>: This tag is used to bold text, emphasizing important words or phrases within your descriptions. It can draw the reader’s attention effectively.
- <em>: Similar to <strong>, this tag italicizes text, allowing you to emphasize words gently. It’s great for adding tone or context to your descriptions.
In summary, utilizing these common HTML tags can make your descriptions more engaging and easier to read. Incorporate them into your Elementor projects, and watch your content come alive!
4. Choosing the Right Tag Based on Context
Selecting the right HTML tag isn’t just about aesthetics; it’s about meaning and context. Understanding when to use each HTML tag effectively can significantly impact how your content is perceived. Let’s break down how to choose the right tag based on your content’s context.
| Context | Recommended HTML Tag | Reason |
|---|---|---|
| General Descriptions | <p> | Best for blocks of text providing information. |
| Main Titles | <h1> | Defines the primary topic of your content. |
| Subsections | <h2> or <h3> | Clarifies the topic hierarchy and enhances readability. |
| Lists of Features or Benefits | <ul> or <ol> | Breaks down information into easily digestible points. |
| Key Terms or Important Information | <strong> | Highlights crucial pieces of information effectively. |
| Emphasis on Specific Words | <em> | Gives a softer emphasis, enhancing meaning without overpowering. |
Ultimately, the right tag boosts both user experience and SEO. Make sure you consider the context of your content before deciding on which HTML tag to use. This level of attention pays off in creating well-structured and engaging descriptions.
5. Implementing HTML Tags in Elementor
Implementing HTML tags in Elementor can seem daunting at first, but once you get the hang of it, it’s smooth sailing! Elementor makes it easy to incorporate various HTML tags to enhance both the functionality and aesthetics of your website. Here’s how you can do it:
- Accessing the Text Editor: Start by dragging and dropping the ‘Text Editor’ widget onto your page. This widget allows you to input and format your text using various HTML tags.
- Switching to Text Mode: By default, the text editor opens in Visual mode. To use HTML tags, click on the ‘Text’ tab. This switches your view to HTML, giving you the opportunity to add tags directly.
- Using Basic HTML Tags: You can easily add various HTML tags like
<h1>,<p>,<ul>, and<li>to format your content. For example: <h2>This is a Heading</h2><p>This is a paragraph.</p>- Previewing Changes: After implementing your tags, click on the ‘Preview’ button to see how they look on your website. This is a great way to catch any errors or formatting issues before going live.
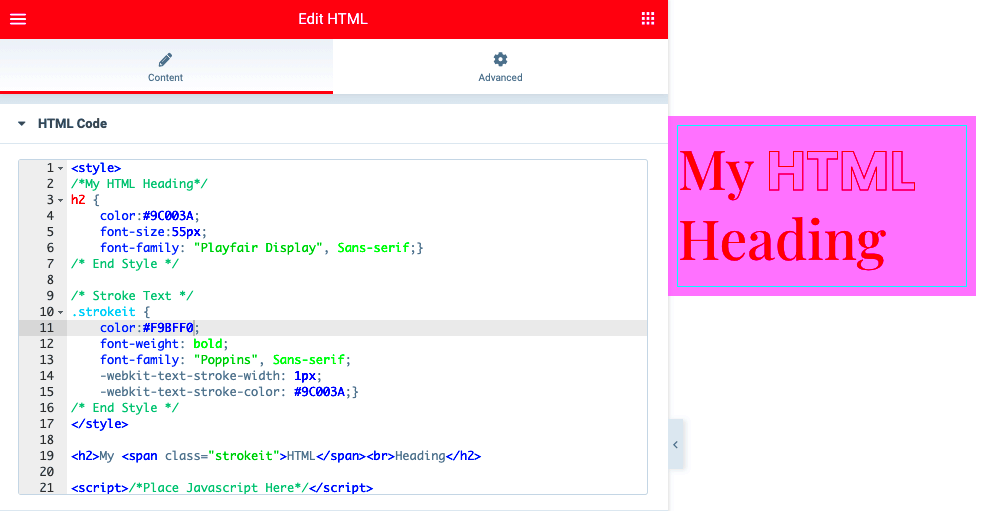
- Custom HTML Widget: If you want more control, Elementor also has a ‘Custom HTML’ widget. This widget allows you to input any HTML code, giving you a wider range of options including integrating scripts or styles.
So, don’t be afraid! Dive into the HTML tags and start implementing them in Elementor to take your web design to the next level.
6. Best Practices for Using Descriptive Tags
When it comes to using descriptive tags in your content, there are definitely some best practices that can help you maximize both SEO and user experience. Here are several key tips to keep in mind:
- Use Semantic HTML: Always opt for semantic tags to accurately describe the content. Instead of simply using
<div>or<span>, prefer<article>,<header>, and other semantic tags that improve accessibility and SEO. - Limit Overuse of Heading Tags: While headings (like
<h1>,<h2>,<h3>) are essential, avoid using too many in a row. Stick to a hierarchy that is logical and enhances readability. - Be Descriptive and Relevant: Make sure your tags accurately reflect the content. For instance, if you’re describing a product, use descriptions within
<p>tags that include relevant keywords. - Keep Accessibility in Mind: Use
<alt>attributes for images and ensure that your tags are easy to navigate for users with disabilities. Tools like screen readers depend heavily on properly structured HTML to interpret your site. - Optimize for SEO: Utilize keywords in your headings and descriptive tags naturally. This not only helps search engines understand your content but also attracts the right audience.
By following these best practices, you’ll not only create a well-structured and functional website but also improve your site’s search visibility and user engagement!
Selecting the Right HTML Tag for Descriptions in Elementor
When it comes to designing a website using Elementor, choosing the appropriate HTML tag for descriptions is crucial. It can impact not only the visual aesthetics but also the SEO performance and user experience. HTML provides a variety of tags that serve different purposes, and understanding these can help you enhance your content’s functionality.
Here are some common HTML tags used for descriptions:
- <p> – The paragraph tag is ideal for longer blocks of text, ensuring readability and organization.
- <h1> to <h6> – Heading tags are essential for structuring content hierarchically. Use them for titles and subtitles to improve SEO.
- <div> – A flexible container that doesn’t provide any semantic meaning but can be styled and manipulated easily.
- <span> – An inline tag that is useful for styling smaller portions of text within other elements.
- <blockquote> – Best for quoted text, providing a distinct style and indicating special text.
When selecting the right tag, consider the following factors:
| Factor | Consideration |
|---|---|
| Content Length | Use <p> for longer descriptions. |
| SEO Importance | Utilize heading tags for key phrases. |
| Styling Needs | <span> is helpful for inline styles. |
In conclusion, making the right choice of HTML tags for descriptions in Elementor can significantly enhance the usability and effectiveness of your website. By understanding the purpose of each tag and considering the specific needs of your content, you can optimize your site for both users and search engines.


