Hey there! If you’re digging into the nitty-gritty of your WordPress site, you’ve likely heard about the .htaccess file. But what is it, exactly? In simple terms, the .htaccess file is a configuration file used by Apache web servers, which many hosting providers use for WordPress sites. It’s like a backstage pass that allows you to control various aspects of your site’s behavior without needing to dive into complicated server settings.
This little file holds a lot of power—everything from URL redirection to security features can be managed through it. But when it comes to setting up IP restrictions, .htaccess becomes your best friend. By editing this file, you can specify which IP addresses have access to certain areas of your site, enhancing your site’s security and managing user access effectively.
Understanding IP Restrictions

Now that we’re pals with .htaccess, let’s unwrap the concept of IP restrictions. Think of it as creating a guest list for a party—only those on the list get in! An IP restriction limits access to your website based on the visitor’s IP address, keeping unwanted guests away. Here’s why that can be important:
- Enhanced Security: By blocking specific IP addresses, you can protect your site from malicious users and bots.
- Control Over Who Accesses Your Site: You might only want certain players to access sensitive areas, like an admin panel.
- Reducing Spam: Limit access to your comment sections or admin areas to trusted IPs.
So, how do you determine which IP addresses to restrict? Here’s a brief rundown:
| Action | Description |
|---|---|
| Block a Single IP | Prevents a specific user from accessing your site. |
| Allow Only Certain IPs | Restricts all access except for listed IPs. |
| Range of IPs | Block or allow a range of IP addresses. |
By strategically applying IP restrictions, you can dramatically enhance the safety of your site. So let’s dive in further and see how to implement these changes in your .htaccess file! Stay tuned!
Common Issues with .htaccess File

When it comes to managing your WordPress website, the .htaccess file can be both a powerful ally and a source of frustration. It’s like the unsung hero of your server, handling various configurations related to security, URL redirection, and more. However, there are some common issues that you might encounter while dealing with this file, especially when applying IP restrictions. Let me walk you through some of them:
- Syntax Errors: One misplaced space or an incorrect line can break your site. It’s crucial to double-check the syntax before saving.
- File Permissions: If the permissions are set too restrictively, your server may not be able to read the file, leading to unexpected behavior or simply rendering your site inaccessible.
- Server Configuration Conflicts: Sometimes, server settings can override .htaccess directives, causing your IP restrictions not to work as intended.
- Too Many Redirects: If you have conflicting rules, it may result in infinite redirects, throwing your users into a loop and making the site unusable.
- Backup Absence: Always remember that making changes without a backup can end in disaster. If something goes wrong, you need to roll back to a working version quickly.
For WordPress administrators, being aware of these issues can save time and reduce headaches. It’s essential to routinely check on your .htaccess file whenever you implement changes to ensure everything works smoothly.
How to Locate the .htaccess File in WordPress
Finding the .htaccess file in your WordPress installation is essential if you plan to make any modifications, including setting IP restrictions. It’s not hidden away like a secret treasure, but its presence can be easy to overlook, so let’s break down how to locate it:
- Using FTP Client:
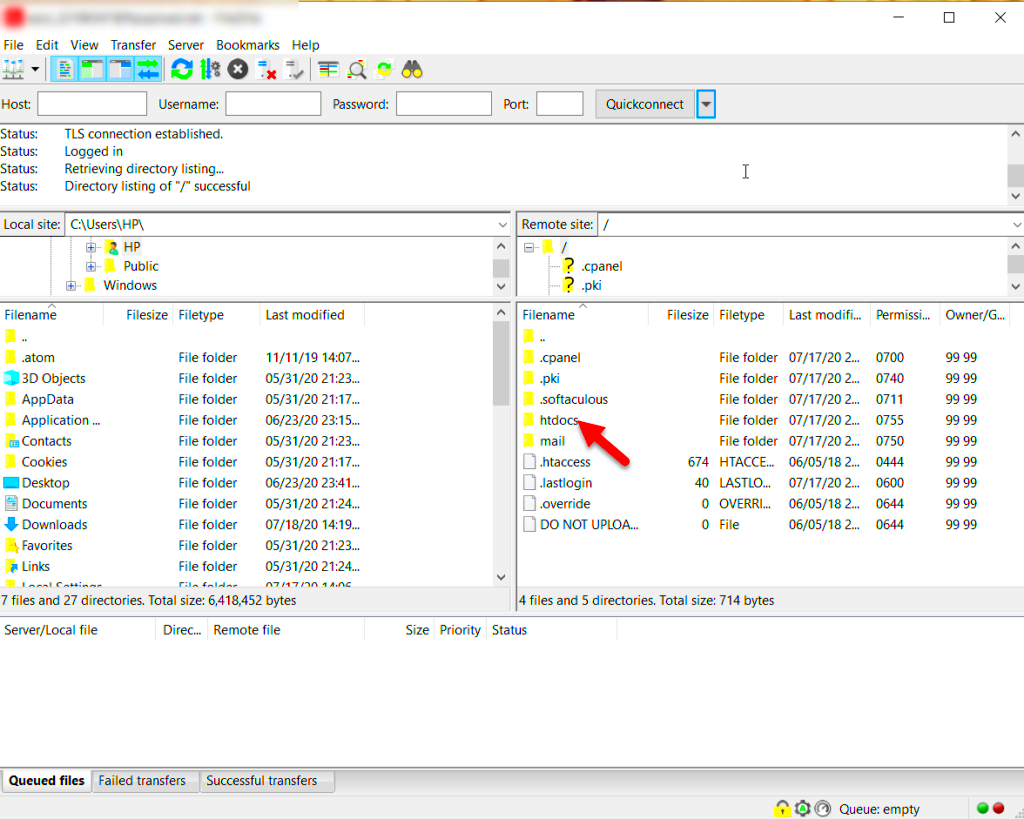
The most common method to access your .htaccess file is by using an FTP client such as FileZilla or Cyberduck. Here’s how:
- Connect to your server using your FTP credentials.
- Navigate to the root directory of your WordPress installation, usually named public_html or www.
- Look for the file named .htaccess. If you don’t see it, ensure that your FTP client is configured to show hidden files.
- cPanel File Manager:
If your hosting provider offers cPanel, you can access your .htaccess file easily:
- Log in to your cPanel account.
- Navigate to the File Manager section.
- Select the public_html directory (or the directory where WordPress is installed).
- Look for the .htaccess file. You may need to enable “Show Hidden Files” in the settings.
- WP-CLI:
If you’re comfortable using command line tools, WP-CLI can help you locate your .htaccess file:
- Open your terminal and SSH into your server.
- Type
cd /path/to/your/wp-installationto navigate to your WordPress directory. - Type
ls -lato list all files, including hidden ones, and see if .htaccess shows up.
Once you find the .htaccess file, make sure you back it up before making any changes. This will ensure that you can restore it if anything goes wrong. Happy editing!
Setting Up IP Restrictions in .htaccess
Setting up IP restrictions in your .htaccess file is a powerful way to control access to your WordPress site. By leveraging the capabilities of this small yet potent file, you can selectively allow or deny visitors based on their IP addresses. Here’s how to do it:
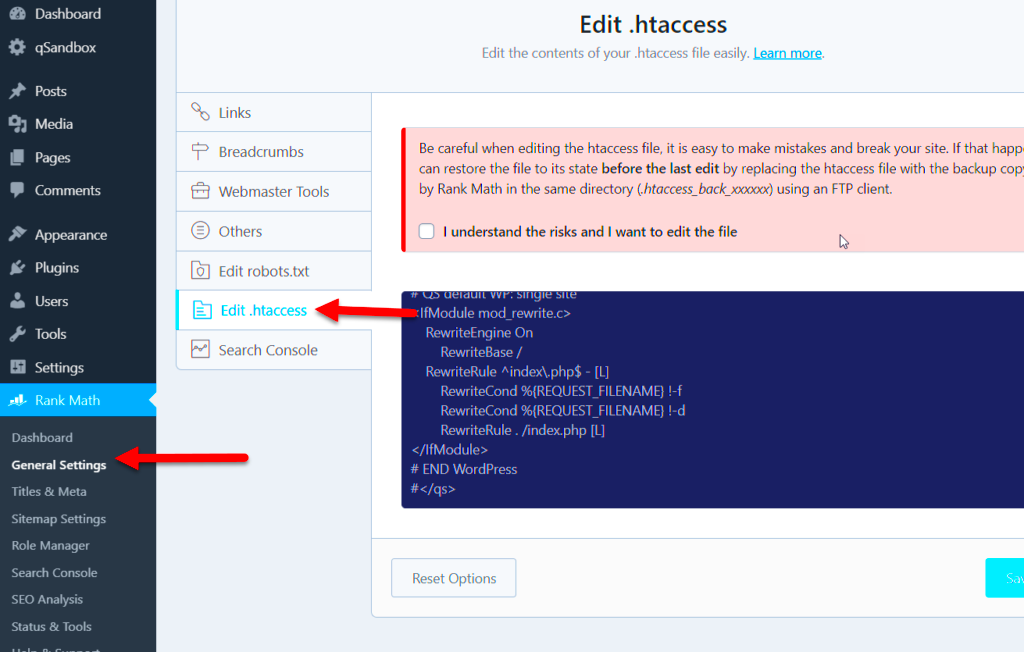
To begin, you need to access the .htaccess file located in your WordPress root directory. You can do this via an FTP client or your web hosting control panel. Once you’re in, it’s important to make a backup of the original .htaccess file just in case anything goes wrong.
Now, to set up IP restrictions, you can use a simple code structure. Here’s a straightforward example:
# BEGIN IP Restriction Require ip 192.168.1.1 Require ip 10.0.0.0/24 Require all denied# END IP RestrictionIn the above code:
- Require ip 192.168.1.1: This line allows access to the specified IP address.
- Require ip 10.0.0.0/24: This notation allows all IP addresses in the specified range.
- Require all denied: This line denies access to everyone else.
Simply replace the IP addresses with your desired values. After adding your rules, don’t forget to save the changes. This will enforce your IP restrictions immediately! Remember to test access from different IP addresses to ensure everything is functioning as expected.
Troubleshooting Tips for .htaccess Issues
Working with the .htaccess file can feel like walking a tightrope—one wrong move, and you might throw your entire site off balance. If you encounter issues after making changes, don’t panic! Here are some practical troubleshooting tips that you can follow:
First, take a deep breath and check your file for syntax errors. Even a simple mistype can cause your website to display the dreaded “500 Internal Server Error.” Here’s what you can do:
- Restore the Backup: If everything goes south, restore the original file you backed up before making changes.
- Review Your Code: Go through the new entries in your .htaccess file line by line to ensure there are no typos or incorrect directives.
- Check Compatibility: Make sure your server supports the directives you’re using. Ask your hosting provider if you’re unsure.
If your site is still acting funny after checking the basics, consider looking at the error logs provided by your web host. They can provide critical clues about what went wrong.
Lastly, if you’re still stuck, reach out to your hosting support or consult the WordPress community forums. The chances are that someone else has faced the same issue, and they can share their insights. A fresh pair of eyes can often spot what you may have missed!
7. Testing Your IP Restrictions
Once you’ve implemented IP restrictions in your .htaccess file, the next logical step is to test them. After all, there’s no point in making changes if you don’t know whether they’re working! Here’s how to do it effectively.
Start by checking the IP address you’re trying to restrict. You can do this by visiting a site like WhatIsMyIP.com to confirm your current IP. Note it down, as this is essential for testing.
Now, follow these simple steps:
- Open a separate browser or use incognito mode, which can help bypass cached data.
- Try accessing your WordPress site from the restricted IP address. You should receive an error message or be redirected as per your .htaccess rules.
- Next, switch to an allowed IP address. This is usually your static IP or a subnet of allowed addresses. Try accessing your site again. You should find that it’s fully accessible.
It’s also wise to double-check your changes by reviewing your server logs. Log files can show you if someone from a restricted IP attempted to access your site and whether your .htaccess file blocked them as expected.
Finally, remember that if you’re collaborating with others or using different networks, you might want to ask those colleagues to run similar tests from varying IPs. This ensures that your IP restrictions are robust and functioning as they should.
8. Best Practices for Managing .htaccess in WordPress
The .htaccess file is a powerful tool when it comes to managing your WordPress site. While it can provide you with a lot of flexibility, it’s also easy to make mistakes. Here are some best practices to keep in mind for effectively managing this file:
| Best Practice | Description |
|---|---|
| Backup Regularly | Always back up your .htaccess file before making changes. This way, you can restore it if something goes wrong. |
| Use Comments | When editing, add comments to explain why changes were made. This is especially useful for team environments. |
| Limit Changes to Necessary Lines | Avoid cluttering your .htaccess with unnecessary rules. Stick to what’s essential for your site’s functionality. |
| Test After Changes | After every modification, perform thorough testing to ensure everything functions correctly. A small mistake can lead to site outages! |
| Consider a Staging Environment | If possible, test changes in a staging environment before applying them to your live site to prevent issues. |
By adhering to these best practices, you can manage your .htaccess file more effectively, ensuring your WordPress site remains robust and secure. Don’t forget that every change is significant, so proceeding with caution is always wise!
Conclusion
In summary, resolving issues with the .htaccess file for IP restrictions in WordPress involves understanding how the .htaccess file functions within your web server and recognizing potential pitfalls in its configuration. Here are the key takeaways:
- Understand the Structure: Familiarizing yourself with the basic structure of a .htaccess file is crucial for effective management.
- Backup Before Changes: Always create a backup of the original .htaccess file before making any modifications. This will allow you to restore settings in case something goes wrong.
- Use Correct Syntax: Ensure that the rules you implement adhere to the correct syntax to avoid server errors.
- Check for Precedence: Remember that if there are multiple rules, the order can affect which rules are applied. Place specific rules before general ones.
- Testing Changes: After making modifications to the .htaccess file, test the site thoroughly to ensure that IP restrictions are functioning as intended.
Implementing IP restrictions in WordPress can enhance your site’s security, but it is essential to approach modifications to the .htaccess file with caution and knowledge. By following best practices and troubleshooting methodically, you can effectively manage IP restrictions and resolve any issues that arise with ease.


