Are you looking to enhance your user experience with seamless login redirection using Elementor? If so, you’ve come to the right place! Successful login redirection can significantly improve how users interact with your website, guiding them to the exact content they need after signing in. No one wants to be left staring at a generic dashboard after logging in, right? In this post, we’ll dive into the world of login redirection in Elementor and explore how to set it up effectively. Let’s get this party started!
Understanding Elementor’s Features for User Management

Elementor isn’t just a page builder; it’s an entire ecosystem designed to boost your website’s functionality, especially when it comes to user management and login redirection. Let’s take a closer look at some of Elementors features that make user management a breeze:
- Custom Login Forms: Elementor allows you to create custom login forms using its drag-and-drop interface. You can tailor the design to match your site’s aesthetic!
- Dynamic Visibility Controls: With dynamic visibility, you can show or hide elements based on whether a user is logged in or out, directing them to relevant content.
- Integrations with Membership Plugins: Elementor seamlessly integrates with popular membership plugins such as MemberPress and WooCommerce Memberships, making user management even easier.
- Redirects and Page Controls: After a successful login, you can effortlessly redirect users to specific pages or sections, keeping their journey smooth and hassle-free.
To sum it all up, Elementor provides an extensive range of features that empower you to manage users effectively. Whether you’re setting up a simple login form or looking for advanced user management solutions, Elementor’s capabilities can surely meet your needs. Ready to dive into the details of setting up login redirection? Let’s go!
Setting Up a Login Page in Elementor
Creating a login page with Elementor is pretty straightforward, even for those who may not be the most tech-savvy. Elementor empowers you with the ability to design stunning pages without writing a single line of code. So, let’s get started!
To set up your login page, follow these simple steps:
- Create a New Page: In your WordPress dashboard, navigate to Pages > Add New. Give your page a title, like “Login”.
- Edit with Elementor: Click on the “Edit with Elementor” button to launch the Elementor editor. This is where the magic begins!
- Drag and Drop the Login Widget: Look for the Login widget in the Elementor panel on the left. Simply drag it onto your page. If you don’t see it, make sure you have a plugin that provides this feature installed.
- Customize Your Login Form: Click on the logged-in widget, and you’ll see options to customize fields like Username, Password, and add a Remember Me checkbox. You can also customize the submit button to match your site’s aesthetic.
- Styling: Head over to the Style tab to customize fonts, colors, spacing, and more. Ensure it fits seamlessly within your website’s design.
- Publish: Once you’re happy with how your login page looks, click the Publish button!
And there you have it! Your very own login page created with Elementor. Now, let’s dive into how to configure a redirect for users after they log in.
Configuring the Redirect After Login
Redirecting users after they log in can significantly enhance user experience on your website. After all, you want them to land on a relevant page right away, whether it’s a dashboard, profile, or any specific content that you have tailored for them. Here’s how you can configure login redirection:
The method you choose depends on which plugins you have available. Here’s a step-by-step guide to redirect users using a popular method:
- Install a Redirection Plugin: If you haven’t already, consider installing a plugin like Redirection or LoginWP. These are user-friendly and efficient for managing redirects.
- Access Plugin Settings: Navigate to the plugin settings in your WordPress dashboard. For LoginWP, go to LoginWP settings when it’s installed.
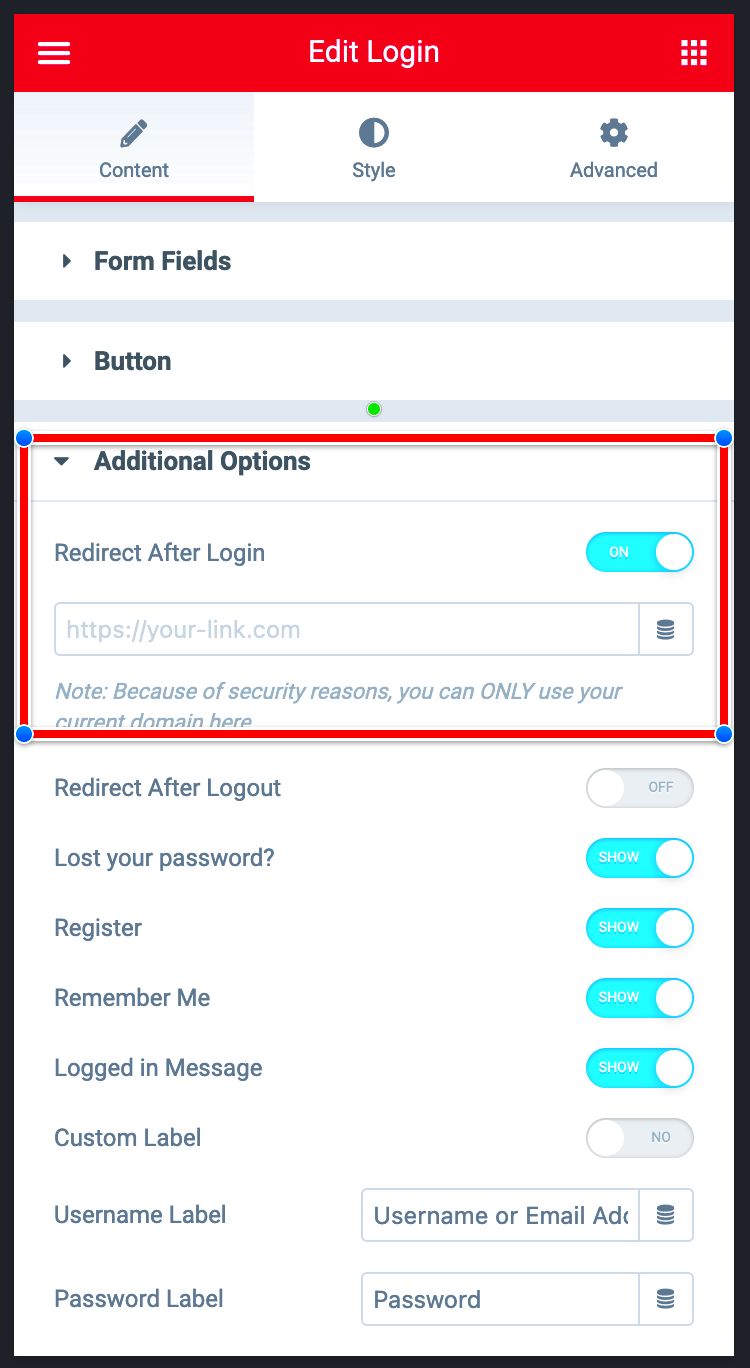
- Set Up Redirection Rules: In the settings area, look for the Redirection tab. Here you can specify where users will be sent after a successful login. Common options are the user’s profile page or a custom dashboard.
- Save Changes: After configuring the desired redirect URL, ensure you hit save!
Here’s a handy table summarizing redirect options:
| User Role | Redirect URL |
|---|---|
| Subscriber | /user-dashboard |
| Editor | /editor-dashboard |
| Administrator | /admin-dashboard |
By taking these steps, you’ll ensure that your users are greeted with the right content instantly after they log in. This not only streamlines their experience but also encourages them to engage more with your site. Happy redirecting!
Using Custom Code for Advanced Redirect Options
If you’re looking to take your redirect game to the next level after a user logs in via Elementor, a little custom code can go a long way. While Elementor provides some basic settings for managing redirects, sometimes you need more flexibility than what the plugin offers out of the box. That’s where custom code comes in!
To implement custom redirections, you can use hooks provided by WordPress. Below are common scenarios and how you can achieve them:
- Redirect Based on User Role: This is useful if you have different user roles (like admin, subscriber, etc.) and want to redirect them to different locations.
- Redirect After Specific Actions: Perhaps you want to redirect users to a different URL based on how they signed up (via a promotional link or a specific form).
Here’s a simple snippet you can add to your theme’s functions.php file:
add_action('wp_login', 'custom_login_redirect', 10, 2);function custom_login_redirect($redirect_to, $request){ $user = wp_get_current_user(); if (in_array('administrator', $user->roles)) { return admin_url(); // Redirects admins to their dashboard } else { return home_url(); // Redirects all other users to the home page }}Before implementing any code, make sure to back up your site! Also, always test your custom code in a staging environment to prevent potential issues on your live site.
Testing the Redirect Functionality
Once you’ve set up your redirects, it’s crucial to test them to ensure everything is working as intended. After all, the last thing you want is for users to end up on a 404 page or the wrong section of your site once they log in. Here are some step-by-step tips to effectively test your redirect functionality:
- Log in with Different User Roles: Make sure to test the login process with various user accounts (like admin, editor, subscriber, etc.). Each role should redirect to its designated area.
- Check for Edge Cases: Consider any unique scenarios, such as logging in via a password reset link or if the user is already logged in.
- Use Browser Developer Tools: Inspect the network activity while logging in. This allows you to verify that the redirect URLs are correct and efficient.
- Sequential Testing: Log out and back in multiple times to see if the redirect is consistently working. A good rule of thumb—test as many scenarios as you can think of!
If you encounter any issues:
- Double-check your code for errors.
- Ensure there are no conflicting plugins affecting the redirect functionality.
- Consult Elementor’s support or documentation if necessary.
Effective testing not only enhances user experience but also helps maintain the integrity of your site. So invest the time to get it right!
Troubleshooting Common Issues
Hey there! So you’ve set up your redirect after login in Elementor, but things aren’t working out quite as planned. Let’s dive into some common issues you might face and how to tackle them like a pro.
1. Redirect URL Not Working: One of the most frequent problems is that the redirect URL isn’t functioning. Double-check the URL you’re inputting. Make sure there are no typos and that the URL is live. You can test it by entering it directly into your browser to ensure it leads to the right page.
2. Cache Interference: Caching can sometimes play tricks on you. If you’ve recently changed your redirect settings but they aren’t taking effect, clear your browser cache and also the cache of any caching plugins you might be using. This simple step can often resolve the issue.
3. Conflicts with Other Plugins: You might be experiencing conflicts with other plugins. Try disabling all other plugins temporarily and see if the redirection works. If it does, then enable them one by one to identify which plugin is causing the conflict.
4. User Role Permissions: If you’re redirecting users based on roles, verify that each role has the correct permissions for accessing the intended redirect pages. Sometimes, users might not have the required access level, leading to unexpected results.
5. 404 Errors: If users are landing on a 404 error page after logging in, make sure that the target page exists and is correctly published. If it’s a draft or deleted, you’ll need to update your redirects accordingly.
With these troubleshooting tips at your disposal, you can turn frustrating issues into simple fixes, ensuring a seamless experience for your users!
Conclusion and Best Practices for User Experience
Wrapping things up here! Implementing redirects after login in Elementor can enhance user experience significantly, but it’s essential to do it right. Here are some best practices to ensure smooth sailing.
1. Keep It Simple: The primary goal of redirecting users is to lead them where they need to go without confusion. Keep your redirects clear and straightforward. Avoid creating multiple redirects that may confuse users about their final destination.
2. Test Everything: Before going live, always test your redirects. Try logging in yourself to follow the user’s journey. Make sure everything works as expected, and if there are issues, troubleshoot as discussed earlier.
3. Inform Your Users: Consider adding a brief message on the redirect page, letting users know they have been redirected for a specific reason. This can foster a sense of security and help manage expectations.
4. Mobile Responsiveness: Ensure that the page you are redirecting to is mobile-friendly. A significant portion of users access sites from their mobile devices, and a poorly formatted page can drive them away.
5. Monitor and Adjust: After implementation, keep an eye on the user behavior analytics. Check if users are bouncing from redirect pages and adjust your strategy based on the data. User feedback can be invaluable for fine-tuning their experience.
By following these best practices, you’ll create a seamless and enjoyable experience that keeps your users coming back for more! Happy redirecting!


