Have you ever wondered how to seamlessly connect your WordPress site with powerful email marketing tools? Look no further! Mailchimp and WordPress together create a perfectly harmonious duo for managing your online presence and marketing efforts. With Mailchimp, you’re tapping into a robust platform designed for building and nurturing your email lists, while
What is the Mailchimp WordPress Plugin?

The Mailchimp WordPress Plugin is a fantastic tool that bridges the gap between your WordPress website and your Mailchimp account. It enables you to easily integrate Mailchimp’s powerful email marketing features into your
- Easy Integration: This plugin allows for quick setup and integration of Mailchimp forms on your WordPress site.
- Customizable Forms: You can create beautifully designed signup forms that match your website’s aesthetic, encouraging visitors to subscribe to your newsletter.
- List Management: Seamlessly sync your subscribers with Mailchimp lists, ensuring that you’re always up-to-date with your audience.
- Analytics Tracking: Gain insights into your email campaigns’ performance directly from your WordPress dashboard.
- Responsive Design: The forms adapt to all devices, ensuring that users can easily subscribe regardless of whether they’re on a desktop, tablet, or mobile.
Overall, the Mailchimp WordPress Plugin is your go-to solution for effectively managing your email marketing efforts while maintaining a user-friendly experience for your website visitors. Don’t miss out on the opportunity to grow your email list and engage with your audience like never before!
3. Benefits of Using the Mailchimp WordPress Plugin
If you’re looking to grow your email list and streamline your marketing efforts, the Mailchimp WordPress Plugin is a solid ally. Here are some of the standout benefits you can expect when you integrate this powerful tool into your WordPress site:
- Easy Integration: The plugin integrates seamlessly with your WordPress site, allowing you to connect your Mailchimp account effortlessly. You won’t need to dive into complicated code or unfamiliar settings.
- User-Friendly: With an intuitive interface, even a novice can create engaging sign-up forms and manage their mailing lists. The setup process is straightforward, making it accessible for everyone.
- Customizable Forms: You can easily create customized sign-up forms that match your site’s aesthetic. Personalize the look and feel to ensure it complements your branding and attracts visitors.
- Automation Features: The plugin enables you to automate your email campaigns. You can set up welcome emails, automated responses, and targeted messages based on user engagement, saving you time and effort.
- Real-Time Analytics: Monitor your email performance directly from your WordPress dashboard. You can see subscriber growth, open rates, and more, allowing you to make data-driven decisions to enhance your campaigns.
- List Segmentation: Mailchimp allows you to segment your audience for more targeted communications. This means you can send personalized messages to specific groups, improving engagement and conversion rates.
By leveraging these benefits, you’re setting yourself up for a successful email marketing strategy. If comprehensively managing your email campaigns while keeping your website aesthetic intact sounds appealing, the Mailchimp WordPress Plugin may just be your best friend!
4. How to Install the Mailchimp WordPress Plugin
Ready to dive into the world of email marketing with the Mailchimp WordPress Plugin? Don’t worry—I’ll walk you through the installation process step-by-step! Whether you’re a seasoned WordPress user or a complete newbie, you can follow these simple instructions:
- Log into Your WordPress Dashboard: Begin by navigating to your WordPress site and logging into the admin panel.
- Navigate to Plugins: On the left side of the dashboard, locate and click on “Plugins.” You’ll see options to add new plugins.
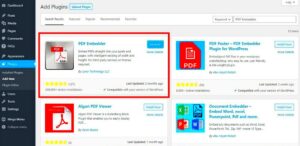
- Add New: Click the “Add New” button to start searching for the Mailchimp plugin. You will be taken to a page where you can find various plugins.
- Search for Mailchimp: In the search bar, type “Mailchimp for WordPress.” This will bring up the official Mailchimp plugin by Mailchimp itself.
- Install the Plugin: Once you find the plugin, click on the “Install Now” button. Wait for the installation to complete—it usually takes just a few seconds.
- Activate the Plugin: After installation, the button will change to “Activate.” Click on it to enable the plugin on your site.
- Connect Your Mailchimp Account: Now that the plugin is activated, you’ll need to connect it to your Mailchimp account. Follow the prompts to authenticate your account and get started.
And that’s it! You now have the Mailchimp WordPress Plugin installed and ready to go. With just a few simple steps, you can start creating beautiful sign-up forms and engage your audience like never before!
Setting Up Your Mailchimp Account
Before diving into the world of email marketing with Mailchimp, you’ll need to set up a Mailchimp account. This is crucial because your WordPress Mailchimp plugin will rely on those account settings to function correctly. But don’t worry, the process is straightforward!
First things first, go to the Mailchimp website and click on the “Sign Up Free” button. You’ll be prompted to enter your email, a username, and a secure password. Once you hit that magical “Get Started” button, check your inbox for a confirmation email. Click the link in the email to activate your account.
Next, Mailchimp will guide you through some initial setup steps. This typically includes:
- Personal Information: Fill out your name and other required details.
- Business Information: Provide information about your business, such as name, website URL, and industry.
- Audience Creation: Here’s where you’ll start building your email list. Follow the prompts to create your audience and customize it to fit your branding.
Once you’re finished with these steps, you can explore the dashboard. Familiarizing yourself with Mailchimp’s user-friendly interface is essential. You’ll find options for creating campaigns, managing your audience, and analyzing performance. Take a moment to browse around; it’ll make things easier when you start using the plugin with WordPress!
And just like that, you’re now equipped with a functional Mailchimp account, ready to integrate with your WordPress site!
Configuring the Mailchimp Plugin Settings
Now that you’ve set up your Mailchimp account, it’s time to dive into configuring the Mailchimp plugin settings in WordPress. This step is vital because it allows you to sync your WordPress site with your Mailchimp account, making it easier to manage your email marketing efforts.
Start by installing the Mailchimp for WordPress plugin if you haven’t already. Once installed, navigate to the plugin settings in your WordPress dashboard. Here’s a simple walkthrough:
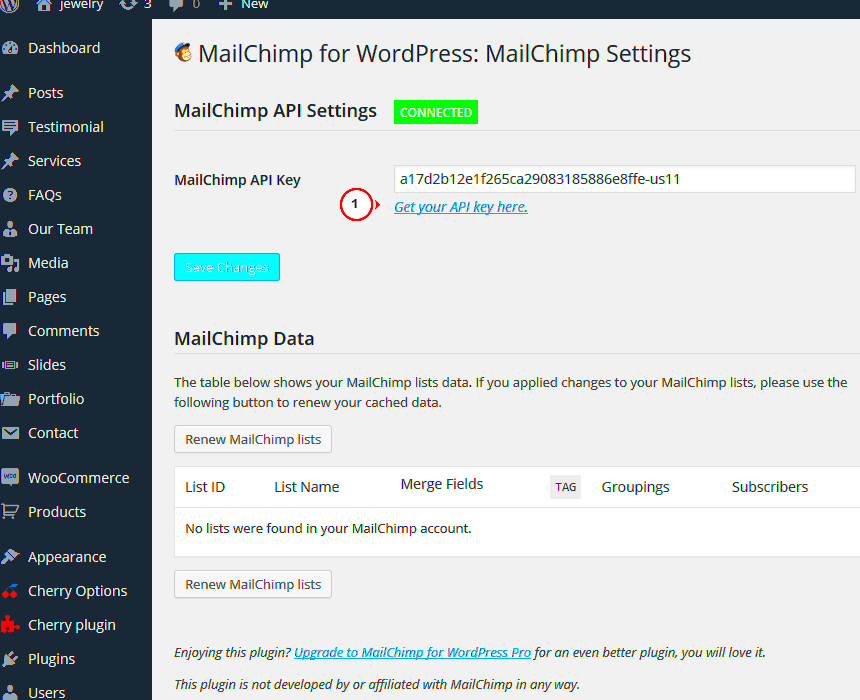
- API Key: The first thing you’ll need is your unique Mailchimp API key. You can find this in your Mailchimp account under the “Account” settings. Copy the key and paste it into the corresponding field in the plugin settings in WordPress.
- Select Audience: After entering your API key, you will be prompted to choose an audience. This is basically the list of subscribers you want to target. Select the appropriate audience from the dropdown menu.
- Form Settings: Customize how your sign-up forms will appear on your WordPress site. You can modify elements like the color scheme, button text, and field labels to align with your branding.
- Additional Options: Explore additional settings such as enabling double opt-in, configuring success messages, and setting up any integrations with other plugins you might be using.
Once you’ve configured all necessary settings, don’t forget to save your changes! You can now start embedding forms or creating pop-ups right on your WordPress site. And voilà! Your Mailchimp plugin is fully set up to help you engage with your audience effectively.
7. Creating and Embedding Signup Forms
Creating and embedding signup forms using the Mailchimp WordPress plugin is a breeze! This feature is paramount since it helps you capture leads directly from your website. Let’s break down the simple process of setting up these forms:
- Install the Mailchimp Plugin: First, ensure that you’ve installed and activated the Mailchimp for WordPress plugin. You can find it in the WordPress plugin directory.
- Connect Your Mailchimp Account: After activation, navigate to the plugin settings and authenticate your Mailchimp account by logging in. This connection allows seamless data transfer between your website and your Mailchimp account.
- Create a Signup Form: Head over to the ‘Form’ option in the Mailchimp plugin menu. With its user-friendly interface, you can easily create a customized signup form. You can choose the fields you want such as name, email, and any other relevant information.
- Design Your Form: The best part? You can adjust the design, colors, and layout to match your website’s branding! There’s also an option to include a success message or redirect users to a different page once they sign up!
- Embed the Form: After designing the form, you can easily embed it on your website. Just copy the generated shortcode and paste it into the WordPress page or post where you want the form to appear. Voila! Your signup form is live.
This whole process enables visitors to subscribe effortlessly, expanding your audience and helping you grow your email list! Remember to monitor the performance of these forms to make necessary adjustments for better engagement.
8. Managing Subscribers with the Mailchimp Plugin
Managing subscribers becomes super easy with the Mailchimp WordPress plugin. Keeping track of who signs up and how you engage with them is crucial for any email marketing strategy. Here’s how you can effectively manage subscribers:
- View Subscriber Lists: Once your forms are embedded and visitors start signing up, you can view all your subscribers directly through the Mailchimp plugin dashboard. This makes it easy to keep tabs on your growing audience.
- Segment Your Audience: Use Mailchimp’s segmentation features to categorize your subscribers. You can group them by interests, behavior, and signup source, allowing you to tailor your email campaigns effectively.
- Manage Resubscribing and Unsubscribing: The plugin supports easy management of subscribers opting in or out. You’ll find options to view those who unsubscribe, making it simpler to take feedback and understand your audience better.
- Automated Welcome Emails: After a user subscribes, you can set up automated welcome emails. This is a great way to engage new subscribers immediately and introduce them to your content or offerings.
- Export Subscriber List: If you wish to analyze your subscribers outside of Mailchimp or transfer them to another service, you can easily export your subscriber list with just a few clicks.
These functionalities make managing your subscribers straightforward and effective, ensuring that your outreach efforts are not only efficient but also impactful! Remember, a well-managed list can significantly enhance your marketing success.
9. Tips for Effective Email Campaigns Using Mailchimp
Using Mailchimp for your email campaigns can be a game changer, but to ensure your efforts yield the best results, you need to be strategic. Here are some handy tips to make your email marketing super effective:
- Segmentation is Key: Instead of sending a one-size-fits-all email, segment your audience. Group your subscribers based on their interests, behavior, or demographics. This allows you to tailor your messages to resonate primarily with specific groups.
- Create Compelling Subject Lines: Your subject line is the very first impression subscribers get. Make it catchy and relevant. Try using personalization or ask intriguing questions that compel readers to click.
- Focus on Quality Content: Content is king! Provide value through engaging articles, tips, or promotions. Use images and bullet points to break text into digestible pieces, ensuring your message is clear.
- Test, Test, Test: Utilize A/B testing to experiment with different aspects of your emails—be it subject lines, sender names, or content layouts. Analyzing results can guide you toward what clicks best with your audience.
- Monitor Analytics: After your campaign, dive into the analytics Mailchimp provides. Look at open rates, click-through rates, and subscriber activity. This valuable info will help you understand what works and inform your future campaigns.
- Optimize for Mobile: With most people checking emails on their phones, ensure your emails are mobile-friendly. A responsive design means they’ll look great no matter what device your readers use.
- Include Strong CTAs: Every email should have a clear Call to Action (CTA). Whether it’s downloading a freebie or making a purchase, telling your readers what you want them to do next is vital.
10. Troubleshooting Common Issues
Like any tool, using the Mailchimp WordPress plugin can come with its fair share of challenges. Here are some common issues you may encounter and tips to troubleshoot effectively:
| Issue | Description | Solution |
|---|---|---|
| Subscription Form Not Displaying | Your signup form doesn’t appear on your site. | Check if the shortcode is correctly placed in a post or widget. If using a widget, ensure it is configured properly in the appearance section. |
| Email Not Sending | Emails are stuck in the Mailchimp queue. | Verify that you’ve linked your WordPress site properly to Mailchimp and check your email sending settings in Mailchimp to ensure everything is configured correctly. |
| High Unsubscribe Rate | Many subscribers are opting out of your emails. | Analyze your content and frequency—are they finding your emails relevant and valuable? A survey can help gather feedback directly from your audience. |
| Delivery to Spam Folder | Your emails are ending up in subscribers’ spam boxes. | Ask subscribers to whitelist your email, and always use a verified domain for sending. Make sure your content isn’t too sales-y and includes a sufficient text-to-image ratio. |
If you encounter any other issues not listed here, be sure to check Mailchimp’s extensive help documentation or seek assistance from their support team. They can help guide you through specific problems you might face.
Conclusion
In summary, the Mailchimp WordPress plugin is an essential tool for website owners looking to enhance their email marketing strategies. It simplifies the process of connecting your WordPress site to Mailchimp, allowing you to manage your email lists and campaigns directly from your dashboard. With its user-friendly interface and powerful features, you can significantly boost your website’s engagement and conversion rates.
To effectively leverage the Mailchimp WordPress plugin, consider the following steps:
- Installation: Start by installing and activating the Mailchimp plugin through your WordPress dashboard.
- Account Linking: Connect your Mailchimp account to the plugin to sync your email lists and campaign data.
- Form Creation: Utilize the plugin to create customizable sign-up forms that match your website’s theme.
- Integration: Integrate the forms into various sections of your site such as sidebars, footers, or dedicated landing pages.
- Analytics: Regularly check the analytics provided by Mailchimp to measure your email campaign performance and optimize your strategy.
The plugin also allows for advanced features, such as conditional fields, A/B testing, and audience segmentation, which can further refine your email marketing efforts.
| Feature | Description |
|---|---|
| Easy Integration | Seamless connection between WordPress and Mailchimp. |
| Custom Forms | Design forms that reflect your brand’s aesthetics. |
| Analytics Tracking | Monitor user engagement and campaign performance. |
| A/B Testing | Try different email versions to find the most effective one. |


