Welcome to the wonderful world of WordPress Multisite! If you’re a WordPress enthusiast, you might be curious about what Multisite is and how it can elevate your blogging experience. In essence,
Understanding Folder Structure in Multisite

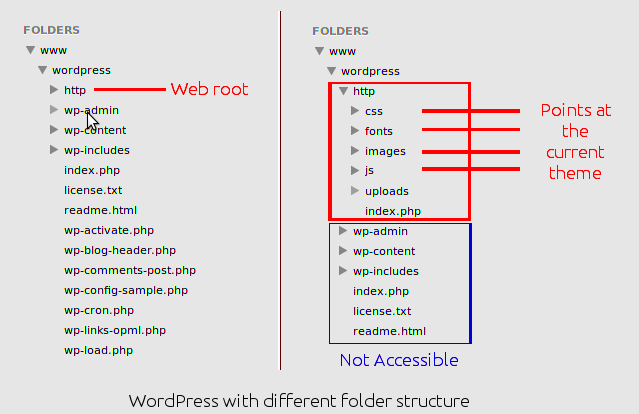
When it comes to WordPress Multisite, understanding the folder structure is crucial for both new and experienced users. The folder structure defines how your individual sites are organized within the main WordPress installation. There are two main types of structures you can choose from:
- Subdirectory Structure: This is the default option where each site is added as a subdirectory of the main site. For instance, if your main site is example.com, additional sites would be example.com/site1, example.com/site2, and so on.
- Subdomain Structure: In this setup, each site exists as a subdomain. So, instead of a subdirectory, your sites would look like site1.example.com, site2.example.com. This provides a clear division between sites and can be beneficial for branding.
Here’s a quick comparison of the two structures:
| Feature | Subdirectory | Subdomain |
|---|---|---|
| URL Structure | example.com/site1 | site1.example.com |
| SEO Implications | May share authority | Separate authority |
| Ease of Setup | Generally simpler | Requires DNS configuration |
| Ideal For | Small networks | Large, distinct brands |
Each structure has its pros and cons, and the choice largely depends on your specific needs. Whichever you choose, understanding this folder structure will help you manage your WordPress Multisite network effectively!
Benefits of Using Folder Structure in Multisite

When it comes to managing multiple sites under a single WordPress installation, choosing the right structure is crucial. Utilizing a folder structure for your WordPress Multisite setup comes with a plethora of benefits that can enhance your site management experience. Here are some noteworthy advantages:
- Organizational Clarity: A folder structure allows you to categorize and compartmentalize your sites effectively. Each site is housed in its own distinct directory, making it easier to keep track of various projects.
- Simplified Navigation: With a well-structured folder system, navigating between sites can be as simple as clicking through directories, minimizing the chances of any mix-ups.
- SEO Advantages: Search engines tend to favor well-organized structures. Having a clear folder hierarchy can contribute positively to your site’s SEO, as URLs are more straightforward and logical.
- Development Flexibility: If you’re developing custom themes or plugins, a folder-based setup allows for easier integration and modification. You can target specific folders rather than sifting through a complex network of sites.
- Resource Allocation: Depending on the site’s needs, you can allocate resources more effectively. Hosting and server resources can be managed with precision, ensuring each site runs smoothly without impacting others.
In summary, using a folder structure for your WordPress Multisite not only streamlines your management processes but also offers several benefits that can lead to improved performance, organization, and even better SEO outcomes.
How to Set Up WordPress Multisite with Folder Structure
Setting up WordPress Multisite with a folder structure is an excellent choice for those looking to manage their websites effectively. Here’s a step-by-step guide to get you started:
- Backup Your Site:
- Modify the wp-config.php File:
- Enable Multisite:
- Update .htaccess File:
- Create Additional Sites:
- Customize Each Site:
Before making any adjustments, ensure to back up your current site. This protects you from losing data during the transition.
Add the following line above the “That’s all, stop editing!” comment:
define('WP_ALLOW_MULTISITE', true);Log into your WordPress dashboard. Navigate to Tools > Network Setup. Here, select the Directory option to use a folder structure. Follow the on-screen instructions.
WordPress will provide some code to add to your .htaccess file. Ensure you replace any existing Multisite code if it’s present.
Once Multisite is enabled, go to My Sites > Network Admin > Sites, and select Add New. Fill out the necessary details for each new site you wish to create.
Install themes or plugins tailored to each specific site as needed. You can manage this from the Network Admin dashboard.
By following these steps, you will have successfully set up your WordPress Multisite with a folder structure, ready to take on multiple projects under one roof! Remember, the flexibility this setup offers is key to managing various sites efficiently.
Logging into Your WordPress Multisite Network
Logging into your WordPress Multisite network can seem daunting at first, especially if you’re managing multiple sites. However, it’s quite straightforward once you understand the structure and what to do. In a Multisite setup, you’ll typically have a primary network that controls all associated sites. So, how do you access your dashboard? Let’s break it down:
- Access the Admin Panel: Start by entering your website’s URL, then append
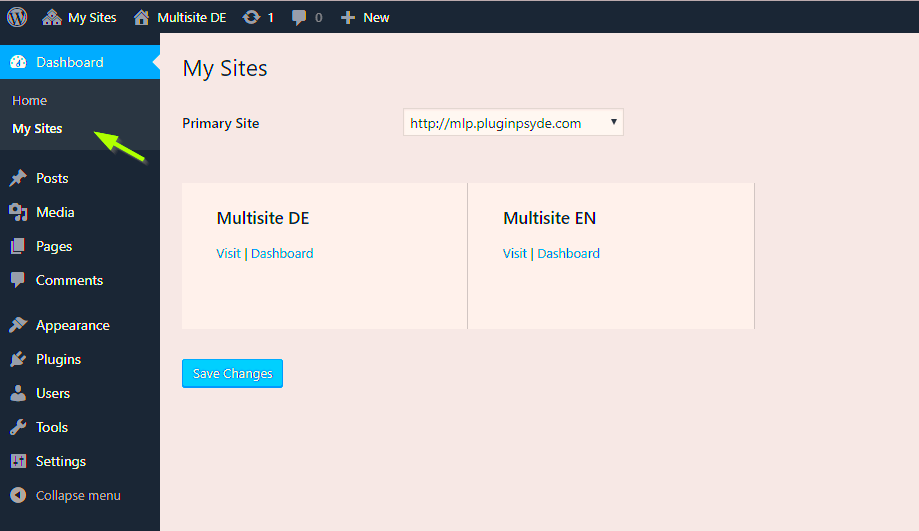
/wp-adminto it. For example, if your primary domain isexample.com, you would go toexample.com/wp-admin. - Network Admin Dashboard: If you’re an admin, you might want to access the network admin dashboard. Simply hover over “My Sites” in the top left corner, then click on “Network Admin” and select “Dashboard.”
- Login Credentials: Enter your username and password. Use credentials provided during the setup of your multisite network. If you manage multiple sites, ensure you choose the correct site to log into.
- Switch Between Sites: Once logged in, you can easily switch between sites by navigating through the “My Sites” dropdown in the upper left corner of your admin dashboard.
And there you have it! Logging in is as simple as that! Just remember, if you are an admin for the entire network, you’ll have different options available to you compared to site admins who can only manage their individual sites.
Troubleshooting Common Login Issues
We’ve all been there: you’re trying to log into your WordPress Multisite, and things aren’t going smoothly. But don’t worry! Many common issues can be fixed with a few straightforward steps. Here’s how to troubleshoot some typical login problems:
- Incorrect Username or Password: Double-check that you’re using the correct login credentials. If you’ve forgotten your password, you can reset it using the “Lost your password?” link on the login page.
- Clearing Cache and Cookies: Sometimes, cached data can interfere with the login process. Clearing your browser’s cache and cookies may help you get a fresh start.
- Disable Plugins: A malfunctioning plugin can block access. If you can’t log in at all, you might need to disable plugins manually via the file manager or FTP.
- Check .htaccess File: If you’re experiencing redirection issues, make sure your .htaccess file is correctly configured. Incorrect settings here can lead to unintended login barriers.
Lastly, if you’re dealing with persistent issues, you might want to consult your hosting provider or refer to the WordPress support forums for more specialized help. Remember, every problem has a solution, so keep a cool head and figure it out step by step!
7. Best Practices for Managing Multisite Logins
Managing logins on a WordPress Multisite network can be a bit tricky, but with some best practices in place, you can simplify the process and enhance security. Whether you’re an admin handling multiple sites or a user accessing different subsites, following these tips can make your experience smoother.
- Use Strong Passwords: Make sure to enforce strong password policies across your network. Encourage users to create passwords that are at least 12 characters long, including a mix of uppercase letters, lowercase letters, numbers, and special characters.
- Regularly Update User Roles: Periodically review user roles and permissions. Ensure that users have access only to the sites they need. Regularly updating roles helps minimize security risks and keeps the network organized.
- Enable Two-Factor Authentication: Adding an extra layer of security through two-factor authentication (2FA) can significantly reduce the risk of unauthorized access. Consider using plugins like Google Authenticator or Authy.
- Monitor Login Attempts: Utilize plugins that track login attempts and alert you of suspicious activity. This will help you identify and mitigate potential threats quickly.
- Educate Users: Offer training sessions or resources to educate users about best practices for creating secure accounts, recognizing phishing attempts, and safely navigating the multisite environment.
- Regular Backups: Back up your Multisite regularly. If a security breach does occur, having a recent backup ensures that you can restore sites quickly.
By implementing these best practices, you can create a secure and efficient WordPress Multisite environment that keeps logins organized and minimizes risks.
8. Conclusion
Logging into a WordPress Multisite with a folder structure doesn’t have to be daunting. Understanding how to properly manage your network, using best practices, and staying informed about updates can make your experience significantly smoother. Whether you’re a site administrator or a user, following the outlined steps can help enhance both security and usability.
To recap, here are some key takeaways:
- Consistency is Key: Maintain a consistent login structure across your network to avoid confusion.
- Stay Informed: Keep up with WordPress updates and security patches to ensure your network stays protected.
- Support and Resources: Accessibility to help and resources is essential for users navigating the multisite environment.
In conclusion, successfully managing logins in a WordPress Multisite using a folder structure involves a combination of good practices, security measures, and ongoing education. Take the time to implement these strategies, and you’ll create a more streamlined and secure system for everyone involved.


