Have you ever come across a design project where the background just didn’t sit right? That’s where transparent vector files come in handy. These files, usually in formats like SVG, AI, or EPS, allow you to place graphics seamlessly over any background without a white box or unwanted borders. They’re a designer’s best friend—offering flexibility, scalability, and crisp quality no matter how big or small. Whether you’re creating logos, banners, or social media graphics, transparent vectors make your work look professional and polished. Let’s dive into why they’re so awesome and how they can elevate your projects!
How to Download Transparent Vector Files from Shutterstock
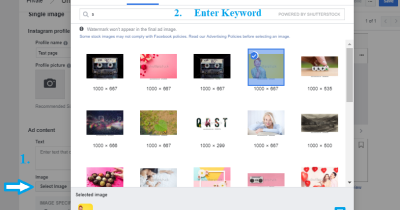
Getting your hands on transparent vector files from Shutterstock is straightforward, but a few tips can make the process even smoother. First, start by heading to Shutterstock’s website and searching for the specific graphics you need. To find transparent vectors, type in your keyword and then use the filter options. Look for the “Vector” category and check the box for “Transparent Background” if available. This narrows down your results to files that already come with transparent backgrounds, saving you time.
Once you’ve found a design you like, click on it to view details. Double-check the file format—most transparent vectors are available in SVG, AI, or EPS formats, ideal for editing and scaling without loss of quality. Make sure the file is compatible with your editing software. Next, select the license type—most Shutterstock files are available with standard or extended licenses, depending on your needs.
To download, you’ll need to create an account if you haven’t already. After purchasing or subscribing, simply click the “Download” button. For transparent vectors, ensure you choose the correct file format—usually, SVG or AI—and confirm the download. Once downloaded, open the file in your preferred editing program like Adobe Illustrator, CorelDRAW, or even some online editors to start customizing your design. And that’s it—easy as pie! Now you’re ready to incorporate stunning transparent vector graphics into your projects effortlessly.
Best Practices for Using Transparent Vectors in Your Projects
Using transparent vector files from Shutterstock can really elevate your design projects, but to get the most out of them, it’s important to follow some best practices. Let’s walk through a few tips that can help you make your visuals look professional and polished.
Choose the Right File Format: When working with transparent vectors, formats like SVG, AI, or EPS are your best friends. They preserve quality and allow for easy editing. Make sure the file you download is compatible with your design software.
Maintain Consistent Resolution and Quality: Vector files are scalable, which means they won’t pixelate when resized. However, ensure that the original file is high-quality so that details remain crisp, especially when used in larger projects like banners or posters.
Use Proper Layering and Grouping: When importing vectors into your design tool, organize elements into layers or groups. This makes it easier to edit specific parts later on without disrupting the entire design.
Leverage Transparency for Depth and Focus: Transparency isn’t just about removing backgrounds; it’s also a powerful tool to add depth. Use semi-transparent elements to create overlays or to subtly highlight parts of your design, guiding the viewer’s eye.
Be Mindful of Color and Contrast: Transparent vectors can sometimes clash with backgrounds. Test your design on different backgrounds to ensure the transparency effect looks natural and the colors stand out appropriately.
Keep Licensing in Mind: Always double-check the license attached to the Shutterstock vector. If you plan to use it commercially or modify it significantly, ensure your usage complies with Shutterstock’s licensing terms.
By following these best practices, you’ll be able to incorporate transparent vector files seamlessly into your projects, making your designs more dynamic and professional-looking. Whether you’re creating a website, a marketing brochure, or social media graphics, these tips will help you maximize the potential of your vector assets.
Editing and Customizing Vector Files for Your Needs
One of the biggest advantages of using vector files from Shutterstock is their flexibility. Unlike raster images, vectors can be easily edited and customized to perfectly fit your project’s style and requirements. Here’s how you can get started with editing and customizing these files:
Choose the Right Editing Software: To edit vector files, you’ll want to use software like Adobe Illustrator, CorelDRAW, or free options like Inkscape. These programs allow you to manipulate vector paths, colors, and layers with precision.
Open and Familiarize Yourself with the File Structure: When you open your vector file, take a moment to explore its layers and groups. Understanding how the elements are organized will make editing much smoother.
Customize Colors and Styles: Want to match your brand palette? Simply select the parts of the vector you want to change and adjust the colors using your software’s color tools. You can also modify stroke widths, add gradients, or apply effects to make your design unique.
Edit Shapes and Paths: Need to change a shape? Use the node or anchor point tools to adjust curves and edges. This is especially handy if you want to tweak the design to better fit your project or create a unique look.
Add or Remove Elements: Need to add new icons, text, or decorative elements? Most vector editors allow you to easily insert new objects or delete existing parts. Just be sure to keep your layers organized for future edits.
Use Templates and Reusable Components: If the vector file includes symbols or reusable components, leverage them to maintain consistency across your designs. Editing a master component automatically updates all instances, saving you time.
Save Variations: Once you’ve customized your vector, it’s a good idea to save different versions. This way, you can experiment without losing your original design, and you’ll have options ready for different uses.
Export in the Needed Format: After editing, export your customized vector in the format that best suits your project—SVG for web, PDF for print, or PNG for quick sharing. Make sure to keep a copy of your layered AI or EPS files for future edits.
Remember, editing vectors is all about experimentation and creativity. Feel free to tweak colors, shapes, and details until your design feels just right. With a little practice, customizing Shutterstock’s transparent vector files will become second nature, giving you the freedom to craft visuals that perfectly match your vision.
Tips for Ensuring Compatibility and Quality
Using transparent vector files from Shutterstock can be a game-changer for your design projects, but to get the best results, you need to make sure everything works smoothly on your end. Here are some handy tips to ensure compatibility and maintain high quality:
Check the File Format
Most vector files from Shutterstock come in formats like AI, EPS, or SVG. Before diving into your project, verify that your design software supports these formats. For example, Adobe Illustrator handles AI and EPS files seamlessly, while SVG files work well across many web applications. If you’re using a different program, double-check its compatibility to avoid any headaches later on.
Use Updated Software
Outdated design tools can sometimes struggle with newer vector files, especially those with transparency features. Make sure your software is up-to-date, as updates often include bug fixes and improved support for vector formats. This way, you’ll see your files in their full glory, with all transparency and details intact.
Maintain Original Quality
When downloading vector files, opt for the highest resolution or the original source files whenever possible. Avoid converting files from raster images, as this can introduce pixelation or loss of transparency quality. Keep the original vector files safe, so you can always revert or make edits without sacrificing quality.
Adjust Transparency Settings Carefully
If you need to tweak transparency or blending modes, do so within your design software rather than altering the source file. This preserves the original quality and ensures compatibility across different platforms or print methods.
Test Print or Web Display
Before finalizing your project, it’s smart to do a quick test—print a sample or view it on different devices. This helps catch any issues with transparency, color rendering, or file compatibility that might not be obvious on your screen. Better to find out early than after publishing or printing!
Conclusion and Additional Resources for Vector File Usage
Using transparent vector files from Shutterstock opens up a world of creative possibilities. They give your designs a professional look with crisp lines and seamless transparency, whether you’re working on logos, illustrations, or web graphics. By following the tips above—like ensuring your software supports the formats, keeping files high quality, and testing your designs—you’ll be able to make the most out of these versatile files.
Remember, mastering vector files takes a bit of practice, but once you get comfortable, you’ll find they can drastically streamline your workflow and elevate your projects. Don’t hesitate to explore additional resources to deepen your understanding:
- Adobe Illustrator Tutorials: Learn advanced techniques for editing vectors and transparency.
- Shutterstock Help Center: Find specific tips on downloading and handling vector files.
- Design Blogs & Forums: Join communities like Dribbble or Behance for inspiration and advice.
- Online Courses: Platforms like Udemy or Skillshare offer dedicated courses on vector graphic design.
With some practice and the right tools, you’ll be confidently working with transparent vector files in no time. Happy designing!