Hey there, fellow content creators! If you’re looking to level up your YouTube channel with eye-catching graphics, Shutterstock can be a game-changer. With its vast library of high-quality images, vectors, and videos, you can find everything you need to make your thumbnails, banners, and in-video graphics pop. Whether you’re a beginner or a seasoned pro, understanding how to navigate Shutterstock will save you time and help you create professional-looking content effortlessly. Let’s dive into how you can harness
Step 1: Creating a Shutterstock Account and Subscription Plan
Getting started with Shutterstock is pretty straightforward, but choosing the right plan is key to making the most of what it offers. First things first, head over to Shutterstock’s website. Click on the “Sign Up” button, usually located at the top right corner. You’ll be prompted to enter your email address, create a password, and provide some basic info. Once you’ve set up your account, you’re ready to pick a subscription plan that suits your YouTube needs.
Understanding Subscription Options
Shutterstock offers several plans, but here are the most common ones for YouTubers:
- On-Demand Packs: Pay-as-you-go options where you purchase a set number of images or videos. Good if you need occasional content.
- Subscription Plans: Monthly or annual plans with a fixed number of downloads. Ideal for consistent content creation.
Choosing the Right Plan
Consider how often you’ll need new graphics. If you’re creating videos weekly or even daily, a subscription plan with unlimited or high download limits makes sense. For more sporadic uploads, on-demand packs might be more cost-effective. Keep in mind:
- Download Limits: Make sure the plan offers enough downloads for your monthly content schedule.
- Content Types: Check if the plan includes vector graphics, videos, or photos, depending on your needs.
- Budget: Compare plans to find one that balances cost and content needs.
Signing Up for a Subscription
Once you’ve chosen your plan, follow the prompts to enter your payment details. Shutterstock often offers free trials or discounts for new users, so keep an eye out for those! After completing the payment, you’ll have instant access to a dashboard where you can search, preview, and download assets. Remember to review the licensing terms — most Shutterstock assets come with broad commercial use rights, perfect for YouTube graphics. Now, you’re all set to explore the library and start creating stunning visuals for your channel!
Step 2: Browsing and Searching for Suitable Graphics
Once you’ve logged into your Shutterstock account, it’s time to find the perfect images and videos that will elevate your YouTube content. Think of this step as shopping for the right accessories to match your outfit — you want something that complements your style and message.
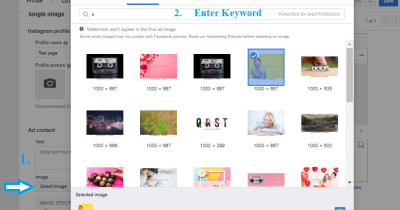
Start by using the search bar at the top of the Shutterstock homepage. Type in keywords related to your video topic. For example, if you’re creating a fitness tutorial, try searching for terms like “workout,” “fitness,” “healthy lifestyle,” or “exercise equipment.” Use specific keywords to narrow down your results and find the most relevant graphics.
To refine your search further, take advantage of Shutterstock’s filtering options. You can filter results by:
- Image type: Photos, vectors, illustrations, or videos.
- Orientation: Horizontal, vertical, or square.
- Color scheme: Monochrome, vibrant, or specific colors.
- Release date: Most recent or popular.
- People: With or without people, age, gender, etc.
This helps you quickly find assets that match your vision without scrolling endlessly. Remember, the goal is to gather a variety of options so you can choose the best ones that resonate with your brand and the message of your video.
As you browse, don’t forget to check out the previews. Shutterstock provides high-resolution previews that let you see exactly how the graphic will look in your project. Save your favorites by clicking the heart icon or adding them to a collection — this makes organizing easier when you’re ready to download.
Pro tip: Use the comparison feature if available, to view multiple graphics side by side. This way, you can make a more informed decision about which visuals truly enhance your YouTube content.
Step 3: Downloading High-Quality Images and Videos from Shutterstock
Found the perfect graphic or video? Great! Now let’s talk about downloading these assets in the highest quality possible. High-quality visuals are key to making your YouTube videos look professional and polished.
First, ensure you’ve purchased the appropriate license for your needs. Shutterstock offers various licensing options, but for most YouTube creators, a standard license will suffice for online use. Once you’ve selected your assets, click on the download button.
Here’s what to do next:
- Select the resolution: For images, choose the highest resolution available, often labeled as “Original”. For videos, select the highest quality option to ensure clarity and smooth playback.
- Choose the format: Most images download as JPEG, PNG, or TIFF, while videos typically come as MP4 files. Pick the format that best suits your editing software.
- Check your download settings: Shutterstock usually provides options to add the files to your cart or download directly if you’ve purchased a subscription or credits. Make sure you’re logged in and have the necessary credits or subscription active.
- Download and save: Once the download begins, save the files to a dedicated folder on your computer. Organizing your assets makes the editing process smoother later on.
Tip: Before inserting the assets into your video editing software, review the files to ensure they downloaded correctly and are of the expected quality. This saves you from surprises during editing.
And that’s it! By carefully browsing for the right graphics and downloading high-quality assets, you’re setting yourself up for creating engaging, visually appealing YouTube videos that stand out. Just remember, the investment in quality visuals can make a big difference in how your audience perceives and engages with your content.
Step 4: Editing and Customizing Graphics for Your YouTube Channel
Once you’ve downloaded the perfect graphics from Shutterstock, it’s time to make them truly your own. Customization is key to ensuring your visuals match your brand style and resonate with your audience. Don’t worry — this part can be fun and straightforward, especially with user-friendly editing tools.
Start by opening your chosen graphics in an editing program like Canva, Adobe Photoshop, or even free options like GIMP or Pixlr. These tools let you tweak colors, add text, and adjust sizes easily. For example, if you’ve downloaded a logo or banner, you might want to:
- Change colors to match your brand palette
- Add your channel name or tagline
- Adjust the size and position for optimal placement
- Incorporate overlays or effects to make graphics pop
Remember, consistency is everything. Keep fonts, colors, and styles aligned with your overall branding. If you’re not comfortable with design, simple adjustments like resizing or adding text can make a big difference. Many Shutterstock graphics come with layered files or editable templates, so check the download details — these make customization quick and easy.
Another pro tip: always preview your graphics in the context of your video. Sometimes, a graphic that looks great on its own might need a tweak once you see it alongside your video content. Take your time to experiment, and don’t hesitate to seek feedback from friends or fellow creators. After all, your graphics should enhance your content and make your channel stand out!
Step 5: Incorporating Shutterstock Graphics into Your YouTube Videos
Now that your graphics are customized and polished, it’s time to seamlessly incorporate them into your YouTube videos. This step is where your visuals really come to life and help elevate your content.
Here’s a simple workflow to help you get started:
- Import your graphics into your video editing software — whether you’re using Adobe Premiere, Final Cut Pro, DaVinci Resolve, or a beginner-friendly app like iMovie or Filmora.
- Position your graphics appropriately — for example, overlay your logo during the intro, add banners or lower thirds for titles, or include end screens with your calls-to-action.
- Adjust timing and transitions — make sure graphics appear at the right moments and fade smoothly in and out to keep your video professional and engaging.
- Resize and align — ensure your graphics are scaled properly for different screen sizes and don’t obstruct important parts of your footage.
Here are a few common ways to use Shutterstock graphics effectively:
- Thumbnails: Use eye-catching images or overlays to entice viewers to click on your videos.
- Intro and outro screens: Brand your videos with consistent opening and closing graphics.
- Lower thirds: Display names, titles, or key points during your content.
- Backgrounds or overlays: Add subtle graphics behind text or as decorative elements to keep visuals lively.
Finally, always preview your video before publishing. Make sure your graphics look natural within the scene, aren’t distracting, and support your message. Using Shutterstock graphics thoughtfully can boost your channel’s professionalism and help you build a strong visual identity that viewers remember.
Tips for Optimizing Shutterstock Graphics for YouTube
Now that you’ve chosen some fantastic graphics from Shutterstock, it’s time to make sure they look their best on your YouTube videos. Optimizing your graphics isn’t just about making them look pretty — it’s about ensuring they enhance your content, load quickly, and engage your viewers effectively.
1. Use the Right Resolution and Size
To keep your videos looking sharp, always select high-resolution graphics. Shutterstock offers images in various resolutions, but for YouTube, aim for at least 1920×1080 pixels (Full HD). If you’re adding text or overlays, ensure they’re large enough to be easily readable on different devices. Remember, graphics that are too small can appear blurry when scaled up, while oversized images may cause longer load times.
2. Keep File Formats and Compression in Mind
JPEG and PNG are common formats for YouTube graphics. Use PNG for images with transparency or sharp lines, and JPEG for photographs or more detailed images. Also, optimize your files for web use — compress them without sacrificing too much quality. This helps your videos load faster and reduces buffering, providing a smoother experience for your viewers.
3. Maintain Visual Consistency
Consistency in colors, fonts, and styles across your graphics creates a professional look. Use Shutterstock graphics that match your channel’s branding or theme. If you’re adding text, choose fonts and colors that are easy to read and complement your overall aesthetic.
4. Incorporate Branding Elements
Adding your logo or channel watermark on graphics can boost brand recognition. Make sure these elements are unobtrusive but visible enough to leave an impression. Shutterstock offers customizable templates where you can easily add your branding elements.
5. Test on Multiple Devices
Before publishing, preview your videos on different screens—smartphones, tablets, desktops—to ensure your graphics look good everywhere. Sometimes what appears clear on a large monitor might be blurry or cut off on a smaller device.
6. Use Animations and Effects Wisely
If you’re adding animated graphics or overlays, keep effects subtle and professional. Overdoing animations can distract viewers, but a tasteful transition or highlighting effect can emphasize important points or calls to action.
7. Keep Accessibility in Mind
Ensure that text overlays are readable by using high contrast colors and sufficient font size. This not only helps viewers with visual impairments but also makes your content more inclusive and engaging.
Conclusion and Best Practices for Using Shutterstock Graphics on YouTube
Using Shutterstock graphics for your YouTube channel can elevate your content, making it more visually appealing and professional. The key is to select the right images, optimize them properly, and ensure they align with your brand and message.
Here are some best practices to keep in mind:
- Always choose high-resolution images to keep your videos crisp and clear.
- Maintain consistency in style, color palette, and branding across all graphics.
- Optimize file sizes to ensure quick loading times and smooth playback.
- Use graphics to highlight key points or add visual interest, but don’t overdo it.
- Test your videos on different devices to ensure your graphics look great everywhere.
- Respect copyright and licensing terms when using Shutterstock images to avoid issues down the line.
Remember, the ultimate goal is to create engaging, professional-looking videos that captivate your audience. By carefully selecting and optimizing Shutterstock graphics, you’ll make your YouTube content stand out and leave a lasting impression. Keep experimenting, stay consistent, and don’t forget to have fun with your creative process!