
Looking to spice up your images quickly without diving into complex editing software? Shutterstock Editor is your new best friend! It’s a user-friendly tool designed to help you make fast, professional-looking edits right in your browser. Whether you’re creating social media posts, blog images, or marketing materials, this editor simplifies the process so you can focus on your content instead of wrestling with complicated programs. The best part? It’s free with your Shutterstock account, making it accessible for everyone. Let’s explore what makes
Some of the key benefits include:
- Ease of Use: Intuitive interface that requires no prior design experience.
- Variety of Tools: From cropping and resizing to adding text and filters, it has everything you need.
- Time-Saving: Make edits in minutes instead of hours.
- Integration with Shutterstock Library: Access millions of high-quality images directly within the editor.
- Responsive Design: Edit on any device — desktop, tablet, or smartphone.
Whether you’re a busy content creator, a small business owner, or just someone who wants to make their images pop, Shutterstock Editor is designed to make your life easier and your visuals more appealing with minimal hassle.
Getting Started with Shutterstock Editor
Getting started with Shutterstock Editor is super straightforward — no complicated sign-ups or downloads needed. Just log into your Shutterstock account, and you’re ready to begin editing. Here’s a simple step-by-step guide to help you jump right in.
- Login to Your Shutterstock Account: Head over to Shutterstock.com and sign in with your credentials. If you don’t have an account, signing up is quick and free.
- Access Shutterstock Editor: Once logged in, click on the “Edit” button on any image you want to customize or select “Create New” from the dashboard to start fresh.
- Choose Your Image: You can upload your own images or select from Shutterstock’s vast library. To browse images, use the search bar, and filter by categories, orientation, or color to find the perfect visual.
- Open the Editor: After selecting an image, click on “Edit” to open the Shutterstock Editor interface.
Once inside the editor, you’ll notice a clean, user-friendly workspace packed with tools. Here are a few tips to help you get comfortable:
- Toolbar: Located on the side, it offers options like cropping, resizing, adding filters, text, overlays, and effects.
- Preview: Always preview your edits before saving to ensure everything looks just right.
- Save and Export: When you’re happy with your edits, click “Save” or “Download” to export your finished image in your preferred format.
And that’s it! With just a few clicks, you’re ready to transform your images into eye-catching visuals perfect for any project. The key is to experiment and explore the tools to see what works best for your style and needs.
Uploading Your Images to Shutterstock Editor
Once you’re ready to start editing your images, the first step is to upload them to Shutterstock Editor. It’s a straightforward process that doesn’t require any technical expertise, so don’t worry if you’re new to this. Just follow these simple steps to get your images uploaded and ready for editing:
- Log into your Shutterstock account. If you don’t have one yet, signing up is quick and free. Having an account gives you access to all the editing features and your uploaded images.
- Navigate to Shutterstock Editor. You can find this option from your dashboard or the main menu. It’s usually labeled as “Editor” or “Create” depending on the interface.
- Click on the “Upload Images” button. This is typically a prominent button on the editor’s homepage. When you click it, a file browser window will pop up.
- Select your images. Browse through your folders and choose the files you want to edit. Shutterstock Editor supports common image formats like JPEG, PNG, and TIFF.
- Upload and wait for the images to load. The upload time depends on your file size and internet connection. You’ll see a progress bar, and once completed, your images will appear in the editor workspace.
Tip: To save time, you can upload multiple images at once. Shutterstock Editor allows batch uploads, so you can prepare a bunch of images for editing without repeating the process each time. Once uploaded, you’re ready to start customizing and enhancing your images to suit your needs.
Using Basic Editing Tools in Shutterstock Editor
Now that your images are uploaded, it’s time to explore the basic editing tools that make photo enhancement quick and easy. Shutterstock Editor offers a user-friendly interface with intuitive controls, so you can make professional-looking edits without any complicated software. Let’s go over some of the core tools you’ll find:
Crop and Resize
This is often the first step in editing. To crop or resize your image:
- Select the image you want to edit.
- Click on the “Crop” tool, which usually looks like a square with overlapping corners.
- Adjust the borders by dragging the handles, or choose preset aspect ratios for social media, print, etc.
- Click “Apply” to finalize the crop, or “Cancel” if you want to keep the original framing.
Adjust Brightness, Contrast, and Saturation
These adjustments help you fine-tune the overall look of your image:
- Find the “Adjustments” section in the toolbar.
- Use sliders to increase or decrease brightness, contrast, and saturation.
- Preview your changes in real-time to see what looks best.
- Click “Reset” if you want to start over or “Apply” to save your adjustments.
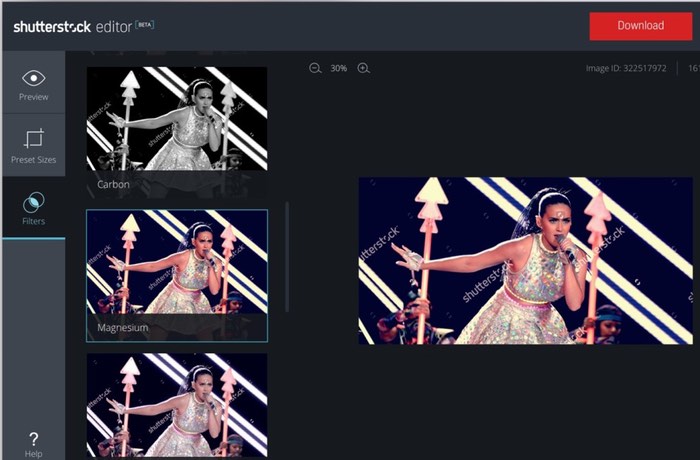
Apply Filters and Effects
If you want to give your images a creative touch:
- Go to the “Filters” or “Effects” tab.
- Browse through options like black & white, vintage, vignette, or blur.
- Click on your preferred effect to preview it instantly.
- Adjust intensity sliders if available, then click “Apply.”
Adding Text and Shapes
Enhance your image with text overlays or simple graphic shapes:
- Select the “Text” tool to add captions, titles, or labels.
- Choose from various fonts, sizes, and colors.
- Position the text anywhere on your image by dragging it around.
- Similarly, add shapes like circles, rectangles, or arrows for visual emphasis.
Remember, these basic tools are designed to make quick edits without overwhelming you. Play around with them, and you’ll be surprised how much you can improve your images with just a few clicks. Once you’re happy with the edits, you can save or export your images directly from Shutterstock Editor, ready to be used for your projects or uploaded elsewhere.
Applying Filters and Effects to Enhance Your Images
Once you’ve uploaded your image to Shutterstock Editor, one of the easiest ways to give it a fresh, professional look is by applying filters and effects. Think of filters as the magic touch that can instantly change the mood or style of your photo—making it brighter, more dramatic, vintage, or even artistic. It’s like giving your image a quick makeover with just a few clicks!
To get started, simply select your image, then look for the “Filters” or “Effects” tab in the toolbar. Shutterstock Editor offers a variety of options, including:
- Brightness & Contrast: Adjust these to make your image pop or to soften shadows and highlights.
- Saturation & Vibrance: Enhance or tone down the colors for a more natural or bold look.
- Blur & Sharpen: Use these to add a dreamy effect or to bring out details in your image.
- Vintage & Black & White: Instantly give your photo a timeless or classic feel.
For example, if you want to make your landscape photo more cinematic, try increasing the contrast and adding a slight vignette effect. Want to give a portrait a soft, dreamy look? Use the blur tool subtly around the edges and reduce sharpness slightly.
Many filters can be fine-tuned with sliders, so you can achieve the exact vibe you’re aiming for. Plus, the best part? You can preview each effect before applying it, so experiment without worry. Once satisfied, just click “Apply,” and your image will be transformed!
Remember, the goal of filters and effects isn’t to overdo it—subtle enhancements often yield the best results. Play around, trust your instincts, and soon you’ll be creating images that really stand out!
Adding Text and Graphics to Your Images
Need to add a catchy headline, a quote, or some fun graphics? Shutterstock Editor makes it super simple to insert text and graphics that complement your image perfectly. This feature is especially useful for creating social media posts, marketing materials, or personalized visuals.
To begin, click on the “Text” tool in the toolbar. You’ll see options to add a heading, subheading, or body text. Once you’ve selected your preferred style, click on the image where you want the text to appear, and a text box will pop up. You can then type your message and customize it to match your style.
Customization options include:
- Fonts: Choose from a wide range of fonts to match your brand or mood.
- Colors: Pick colors that stand out or blend seamlessly with your image.
- Size & Alignment: Resize your text and position it precisely where you want.
- Effects: Add shadows, outlines, or transparency for better visibility and flair.
Want to make your message pop? Try using bold fonts or contrasting colors. For a more subtle look, softer hues and elegant fonts work beautifully.
In addition to text, you can add graphics like icons, shapes, or stickers. Simply click on the “Graphics” or “Elements” tab, browse through the available options, and drag your preferred graphics onto the image. Resize, rotate, and position them to enhance your design.
For example, if you’re creating a promotional image, adding a colorful badge or icon can draw attention to key information. Combining text and graphics thoughtfully can turn a simple photo into a compelling visual story.
Once you’ve added your text and graphics, don’t forget to review your composition. Adjust spacing, alignment, and size to ensure everything looks balanced and professional. When you’re happy with your design, just hit “Download” or “Save,” and your customized image is ready to impress!
Saving and Exporting Your Edited Images
Once you’ve put the finishing touches on your image using Shutterstock Editor, it’s time to save and export your masterpiece. The good news? Shutterstock makes this process straightforward, so you can focus more on your creative ideas and less on technical hurdles.
After completing your edits, look for the Save or Download button, typically located at the top right corner of the editor interface. When you click it, you’ll usually be prompted to choose your preferred file format and quality. Common options include:
- JPEG – Great for most web uses, easy to upload and share.
- PNG – Ideal if your image has transparency or needs a higher quality for printing.
- PDF – Useful if you’re creating designs that need to be printed or shared as a document.
Next, select the resolution or quality setting based on your needs. For online use, a standard resolution like 72 DPI is usually enough, but for printing or high-quality presentations, opt for higher resolutions, like 300 DPI.
Another handy feature is the ability to save your project as a template if you plan to make similar edits in the future. This way, you can quickly access your saved templates without starting from scratch each time.
Once you’re satisfied with your export options, click Download. Your image will then be processed and saved to your computer, usually in your default downloads folder. If you’re working on multiple images or large files, the download might take a few moments. Just be patient — and make sure you choose the correct format and quality for your specific needs.
Remember, it’s always a good idea to keep a copy of your original image untouched somewhere safe, just in case you want to revisit or redo your edits later. Shutterstock Editor makes it easy to experiment without worry — your original file stays intact!
Tips for Efficient Image Editing with Shutterstock Editor
Want to speed up your editing process and get the most out of Shutterstock Editor? Here are some practical tips to help you work smarter, not harder.
1. Use Templates and Presets: Shutterstock offers pre-designed templates and editing presets that can save you tons of time. Whether you’re creating social media posts, banners, or flyers, starting with a template gives you a professional layout that’s easy to customize.
2. Leverage Keyboard Shortcuts: Familiarize yourself with common shortcuts like undo (Ctrl+Z or Cmd+Z), redo, copy, and paste. These small tricks can significantly speed up your workflow.
3. Organize Your Workspace: Keep your workspace tidy by closing unnecessary panels and tools. Customize the toolbar to keep your most-used features within easy reach, so you don’t waste time hunting for tools.
4. Use Layers Wisely: Layers help you manage different elements of your design. Lock layers you don’t want to accidentally change, and hide others to focus on specific parts of your image. This organization makes editing more manageable and efficient.
5. Make Use of Batch Editing: If Shutterstock Editor supports batch processing, use it to apply the same edits or filters to multiple images at once. This is especially helpful for repetitive tasks like resizing or color adjustments.
6. Save Your Custom Settings: Found a particular combination of filters, effects, or adjustments you love? Save those settings as a preset so you can quickly apply them to future projects.
7. Use Shortcut Keys for Common Actions: For example, pressing ‘C’ might activate the crop tool, while ‘T’ could open the text tool. Check the documentation or settings to see what shortcuts are available to you.
8. Preview Before Finalizing: Always use the preview feature to see how your edits look in real-time. It helps you catch mistakes early and avoid wasting time on unnecessary adjustments.
9. Keep Your Files Organized: Save your working files with clear, descriptive names and organize your folders logically. This way, you can quickly locate your projects when you need them.
By incorporating these tips into your workflow, you’ll find yourself editing images faster and more efficiently, leaving you more time for your creative ideas. Remember, the key is to stay organized, use available tools wisely, and don’t be afraid to experiment with different features. Happy editing!
Conclusion and Next Steps for Creative Image Edits
Mastering Shutterstock Editor opens up a world of possibilities for quick and professional image enhancements. By familiarizing yourself with its intuitive tools, you can effortlessly create stunning visuals that elevate your projects. Remember, the key to efficient editing is practice—spend time exploring features like filters, cropping, text overlays, and adjustments to find what works best for your style.
As you become more comfortable, consider experimenting with the following next steps to refine your skills:
- Explore Advanced Features: Dive into options such as background removal, blending modes, and custom overlays to add unique touches to your images.
- Utilize Templates: Use pre-designed templates for social media posts, presentations, or marketing materials to save time while maintaining a professional look.
- Organize Your Assets: Create categories or folders within Shutterstock Editor to easily access your favorite images and elements for future projects.
- Learn from Tutorials: Watch online tutorials or read guides to discover hidden features and creative techniques that can enhance your workflow.
Remember, consistent practice and experimentation are essential to developing your editing skills. As you become more confident, you’ll be able to produce eye-catching visuals swiftly, making your content stand out across various platforms. Keep exploring, stay creative, and enjoy the process of transforming simple images into compelling visual stories.

