Welcome to the world of Shutterstock Editor, a powerful tool that makes creating stunning, professional designs easier than ever. Whether you’re crafting social media posts, flyers, or banners, this online editor offers a user-friendly experience with a ton of features to bring your ideas to life. No matter your skill level, Shutterstock Editor helps you produce high-quality visuals quickly and efficiently. In this section, we’ll explore what makes this tool stand out and why it’s a must-have for marketers, entrepreneurs, and creatives alike.
Why choose Shutterstock Editor? Here are some key benefits:
- Ease of Use: Intuitive interface designed for beginners and pros.
- Extensive Asset Library: Access to millions of royalty-free images, icons, and fonts.
- Versatility: Suitable for a wide range of projects from social media to print.
- Time-Saving Tools: Ready-made templates and smart editing features speed up your workflow.
- Cloud-Based Platform: Edit your designs anywhere, anytime, without downloads or installations.
All these benefits combine to make Shutterstock Editor a go-to solution for creating professional-looking designs without needing advanced graphic design skills. It’s like having a creative studio right at your fingertips!
Getting Started with Shutterstock Editor
Ready to dive in? Getting started with Shutterstock Editor is simple and straightforward. Here’s a step-by-step guide to help you kick off your first project:
- Create a Shutterstock Account: If you don’t already have one, sign up for free on the Shutterstock website. An account gives you access to all the editing features and assets.
- Access Shutterstock Editor: Log in to your account and navigate to the Shutterstock Editor through the main dashboard or directly via the editor link.
- Select a Template or Start from Scratch: You can choose from dozens of customizable templates for specific needs like social media posts, flyers, or banners. Prefer to start fresh? Just select a blank canvas with your desired dimensions.
- Explore the Interface: Familiarize yourself with the workspace—there’s a toolbar, layers panel, and options for adding images, text, icons, and backgrounds.
- Add Your Content: Upload your own images or select from Shutterstock’s library. Drag and drop elements onto your canvas to position them exactly how you want.
- Edit and Customize: Use the editing tools to resize, crop, rotate, or apply filters. Customize text with fonts, colors, and effects. Play around with layering and transparency for a polished look.
- Save and Export: When you’re happy with your design, save it directly in your account or export it in the format you need—JPEG, PNG, or PDF.
That’s it! With a little exploration and creativity, you’ll be designing like a pro in no time. Remember, the key is to experiment and take advantage of the templates and assets that Shutterstock Editor offers. Happy designing!
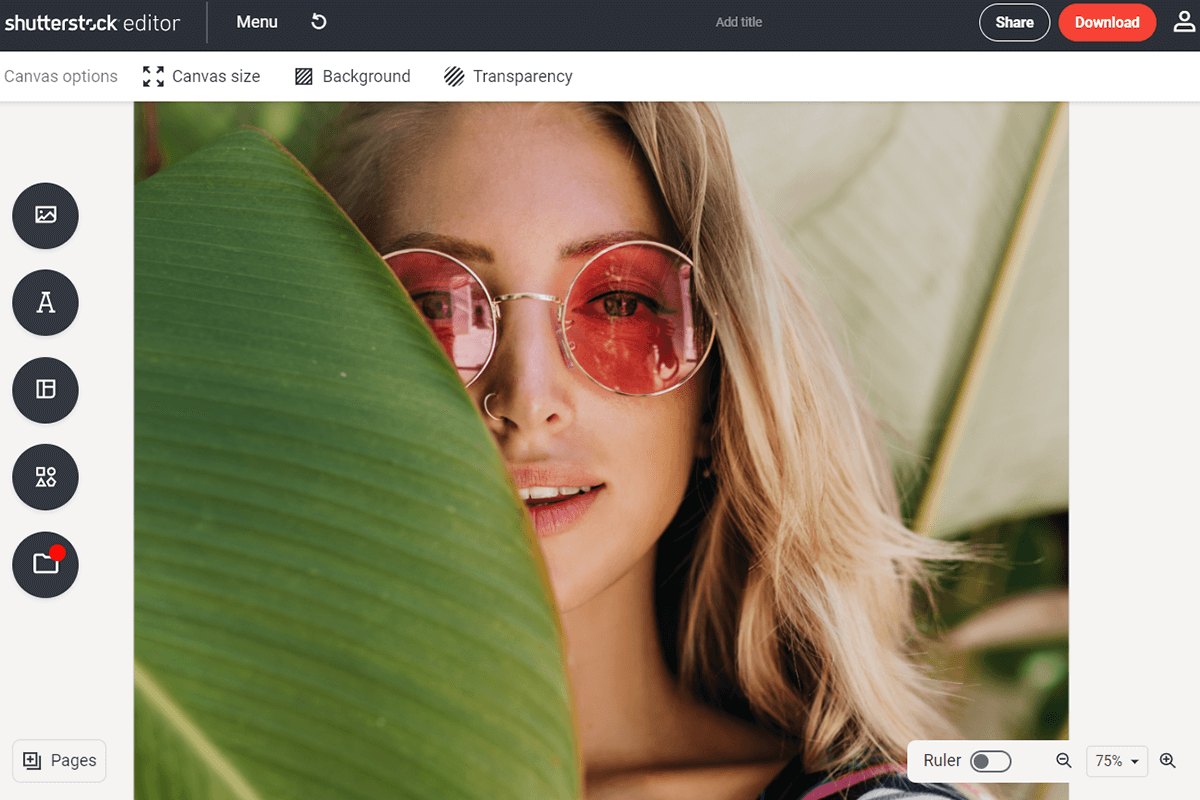
How to Upload and Select Images for Your Design
Getting started with your design on Shutterstock Editor is pretty straightforward, but one of the most important steps is choosing the right images. Whether you’re working on a social media post, a flyer, or a presentation, selecting high-quality images can make all the difference.
First things first, you need to upload your images. Shutterstock Editor makes this super simple. Just look for the “Upload” button—usually located on the sidebar or at the top of the interface. Clicking this will open a file browser where you can select images from your computer. You can upload multiple images at once, which is a huge time-saver.
Once uploaded, your images will appear in the My Files section. Here, you can organize them into folders or keep them in the main gallery for quick access. When you’re ready to add an image to your design, simply drag and drop it onto your canvas or click on it to insert.
Choosing the right images is key. Shutterstock Editor offers a built-in search feature, powered by Shutterstock’s extensive library. You can search for stock images directly within the editor, which is perfect if you need professional visuals but don’t have your own photos. Use keywords that relate to your project—like “business,” “nature,” or “technology”—to find images that match your theme.
As you browse through images, look for those with a high resolution and good composition. Remember, images with transparent backgrounds (PNG files) are especially handy if you want to layer them over other elements or backgrounds. Also, pay attention to licensing—most images are available for commercial use, but it’s good to double-check if you’re using Shutterstock assets for business projects.
Finally, once you select your images, you can resize, crop, or adjust them directly within the editor. Don’t be afraid to experiment with different images to see what fits best. The goal is to choose visuals that complement your message and create a cohesive, professional look.
Using Tools and Features to Enhance Your Designs
Shutterstock Editor is packed with powerful tools and features that help elevate your designs from basic to breathtaking. Whether you want to add a splash of color, create emphasis, or add special effects, there’s something for everyone.
One of the first things you’ll want to explore is the Text Tool. Adding text is simple—just click the “Text” button and choose from various font styles. You can customize size, color, alignment, and even add effects like shadows or outlines to make your message stand out.
Next, let’s talk about Backgrounds. You can choose from solid colors, gradients, or even upload your own background image. The background tool allows you to create contrast and ensure your main elements pop. Play around with transparency and layering options to get the perfect look.
The Filters and Effects feature is a game-changer. You can apply filters such as blurring, sharpening, or color adjustments to your images or design elements. Want a vintage feel or a dramatic black-and-white look? Just select the element and choose from the available effects—easy and effective.
Another handy feature is the Elements Library. This includes icons, shapes, borders, and decorative elements. Adding simple shapes like circles or rectangles can help organize your layout or highlight specific information. Icons can quickly convey ideas visually without cluttering your design.
For more advanced customization, try the Transparency and Layering options. Adjust the opacity of images or text to create depth and focus. Layer different elements to build complex compositions—stacking images, text, and graphics until you achieve your desired look.
Finally, don’t forget the Alignment and Spacing tools. Proper alignment ensures your design looks neat and professional. Use guides and snap-to features to position elements precisely, making your layout balanced and visually appealing.
With these tools and features at your fingertips, the possibilities are endless. Experiment, combine effects, and don’t hesitate to try new styles. Mastering these features will help you create stunning, professional designs that truly stand out.
Adding Text, Graphics, and Effects for a Custom Look
Once you’ve got your canvas set up in Shutterstock Editor, it’s time to make your design truly yours by adding some personal flair. Whether you’re creating a social media post, a flyer, or a logo, the right combination of text, graphics, and effects can make your project stand out.
Adding Text is straightforward. Click on the “Text” tool in the toolbar, and a text box will appear on your canvas. You can then type your message—be it a catchy slogan, a quote, or any info you want to highlight. Don’t forget to customize the font, size, color, and alignment to match your style. Shutterstock offers a variety of fonts, from playful scripts to professional sans-serifs, so feel free to experiment.
To make your text pop or blend seamlessly, consider using text effects like shadows, outlines, or transparency. These can add depth and dimension, making your message more readable and visually appealing. For example, a subtle drop shadow can lift your text off the background, giving it a more polished look.
Adding Graphics
Graphics are the visual elements that complement your message—think icons, shapes, or decorative elements. Shutterstock Editor provides a vast library of graphics you can browse through or search for specific items. Simply drag and drop your chosen graphic onto the canvas, resize it, and position it where it looks best.
Want to add some flair? Use layering to place graphics above or below other elements. Adjust transparency for a softer look, or apply filters for artistic effects. Combining different graphics and effects can help you craft a unique visual story that captures attention.
Applying Effects
Effects are the finishing touch that can tie your design together. You might want to add a blur to the background to emphasize your text or use color overlays to create mood. Shutterstock Editor offers options like filters, color adjustments, and distortion effects. Play around with these to see what enhances your design without overwhelming it.
Pro tip: Keep it balanced. Too many effects can make your design look cluttered, so choose a few that enhance your message. Remember, simplicity often results in a more professional look.
Saving, Exporting, and Sharing Your Finished Designs
So, you’ve added your text, graphics, and effects, and you’re happy with your masterpiece—that’s awesome! Now, it’s time to save, export, and share your work so it can reach your audience or be printed.
Saving your project is simple. Shutterstock Editor automatically saves your work as you go, but it’s always good to manually save or create different versions if you’re experimenting with multiple ideas. Look for the “Save” button or the version history feature, so you can revisit earlier drafts if needed.
Exporting your design
When you’re ready to download your design, click on the “Download” button. You’ll be prompted to select the file format best suited for your needs:
- JPEG: Great for web use and social media. It offers a good balance between quality and file size.
- PNG: Ideal if you need transparency or higher quality for printing.
- PDF: Perfect for print materials like flyers or posters.
Before downloading, check the resolution settings. For online use, 72-150 dpi is usually enough, but for printing, opt for 300 dpi to ensure crisp quality. You can also choose to download in multiple sizes or crop your design directly during the export process.
Sharing your design
Once downloaded, sharing is a breeze. You can upload your design directly to social media platforms, embed it in emails, or share via cloud storage. Some platforms allow direct sharing from Shutterstock Editor if you have integrated your accounts.
For collaborative projects, consider saving your design in a shared workspace or cloud folder so team members can review or make edits. If you’re printing, simply send the high-resolution file to your preferred print shop, and they’ll take care of the rest.
Remember, a well-exported and shared design can make all the difference in how your message resonates. Take a moment to double-check your work, ensure the quality is top-notch, and then celebrate your creative achievement!
Tips and Best Practices for Professional Results
Getting the most out of Shutterstock Editor is all about honing your skills and following a few tried-and-true tips. Whether you’re a beginner or have some experience, these best practices can help you create designs that look polished and professional.
Start with a Clear Goal: Before diving into your project, ask yourself what you want to achieve. Are you designing a social media post, a flyer, or a banner? Knowing your goal helps you choose the right dimensions, styles, and elements.
Use High-Quality Assets: Shutterstock offers a vast library of images, icons, and fonts. Always select high-resolution images to ensure your final design looks sharp, especially if you plan to print. Avoid stretching or enlarging images too much, as it can lead to pixelation.
Leverage Templates: Templates are a fantastic starting point. They save time and give you a professional layout. Customize templates to fit your brand or message—alter colors, fonts, and images to make it uniquely yours.
Maintain Consistent Branding: Use your brand colors, fonts, and logos consistently throughout your designs. This consistency builds brand recognition and makes your visuals look cohesive and professional.
Balance Your Composition: Keep your design clean and organized. Use grids and alignment tools to position elements neatly. Leave some negative space to prevent clutter and make your key messages stand out.
Utilize Layering and Transparency: Play with layering images and text for depth. Transparency effects can add sophistication, making your design more dynamic without overwhelming the viewer.
Proof and Review: Always double-check your work. Look for typos, alignment issues, and color mismatches. It helps to step back and view your design from a fresh perspective or get feedback from a colleague.
Save Versions: Save multiple versions as you work. This way, you can experiment without losing your progress and revert to previous versions if needed.
Remember, mastering Shutterstock Editor takes practice. Don’t hesitate to explore different tools and features, and over time, you’ll develop a keen eye for creating standout, professional-grade designs.
Conclusion and Additional Resources for Shutterstock Editor Users
Congratulations! You’re now equipped with the essential knowledge to start creating stunning, professional designs using Shutterstock Editor. From understanding its interface to utilizing advanced features, you’ve taken a significant step toward elevating your visual content game.
Remember, the key to mastery is continuous practice. Experiment with different templates, explore customizations, and don’t be afraid to push your creative boundaries. Over time, you’ll develop an intuitive sense of what works best for your brand or project.
To help you further on your design journey, here are some valuable resources:
- Shutterstock Blog & Tutorials: Regularly updated with tips, trends, and how-to guides to enhance your skills.
- Official Shutterstock Editor Help Center: Comprehensive FAQs and step-by-step instructions.
- Design Inspiration Websites: Platforms like Behance and Dribbble showcase professional designs that can spark your creativity.
- Online Courses & Workshops: Websites like Skillshare or Udemy offer courses on graphic design fundamentals and advanced techniques.
Finally, stay inspired and keep experimenting. The more you use Shutterstock Editor, the more intuitive and powerful your designs will become. Happy creating!