Thinking about turning your video creations into income? Shutterstock is a popular platform that allows you to sell your videos to a global audience. Whether you’re a professional videographer or just someone with a collection of high-quality clips, uploading your videos to Shutterstock can be a great way to showcase your work and earn some extra cash. But the process isn’t just about clicking upload—there are some important steps and best practices to follow. Let’s walk through how to get your videos ready and successfully uploaded so they stand out and sell well!
Preparing Your Videos for Upload

Before you hit that upload button, it’s essential to prepare your videos properly. Quality, format, and metadata all play a role in how well your videos perform and get noticed by buyers. Here’s what you need to keep in mind:
- Check the video quality: Shutterstock demands high-resolution videos. Aim for at least 4K (3840 x 2160 pixels) if possible, but HD (1920 x 1080 pixels) is acceptable. Make sure your clips are sharp, well-lit, and free of any blurriness or pixelation.
- Use the right format: Export your videos in widely accepted formats like MP4 (H.264 codec), MOV, or AVI. MP4 with H.264 is the most recommended because it offers a good balance of quality and file size.
- Keep the file size manageable: While high-quality is key, large files can be cumbersome. Shutterstock recommends keeping your video files under 500 MB when possible—but always check their latest guidelines for updates.
- Trim any unnecessary parts: Make sure your clips are concise and relevant. Buyers prefer clean, focused footage without long, dull sections.
- Check for proper audio: Audio should be clear and free of background noise or distortion. Use high-quality audio recordings and consider removing any unwanted sounds.
- Ensure originality and compliance: Your videos should be your own work and not infringe on any copyright. Avoid including recognizable brands, logos, or protected content unless you have proper releases.
Once you’ve got your videos polished and formatted correctly, you’ll be ready to upload them to Shutterstock. Proper preparation not only boosts your chances of acceptance but also makes your videos more appealing to buyers. Remember, quality and relevance are king in stock footage—so take your time to get it right before submitting!
Creating a Shutterstock Contributor Account

So, you’re ready to start earning money by selling your videos on Shutterstock? The first step is setting up your contributor account. Don’t worry—it’s a straightforward process, and I’ll walk you through it so you can get started as smoothly as possible.
First things first, head over to the Shutterstock Contributor website. You’ll see an option to sign up—click on it to begin. You’ll need to provide some basic information such as your name, email address, and create a password. Make sure to use an email address that you check regularly because Shutterstock will send you important updates about your account.
Next, you’ll be prompted to fill out your profile details. This includes your:
- Legal name
- Country of residence
- Tax information (this is important for earning money)
It may seem like a lot, but filling out these details accurately is essential for getting paid and avoiding any issues down the line. Shutterstock is pretty strict about verifying contributor information to maintain quality and trust on their platform.
After your profile info is complete, you’ll need to agree to Shutterstock’s contributor terms and conditions. Take a moment to read through these—it’s always good to understand what you’re signing up for.
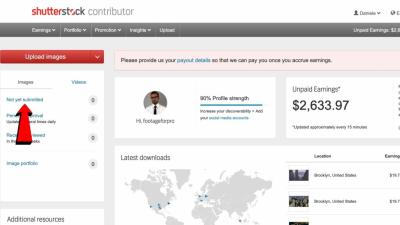
Finally, you’ll be asked to verify your email address. Just click the link in the verification email they send you, and you’re almost there! Once your email is verified, you’ll have access to your new contributor dashboard, where you can upload videos, track your sales, and manage your profile.
Pro tip: Before uploading any videos, make sure to review Shutterstock’s content guidelines and quality standards. This will help you create videos that are more likely to be accepted and sold. Remember, quality and originality are key to standing out and making sales on the platform.
Uploading Your Videos to Shutterstock
Now that your contributor account is set up, it’s time to upload your videos. Uploading videos to Shutterstock is designed to be user-friendly, but there are some best practices to keep in mind to maximize your chances of acceptance and sales.
To start, log in to your contributor dashboard and click the “Upload” button. You’ll be guided to a page where you can select files from your computer. Keep in mind that Shutterstock accepts various video formats, but the most common is MP4. Ensure your videos meet the following specifications:
- Format: MP4 (H.264 codec preferred)
- Resolution: At least 1920×1080 (Full HD)
- Frame Rate: 24, 25, or 30 fps
- Duration: Usually at least 5 seconds, but check the latest guidelines
- File Size: Up to 500 MB or more, depending on the platform’s current limits
Before uploading, it’s a good idea to double-check your videos for quality. Make sure they are well-lit, steady, and free of distracting noise or artifacts. Clear audio and a smooth visual flow help your videos stand out.
Once you’ve selected your videos, you’ll need to add some essential metadata. This includes:
- Title: Be descriptive and clear
- Keywords: Use relevant tags to help buyers find your videos
- Description: Summarize what your video shows in a compelling way
Take your time with this step. Good metadata can significantly improve your video’s visibility and sales potential. Think about what a buyer might search for and include those keywords naturally.
After filling out the metadata, you’ll see options for licensing and pricing. Shutterstock offers different licensing options, and you’ll need to select the appropriate one. Typically, for stock videos, you’ll choose a standard license, but review the options to make sure you’re comfortable with the terms.
Finally, click “Submit”. Your video will go through Shutterstock’s review process. This step is crucial—reviewers will check if your video meets quality standards and adheres to content guidelines. If your video is rejected, don’t be discouraged. Shutterstock usually provides feedback, and you can revise and resubmit.
Remember, consistency is key. The more high-quality videos you upload, the better your chances of building a successful portfolio. Keep learning from each upload, and over time, you’ll find your niche and start earning from your creative efforts!
Optimizing Video Titles, Descriptions, and Tags for Better Sales

Now that you’ve uploaded your video, the next crucial step is making sure it gets noticed by the right buyers. Think of your video listing as a storefront—you want it to stand out and clearly communicate what it’s about. That’s where optimizing titles, descriptions, and tags comes into play.
Start with a clear, descriptive title. Your title should accurately reflect the content of your video while including relevant keywords. For example, instead of a generic title like “My Video,” go for something specific like “Sunset Over Mountain Range with Vibrant Colors.” This helps buyers searching for specific footage find your video easily.
Craft a compelling and detailed description. Use this space to provide context about your video. Mention important details like location, mood, activities, or subjects involved. Incorporate keywords naturally—this boosts SEO without sounding spammy. For example, “This breathtaking shot captures a serene sunset over the Rocky Mountains, highlighting vibrant colors and peaceful scenery perfect for travel or nature projects.”
Utilize relevant tags. Tags are keywords that help categorize your video. Think about what potential buyers might search for. Include broad tags like “nature,” “sunset,” and “mountains,” as well as more specific ones like “Vail,” “winter landscape,” or “dusk.” Shutterstock allows multiple tags, so be thorough without overdoing it. Focus on quality and relevance rather than quantity.
| Tip | Example |
|---|---|
| Use keywords naturally | “A peaceful beach sunrise with gentle waves.” |
| Include location and mood | “City skyline at night with vibrant lights” |
| Be specific with tags | “Yoga pose,” “Meditation,” “Relaxation” |
Remember, the goal is to make your video easy to discover and appealing to potential buyers. Well-optimized titles, descriptions, and tags can significantly boost your chances of making sales.
Reviewing and Submitting Your Videos for Approval
Once you’ve optimized your video listing, it’s time to review your submission and send it off for approval. Shutterstock has a review process to ensure all content meets their quality and technical standards, so it’s worth taking a few extra minutes to double-check everything.
Before submitting, review your video for:
- Quality: Make sure your video is sharp, well-lit, and free of distracting noise or artifacts.
- Technical specifications: Confirm your video adheres to Shutterstock’s requirements—appropriate format, resolution, aspect ratio, and file size.
- Content guidelines: Ensure your video doesn’t contain copyrighted material, logos, or other proprietary content unless you have permission.
- Metadata accuracy: Check that your title, description, and tags are correct and free of typos or misleading information.
Some tips to streamline this process:
- Preview your video: Watch it from start to finish to catch any issues.
- Use quality checks: Use tools or software to verify technical specs and color grading.
- Read Shutterstock’s content policies: Stay updated on what’s acceptable to avoid rejections.
When everything looks good, click the “Submit for Review” button. Shutterstock’s review team will then evaluate your video—usually within a few days. If it passes, it will go live and be available for sale. If not, you’ll receive feedback on what needs to be improved or corrected.
Patience is key here. Sometimes, a small tweak can make the difference between acceptance and rejection. Take the feedback seriously, make necessary adjustments, and resubmit. Remember, every approved video increases your portfolio’s potential to earn income.
Tips for Increasing Video Sales on Shutterstock
So, you’ve uploaded some videos to Shutterstock and you’re eager to start making sales. The good news is, with a few smart strategies, you can boost your chances of getting noticed and increasing your earnings. Let’s dive into some practical tips that can help you stand out in the marketplace.
1. Focus on High-Quality Content
First things first: quality matters. Shutterstock is a professional platform, and buyers are looking for crisp, clear, and well-produced videos. Invest in good equipment if you can, and pay attention to lighting, sound, and composition. Even smartphone videos can do well if they’re shot thoughtfully. Remember, a high-quality video not only looks better but also signals to buyers that you’re a serious creator.
2. Use Relevant and Trending Keywords
Keywords are your best friends in getting your videos discovered. When uploading, spend time researching what keywords are trending or relevant to your video content. Use descriptive terms that accurately reflect what’s in the video, and include popular search phrases. Avoid keyword stuffing, but make sure your metadata is comprehensive and targeted.
3. Create Niche Content
While broad, popular topics attract a lot of searches, niche content can sometimes face less competition and attract dedicated buyers. Think about specific themes, industries, or unique concepts that aren’t overly saturated. For example, instead of generic “business meeting” footage, consider something more specific like “remote team collaboration in a virtual office.”
4. Keep an Eye on Trends and Seasons
Stay updated on current trends, holidays, and seasonal themes. Videos related to upcoming holidays or trending topics often see a spike in demand. For instance, during the holiday season, festive-themed videos are in high demand. Planning your content calendar around these trends can help you get more eyes on your work.
5. Be Consistent and Upload Regularly
Consistency is key. The more videos you upload, the higher your chances of making sales. Plus, Shutterstock’s algorithms favor active contributors. Set a manageable upload schedule—whether it’s weekly or bi-weekly—and stick to it. Over time, this consistency can help build your portfolio’s visibility.
6. Engage with the Community and Keep Learning
Follow other creators, join forums, and read Shutterstock’s contributor resources. Learning from others and staying informed about platform updates can give you an edge. Sometimes, small tweaks based on community advice can significantly improve your sales performance.
Conclusion and Final Tips for Successful Video Uploads
Uploading videos to Shutterstock is an exciting opportunity to turn your creative work into income. While it might seem straightforward at first, success often depends on a combination of quality, strategy, and persistence. Keep in mind these final tips to maximize your chances of making sales:
- Always adhere to Shutterstock’s technical requirements. Proper formats, resolutions, and file sizes matter.
- Write compelling titles and descriptions. Clear, engaging, and keyword-rich metadata can make a big difference.
- Stay patient and persistent. Building a portfolio that yields consistent sales takes time.
- Monitor your performance. Use Shutterstock’s analytics tools to see which videos perform best and adjust your future uploads accordingly.
- Keep your content fresh and relevant. Regular uploads aligned with current trends can give you an ongoing presence in the marketplace.
Remember, every creator starts somewhere. With dedication, attention to detail, and a bit of strategic thinking, you’ll be well on your way to increasing your video sales on Shutterstock. Happy shooting, and here’s to your success in the stock footage world!