If you’ve ever thought about turning your passion for videography into a side hustle, uploading videos to Shutterstock might be the perfect opportunity. Shutterstock is one of the world’s leading stock content platforms, and it offers creators like you a way to earn money every time someone downloads your videos. Whether you’re a hobbyist or a professional filmmaker, contributing to
Creating a Shutterstock Contributor Account
Getting started with Shutterstock is straightforward, but there are a few important steps to ensure your account setup goes smoothly. First, visit the Shutterstock Contributor website and click on the “Sign Up” button. You’ll be prompted to fill out a simple registration form with your basic details like your name, email address, and a secure password. It’s a good idea to use an email that you check regularly because
Once registered, you’ll need to verify your email address. Check your inbox for a confirmation email and click the link provided. After verification, you’ll be guided through setting up your profile. This includes providing some additional details such as your country of residence and tax information, which is necessary for payment processing and compliance purposes.
Next, you’ll want to familiarize yourself with Shutterstock’s contributor guidelines. These rules cover everything from video quality standards to content restrictions. It’s crucial to review and understand these guidelines to maximize your chances of approval and sales. Shutterstock also provides helpful resources and tutorials that can guide you through the submission process.
Before uploading your first video, you might also consider setting up your payment preferences. Shutterstock offers various payout methods, including PayPal and bank transfers. You can specify your preferred method and ensure your payment details are accurate to avoid delays in receiving your earnings.
Finally, take some time to prepare your portfolio. Think about the types of videos you want to upload—whether it’s nature scenes, cityscapes, lifestyle shots, or anything else you’re passionate about. Having a few polished videos ready to go will make your initial submissions more successful. Once everything is set up, you’re ready to start uploading and earning from your creative work!
Preparing Your Videos for Uploads
Before you hit that upload button, it’s super important to make sure your videos are ready to impress. Think of it like preparing a dish—you want everything to look and taste perfect before serving. The same goes for your videos; quality, clarity, and relevance are key.
First things first, check your footage for quality. Shutterstock is all about high-quality videos that can be used in professional projects. Your videos should be sharp, well-lit, and free from distracting background noise or shaky camera work. If needed, take some time to do basic editing to trim out any unnecessary parts or mistakes.
Next, pay attention to the technical specs. Shutterstock recommends videos to be in MP4 format with a H.264 codec. The maximum file size is usually around 500 MB, and the ideal resolution is 1920×1080 pixels (Full HD). Higher resolutions like 4K are also accepted and can give your videos an edge, but just ensure your file size stays within the upload limits.
Color grading and proper exposure can make a big difference. Bright, vibrant colors tend to attract more viewers and buyers. Also, avoid overly dark or washed-out footage. If your video contains any branding, logos, or sensitive information, consider cropping or blurring it out unless it adds value to your portfolio.
Another thing to keep in mind is the content relevance. Think about what buyers might be searching for—business scenes, nature, lifestyle, technology, etc. Providing a variety of versatile clips can increase your chances of making sales.
Lastly, create a compelling preview or thumbnail image. Shutterstock allows you to choose a thumbnail frame—pick one that best represents your video and can catch the eye of potential buyers. Remember, first impressions count!
Uploading Your Videos to Shutterstock Step by Step
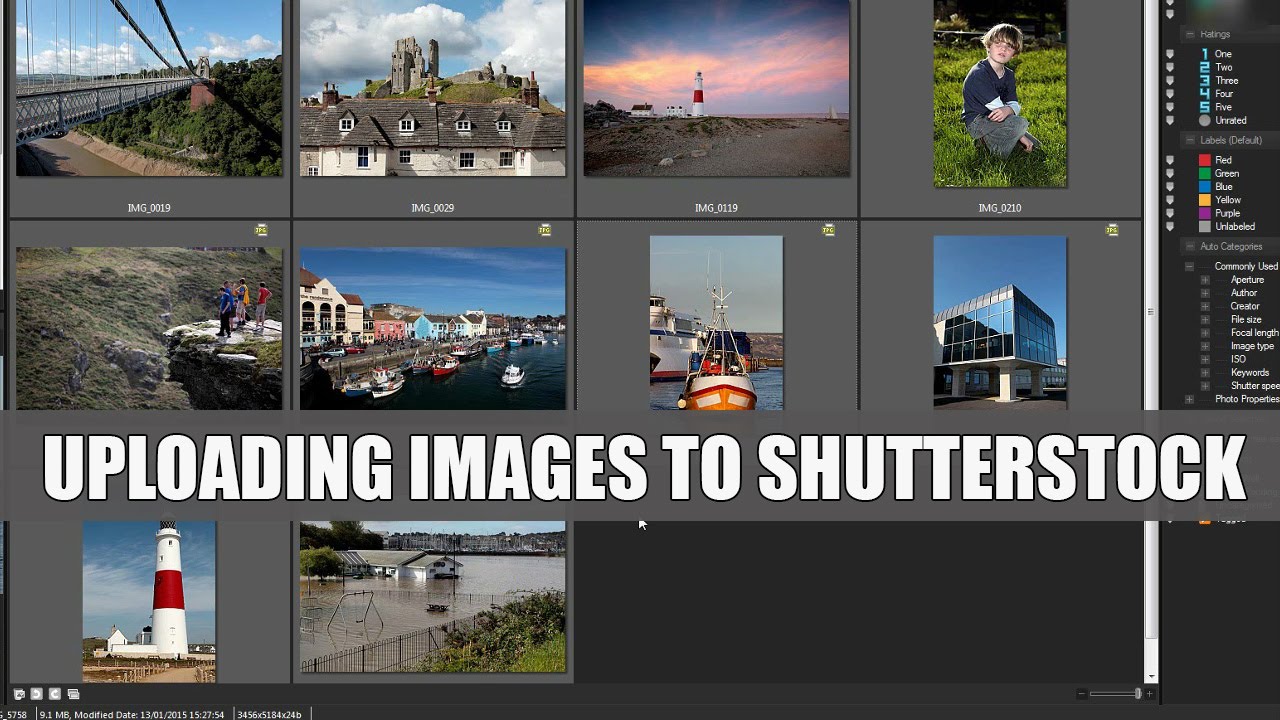
Ready to upload? Let’s walk through the process step by step so you can get your videos online smoothly and confidently.
- Log into your Shutterstock Contributor account. If you don’t have one yet, sign up—it’s free and straightforward.
- Click on the “Upload” button. Usually, you’ll find this in the dashboard or main menu.
- Select your videos. You can upload multiple files at once. Make sure they meet the technical specifications we discussed earlier.
- Fill out the video details. Here’s where you add a descriptive title, detailed description, and relevant keywords. Use keywords that accurately describe your footage to improve discoverability. Think about what buyers might search for—terms like “city skyline,” “happy family,” or “nature landscape.”
- Choose the appropriate category and subcategory. This helps buyers find your clips more easily.
- Set licensing options. Typically, you’ll select Royalty-Free license, which is the standard for Shutterstock. This means buyers can use your footage in various projects without additional payments.
- Review your upload. Double-check all details, keywords, and ensure the video plays correctly in the preview. Fix any issues now to avoid delays later.
- Submit your videos for review. Once everything looks good, hit the “Submit” button. Shutterstock’s review team will then evaluate your footage for quality and relevance.
While your videos are under review, avoid making changes unless necessary. This process can take anywhere from a few days to a week. If approved, your videos will go live and be available for licensing. If not, Shutterstock typically provides feedback, so you can learn and improve future uploads.
And there you have it! Uploading your videos might seem a bit daunting at first, but once you get the hang of it, it’s a straightforward process. Keep creating, refining, and uploading—your extra income journey awaits!
Optimizing Video Titles, Descriptions, and Tags for Better Visibility
Once you’ve uploaded your videos to Shutterstock, the next step is making sure they can be easily found by buyers. Think of it like setting up a storefront—if your display isn’t eye-catching or clearly labeled, people might walk right past. The same goes for your video metadata: titles, descriptions, and tags.
Start with a compelling, clear video title. It should accurately describe what’s in your video while including relevant keywords that potential buyers might search for. For example, instead of “Beautiful Scene,” try “Sunset Over Mountain Range with Vibrant Colors.” This gives context and makes your video more discoverable.
Next, craft a detailed description. Use this space to add more context, tell a story, or highlight unique aspects of your footage. Incorporate keywords naturally—think about what someone searching for this type of content might type in. For instance, if your video shows a busy city street, include terms like “urban lifestyle,” “city traffic,” or “crowd scenes.” Remember, the description helps both algorithms and buyers understand what your video is about.
Then, add relevant tags. Tags are like keywords that direct Shutterstock’s search engine to your content. Use a mix of broad and specific tags. For example, if your video features a “kayaking adventure in the mountains,” tags could include:
- kayaking
- adventure
- mountains
- outdoor activity
- water sports
Keep in mind: quality over quantity. Use targeted, accurate tags rather than stuffing irrelevant keywords. This helps ensure your video appears in the right searches and attracts genuine buyers. Regularly reviewing and updating your metadata based on trending keywords can also boost visibility over time.
Finally, consider analyzing which of your videos perform well and adjusting your titles, descriptions, and tags accordingly. Over time, this optimization process can significantly increase your video’s exposure, bringing in more views and potential sales. Remember, the goal is to make your content as discoverable as possible without sacrificing clarity or accuracy.
Understanding Shutterstock’s Content Guidelines and Requirements
Before you start uploading videos, it’s essential to understand Shutterstock’s content guidelines and requirements. Think of these as the rules of the game—they help ensure your videos meet quality standards and are suitable for licensing. Ignoring these guidelines can lead to rejected submissions or even account issues, which nobody wants!
First off, Shutterstock has technical specifications your videos need to meet:
- File format: Usually MP4 with H.264 codec.
- Resolution: Minimum of 1920×1080 (Full HD). Higher resolutions like 4K are encouraged for more premium content.
- Frame rate: Typically between 24-30 fps.
- File size: Varies, but generally under 500MB for quick uploads.
Next, consider the content restrictions. Shutterstock aims to provide high-quality, safe, and legal content. This means:
- Your videos must not contain illegal activities, violence, or hate speech.
- No explicit nudity or adult content.
- Ensure you have rights or licenses for any music, images, or recognizable brands included.
- Videos should be well-lit, stable, and free of distracting noise or artifacts.
Another key point is model and property releases. If your video features recognizable people or private property, you need proper releases. Shutterstock reviews these releases to verify authenticity, so don’t skip this step if relevant.
Lastly, adhere to content originality. Shutterstock prefers fresh, unique footage. Avoid uploading content that’s heavily similar to what’s already available or violates intellectual property rights.
Take some time to review Shutterstock’s detailed guidelines on their contributor portal. Staying informed helps you create content that aligns with their standards, reduces rejection rates, and increases your chances of earning extra income. Remember, quality and compliance are the keys to building a successful stock footage portfolio!
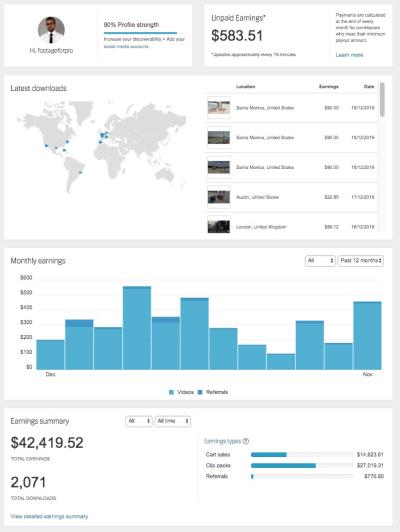
Monitoring Your Video Performance and Earnings
Once you’ve uploaded your videos to Shutterstock, the next step is to keep a close eye on how they’re performing. This isn’t just about tracking numbers—it’s about understanding what works, what doesn’t, and how you can optimize your future uploads for better results.
Shutterstock provides a user-friendly dashboard where you can see detailed statistics on each of your videos. Here’s what you should be paying attention to:
- Download Counts: This shows how many times your video has been downloaded. More downloads typically mean your content resonates with buyers.
- Revenue Earnings: Keep an eye on how much money you’re earning from each video. Tracking this helps you identify which types of videos are most profitable.
- Geographic Data: Knowing where your videos are popular can guide your future content creation. For example, if you see a lot of downloads from Europe, consider creating more content tailored to that audience.
- Search Performance: Shutterstock’s platform allows you to see how often your videos appear in search results. If your videos show up frequently but aren’t downloaded, it might be time to tweak your keywords or titles.
Regularly reviewing these metrics can help you identify trends. Are certain themes or styles getting more traction? Are there specific keywords that boost visibility? Use this data to refine your approach.
Additionally, tracking your earnings over time helps you set realistic goals. For instance, if you notice your monthly income is plateauing, it might be a sign to diversify your portfolio or improve your video quality.
Remember, consistency is key. The more you upload and monitor, the better you’ll understand what the market wants. Over time, this will lead to smarter content creation and, hopefully, increased income.
Tips for Increasing Your Video Sales and Income
If you’re looking to boost your earnings from Shutterstock videos, a few smart strategies can make a big difference. Think of this as fine-tuning your approach to stand out in a crowded marketplace.
Here are some practical tips:
- Create High-Quality Content: Always prioritize sharp, well-lit, and professionally shot videos. Clear audio and good composition make your videos more appealing.
- Focus on Trends and Evergreen Topics: Stay updated with what’s popular—like remote work, technology, health, or environmental themes. Also, create timeless content that remains relevant over time.
- Optimize Your Metadata: Use relevant, specific keywords in your titles, descriptions, and tags. Think about what buyers might search for and include variations.
- Use Appropriate Titles and Thumbnails: Craft compelling titles that accurately describe your video. Choose eye-catching thumbnails that entice clicks without being clickbaity.
- Upload Regularly: The more quality content you add, the higher your chances of being discovered. Consistency also shows Shutterstock that you’re an active contributor.
- Take Advantage of Trends and Seasonal Content: Create videos around upcoming holidays, seasons, or global events to tap into current demand.
- Engage with the Platform: Respond to feedback, update existing videos if needed, and stay active within Shutterstock’s contributor community for tips and insights.
Another tip is to diversify your portfolio. Don’t just stick to one niche—explore different themes and styles. This broadens your appeal and can open up new income streams.
Lastly, invest in ongoing learning. Watch tutorials, read about video marketing, and stay inspired. As you sharpen your skills and adapt to market trends, you’ll find it easier to increase your sales and boost your income over time.
Remember, patience and persistence pay off. With consistent effort and smart strategies, your Shutterstock videos can become a reliable source of extra income. Happy shooting!
Conclusion and Next Steps for Successful Video Uploads
Uploading videos to Shutterstock can be a lucrative way to generate extra income, but success requires attention to detail and adherence to platform guidelines. Remember, high-quality, original content that resonates with the audience has the best chance of earning revenue. Before uploading, ensure your videos meet Shutterstock’s technical specifications and content requirements to avoid rejection.
To maximize your earning potential, consider the following next steps:
- Review Shutterstock’s Contributor Guidelines: Familiarize yourself with their standards for video quality, content originality, and metadata accuracy.
- Optimize Your Metadata: Use descriptive titles, relevant keywords, and accurate categories to make your videos easily discoverable.
- Maintain Consistency: Regular uploads can increase your visibility and establish your portfolio as a reliable source of content.
- Monitor Performance: Analyze which videos perform well and adapt your future content strategy accordingly.
| Step | Action | Tip |
|---|---|---|
| Preparation | Ensure your videos meet technical specs | Use high-resolution footage with clear audio |
| Upload | Follow Shutterstock’s upload process | Fill out metadata accurately and thoroughly |
| Post-Upload | Promote your portfolio and analyze feedback | Engage with the platform community and refine your content |
Consistent effort, quality content, and strategic optimization are key to thriving as a Shutterstock contributor. Keep learning and adapting, and your videos can become a steady source of extra income.