If you’re a designer or artist looking to turn your creative vectors into a steady income stream, Shutterstock is a fantastic platform to showcase and sell your work. Uploading vectors might seem straightforward, but there are some important tips and best practices that can help you maximize your earnings. Whether you’re just starting out or trying to optimize your existing portfolio, understanding the process and how to prepare your files properly can make a big difference. Let’s dive into how you can get your vectors uploaded smoothly and start earning more today!
Preparing Your Vector Files for Upload
Before you hit that upload button, it’s crucial to ensure your vector files are in top shape. Proper preparation not only helps your work look professional but also reduces the chance of rejection or customer dissatisfaction. Here are some key steps to prepare your vectors for Shutterstock:
- Use the Correct File Format: Shutterstock primarily accepts AI, EPS, and SVG files. Make sure your vectors are saved in one of these formats, and double-check that they are compatible with the platform’s requirements.
- Optimize Your Files: Keep your vectors clean and organized. Remove unnecessary layers, hidden elements, or stray points that can clutter the file. Simplify complex paths where possible to ensure smooth rendering.
- Check for Licensing and Originality: Ensure your vectors are original or properly licensed. Shutterstock values unique, high-quality work, so avoid copyrighted material unless you have the rights to use and sell it.
- Maintain Proper Resolution and Dimensions: While vectors are scalable, it’s good practice to set a standard artboard size (e.g., 5000px wide) and ensure your artwork is centered. This helps buyers see the full scope of your work without cropping issues.
- Add Descriptive Metadata: Prepare relevant keywords, titles, and descriptions that accurately describe your vector. Well-optimized metadata increases the visibility of your work in searches.
Finally, before uploading, preview your vector in different viewers or software to confirm everything appears correctly. Taking these steps will help your vectors look their best and meet Shutterstock’s quality standards, paving the way for more sales and higher earnings.
Creating a Shutterstock Contributor Account

Getting started as a contributor on Shutterstock is pretty straightforward, but it’s important to do it the right way to set yourself up for success. Think of your contributor account as your storefront — it’s where potential buyers will find and purchase your vectors, so making a good first impression is key.
First things first, head over to the Shutterstock Contributor page. You’ll see a clear button that says “Become a Contributor” or something similar. Click that to begin your registration process.
During sign-up, you’ll need to provide some basic info:
- Personal details: Name, email, and country of residence.
- Payment information: Bank details or PayPal info so you can get paid. Make sure you have these ready.
- Tax info: Depending on your country, you might need to fill out a tax form — don’t worry, it’s standard stuff.
Next, you’ll create a username and password. Choose something professional yet memorable — this helps build your brand as a vector artist. After completing the registration, Shutterstock will send a confirmation email. Just click the link in that email to verify your account.
Once verified, you’ll be prompted to fill out your contributor profile. Upload a friendly profile photo, craft a short bio, and add your social media links if you want. This helps buyers trust your work and makes your profile more engaging.
Before uploading vectors, take some time to review Shutterstock’s content guidelines. They have specific rules about what kinds of vectors are acceptable, so reading these will save you headaches later. Make sure your work is original, high quality, and properly labeled — because the better your vectors are, the more you’ll earn!
Finally, explore the contributor dashboard. It might look a little overwhelming at first, but it’s your hub for managing uploads, tracking sales, and seeing your earnings. Spend some time familiarizing yourself with it — it’s your new workspace, after all!
Uploading Vectors Step by Step

Now that your account is set up, it’s time to upload your vectors. Don’t worry — it’s a simple process, and once you get the hang of it, you’ll be uploading new work in no time. Here’s a step-by-step guide to make it as smooth as possible:
- Log in to your Contributor Dashboard: Head to your Shutterstock account and click on the upload button. Usually, it’s a prominent “Upload” or “Add Content” button.
- Select your files: Click the upload area or drag and drop your vector files into the upload window. Shutterstock accepts vector formats like AI, EPS, SVG, and sometimes ZIP files containing multiple vectors.
- Fill out the metadata: This is super important! Provide a clear and descriptive title, tags, and categories. Think about what buyers will search for — use relevant keywords like “modern logo,” “flat illustration,” or “business infographic.”
- Set the licensing options: Shutterstock offers Standard and Enhanced licenses. Most vectors are uploaded with Standard license, but if you have exclusive rights or special licensing, specify that accordingly.
- Preview and confirm: Review your upload to ensure everything looks good. Check the preview for any issues with your vectors — especially if they contain transparency or complex details.
- Submit for review: Once satisfied, hit the “Submit” button. Your vectors will now go into Shutterstock’s review queue.
While waiting for approval, you can upload more vectors or check the status of your submissions in your dashboard. If your vectors get rejected, don’t get discouraged! Shutterstock usually provides feedback, and you can revise and resubmit.
A few tips to help your vectors get approved faster:
- Follow guidelines: Make sure your vectors are original, well-crafted, and meet technical specifications.
- Use relevant keywords: The right keywords help buyers find your work.
- Upload high-quality files: Low-res or corrupted files will be rejected, so double-check your vectors before uploading.
And that’s it! Uploading vectors to Shutterstock is an ongoing process — the more you upload, the higher your chances of making sales. Keep creating, keep uploading, and watch your earnings grow!
Optimizing Vector Titles, Descriptions, and Tags for Better Visibility
Now that you’ve uploaded your vectors, it’s time to make sure they get noticed. Think of your titles, descriptions, and tags as the digital signage that guides viewers — and the Shutterstock algorithm — to your artwork. The goal is to make your vectors discoverable by the right audience, which can significantly boost your earnings.
Start with a clear, descriptive title. Use concise language that accurately reflects what your vector depicts. Instead of vague titles like “Design 1,” go for something like “Minimalist Mountain Sunset Vector Illustration.” This helps users searching for specific themes find your work easily.
Craft a detailed description. Here, you want to expand on the title, adding context and relevant details. Mention the style, color scheme, intended uses, or any unique features. For example:
- Style: Flat design, minimalist
- Colors: Warm sunset hues
- Uses: Website headers, print posters, branding
This not only improves SEO but also helps buyers understand exactly what they’re getting, reducing confusion and increasing the likelihood of a purchase.
Use relevant tags wisely. Tags are the keywords that connect your vector to search queries. Think about the terms your potential buyers might type in. Be specific and include synonyms, related concepts, and popular keywords. Instead of just “mountain,” add “mountain landscape,” “nature,” “outdoor,” or “adventure.”
Tip: Research trending keywords on Shutterstock or other stock sites to see what’s popular. Incorporate those into your tags to increase visibility.
Remember, avoid keyword stuffing. Keep your titles, descriptions, and tags natural and relevant. Well-optimized metadata can dramatically improve your vectors’ exposure, leading to more downloads and higher earnings over time.
Understanding Shutterstock’s Quality Standards and Guidelines
Before you start uploading vectors, it’s crucial to understand what Shutterstock expects from contributors. The platform maintains high standards to ensure buyers receive top-notch content, and adhering to these guidelines can help your vectors get accepted and perform well.
Here’s a quick rundown of Shutterstock’s key quality standards:
- Originality: Your vectors should be original work. Avoid copying or closely mimicking existing designs. Unique, creative vectors stand out and are more likely to be accepted.
- Technical quality: Files must be high resolution, clean, and free of errors. Make sure your vectors are properly formatted, with smooth lines and no overlapping or stray points.
- Clarity and simplicity: Vectors should communicate their message clearly. Avoid overly complex designs that may not scale well or look cluttered at smaller sizes.
- Proper licensing and model releases: If your vector includes recognizable people, brands, or copyrighted elements, ensure you have the necessary rights or model releases.
Additionally, Shutterstock has specific guidelines for vector files:
| Aspect | Guideline |
|---|---|
| File Format | EPS, AI, or SVG files are preferred. Ensure they are compatible with vector editing software. |
| Color Mode | Use RGB color mode for web and digital vectors. |
| Layers | Organize elements in layers for ease of editing and clarity. |
| File Size | Ensure files are optimized for quality but not overly large, typically under 50MB. |
Remember, Shutterstock reviews every submission carefully. If your vectors don’t meet the standards, they might be rejected, which can delay your earning potential. Take the time to review your work, double-check for errors, and ensure compliance with all guidelines before submitting.
By understanding and following Shutterstock’s quality standards, you not only increase your chances of acceptance but also position yourself as a reliable contributor, paving the way for consistent earnings and growth on the platform.
Managing Your Portfolio to Maximize Earnings
Once you’ve started uploading vectors to Shutterstock, the journey doesn’t end there. Managing your portfolio effectively is key to maximizing your earnings and building a strong presence on the platform. Think of your portfolio as your digital storefront — the more organized, diverse, and updated it is, the more attractive it becomes to buyers.
First, focus on maintaining a diverse collection. Upload vectors across various themes, styles, and topics to appeal to a wider audience. For example, include vectors related to business, technology, lifestyle, holidays, and more. This way, you’re not putting all your eggs in one basket, and you’ll attract different clients searching for different styles.
Next, keep an eye on your best-performing vectors. Shutterstock provides analytics that show which of your images are getting the most downloads. Identify patterns—are certain themes, colors, or styles more popular? Use this insight to guide your future uploads, focusing on what sells best.
Regularly update your portfolio by removing outdated or underperforming vectors. This keeps your profile fresh and relevant. Adding new work frequently signals to Shutterstock that you’re an active contributor, which can positively influence your visibility in search results.
Organize your vectors into well-labeled collections or categories if the platform allows. This not only helps you keep track of your work but also makes it easier for potential buyers to find related images. For example, grouping all your holiday-themed vectors together can lead to higher downloads during festive seasons.
Engage with the community and stay informed about current trends. Follow successful contributors, participate in forums, and stay updated on what’s trending in the creative world. Incorporating trending themes or styles into your vectors can give your portfolio a boost in visibility and sales.
Remember, quality over quantity is essential. Prioritize creating high-quality, original vectors that meet Shutterstock’s standards. A well-curated, professional-looking portfolio will attract more buyers and lead to repeat sales.
Tips for Increasing Download Rates and Earnings
Now that your portfolio is in top shape, it’s time to boost those download rates and, consequently, your earnings. Here are some practical tips to help you get more eyes on your vectors and turn those views into sales.
- Optimize Your Titles and Descriptions: Use clear, descriptive titles and keyword-rich descriptions. Think about what a buyer might search for. For example, instead of “Vector 1,” try “Modern Businesspeople Holding Digital Devices Vector.”
- Use Relevant and Trending Keywords: Incorporate keywords that reflect current trends, popular search terms, and specific themes. Research trending topics on Shutterstock or in your niche to stay ahead.
- Create Collections: Group related vectors into collections. Buyers often browse collections to find multiple matching images, increasing your chances of multiple downloads.
- Participate in Promotions: Keep an eye out for Shutterstock’s promotional opportunities or special events. Offering your vectors during these times can lead to a spike in downloads.
- Share Your Portfolio: Promote your vectors on your social media channels, personal website, or design communities. The more exposure your work gets outside Shutterstock, the higher the chance of downloads.
Another effective strategy is to keep your vectors updated and relevant. Seasonal and holiday vectors tend to perform well during specific times of the year. For example, uploading Christmas-themed vectors in November or New Year graphics in December can lead to seasonal spikes.
Additionally, pay attention to the quality and uniqueness of your vectors. Stand out by offering original designs that aren’t widely available. Buyers appreciate fresh ideas, and unique vectors have a higher chance of being downloaded multiple times for different projects.
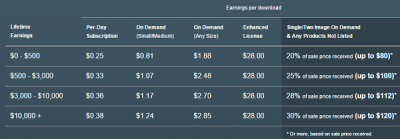
Lastly, consider the pricing strategy. While Shutterstock generally sets prices, ensuring your vectors are competitively priced — especially during promotions — can make a significant difference in download rates. Remember, more downloads often lead to higher earnings over time, even if individual prices are modest.
By consistently managing your portfolio and applying these tips, you’ll create a cycle of increasing visibility, downloads, and earnings. Keep experimenting, stay committed, and watch your vector business thrive!
Common Mistakes to Avoid When Uploading Vectors
Uploading vectors to Shutterstock can be a great way to earn passive income, but it’s easy to make some common mistakes that can hurt your chances of making sales. Let’s go over some pitfalls to watch out for so you can optimize your uploads and get the best results.
1. Poor Image Quality: Always ensure your vectors are high-resolution and clean. Blurry, pixelated, or poorly traced images will be rejected or won’t sell well. Use vector editing software like Adobe Illustrator or Affinity Designer to double-check your files before uploading.
2. Ignoring Shutterstock’s Guidelines: Each platform has its own rules about file formats, sizes, and content. Make sure you read Shutterstock’s contributor guidelines thoroughly. For example, vectors should be in AI, EPS, or SVG format, and adhere to their content policies regarding copyright and originality.
3. Overly Complex or Too Simple Designs: Striking a balance is key. Overly complex vectors can be overwhelming and hard to use, while overly simple ones might not provide enough value. Try to create versatile designs that can be used in multiple contexts.
4. Not Using Descriptive, Keyword-Rich Titles and Tags: Metadata is critical for discoverability. Use clear, descriptive titles and relevant keywords so your vectors appear in the right searches. Avoid keyword stuffing—be honest and accurate.
5. Duplicate or Similar Files: Uploading multiple versions of the same vector or very similar designs can lead to rejection or cannibalization of your own sales. Instead, focus on creating a varied portfolio with unique, high-quality vectors.
6. Ignoring Trends and Market Demand: Keep an eye on current design trends and popular themes. Uploading only niche or outdated styles might limit your sales. Research what buyers are searching for and tailor your vectors accordingly.
7. Forgetting to Update and Maintain Your Portfolio: Regularly review your uploads and remove outdated or underperforming files. Refresh your portfolio with new designs to keep your offerings relevant and engaging for returning customers.
By avoiding these common mistakes, you’ll increase your chances of getting your vectors accepted and, more importantly, selling them. Remember, attention to detail and understanding the platform’s expectations go a long way in boosting your earnings.
Monitoring Your Sales and Analyzing Performance
Once you start uploading vectors and making sales, the journey doesn’t end there. Monitoring your sales and analyzing how your vectors perform is essential for growing your success on Shutterstock. Let’s explore how to do this effectively.
1. Use Shutterstock’s Contributor Dashboard: This is your main hub for tracking sales, earnings, and performance metrics. Log in regularly to see which files are selling well and which aren’t. The dashboard provides data on views, downloads, and earnings per file.
2. Identify Top Performers: Pay attention to your best-selling vectors. What themes, styles, or keywords are driving those sales? Use this insight to guide your future uploads—focus on popular topics or refine your style based on what works.
3. Analyze Sales Trends Over Time: Look at your sales data over weeks or months. Are certain times of year seeing more downloads? Are specific categories trending upward? This can help you plan your content calendar and upload schedule.
4. Experiment and Adjust: Don’t be afraid to test new styles, themes, or keywords. If certain vectors aren’t selling, revisit them—maybe update their keywords or improve the design. Continuous tweaking helps optimize your portfolio for better performance.
5. Use External Tools for Deeper Insights: Some contributors use Excel or analytics tools to track their sales data more comprehensively. Keep a record of your uploads, keywords, and earnings to spot patterns and make data-driven decisions.
6. Stay Informed About Market Trends: Follow design blogs, forums, and Shutterstock’s blog updates to stay ahead of industry trends. Knowing what’s popular can inspire your next set of vectors, increasing your chances of sales.
7. Set Goals and Review Progress: Establish realistic targets for your sales volume or earnings. Regularly review your progress, celebrate your wins, and identify areas for improvement. This keeps you motivated and focused on growth.
By actively monitoring and analyzing your sales data, you can make smarter decisions about what to create, how to optimize your files, and where to focus your efforts. Over time, this strategic approach will help you maximize your earnings and build a thriving vector portfolio on Shutterstock.
Conclusion and Additional Resources for Shutterstock Contributors
In conclusion, uploading high-quality vectors to Shutterstock can significantly boost your earning potential as a contributor. Remember to focus on creating original, versatile, and relevant designs that meet Shutterstock’s standards. Consistency and attention to detail in your submissions will help you build a strong portfolio and increase visibility in the marketplace.
To maximize your success, stay informed about the latest trends in graphic design and stock imagery. Regularly review Shutterstock’s contributor guidelines and utilize their resources for tips and best practices. Engaging with the contributor community can also provide valuable insights and feedback.
Here are some additional resources to support your journey:
- Shutterstock Contributor Help Center – Official guidelines, tips, and FAQs
- Shutterstock Blog – Industry trends, success stories, and tutorials
- Creative Bloq – Design inspiration and tutorials
- Behance – Showcase your portfolio and connect with other designers
- Udemy – Courses on vector design and digital illustration
By leveraging these resources and continuously honing your skills, you can enhance your portfolio, improve your submission quality, and ultimately increase your earnings on Shutterstock. Happy designing!