Thinking of sharing your stunning photos with the world? Shutterstock is a fantastic platform for photographers to showcase and sell their work. If you’re already using Lightroom to edit and organize your images, why not streamline the process by uploading directly from Lightroom? This integration makes it easier to get your photos online without the hassle of exporting and manually uploading through your browser. In this guide, we’ll walk through how to connect Lightroom to Shutterstock and start sharing your images with just a few clicks. Let’s make your workflow smoother and more efficient!
Prerequisites for Uploading to Shutterstock from Lightroom
Before you jump into uploading your photos directly from Lightroom, there are a few important things you’ll need to have in place:
- Active Shutterstock Contributor Account: First, you need to sign up as a contributor on Shutterstock. If you haven’t done that yet, head over to their contributor registration page and create an account. This will give you access to upload and manage your photos.
- Adobe Lightroom Installed: Make sure you have Adobe Lightroom (Classic or CC) installed and updated to the latest version. The integration features work best with the most recent updates.
- Shutterstock Plugin for Lightroom: You’ll need to install the official Shutterstock plugin for Lightroom. You can find it on the Adobe Exchange or the Shutterstock website. Download and install it following their instructions.
- Good Internet Connection: Since you’re uploading high-resolution images, a stable and fast internet connection will help speed up the process and prevent interruptions.
- Properly Edited Images: Ensure your photos are edited and ready for submission. Shutterstock has specific guidelines about image quality, model releases, and licensing, so double-check your files meet their criteria before uploading.
Once you have these prerequisites sorted out, you’ll be ready to connect Lightroom with Shutterstock and start uploading your images seamlessly. Having everything set up beforehand saves time and makes the entire process much smoother.
Step-by-Step Guide to Connecting Lightroom with Shutterstock
Getting your photos from Lightroom straight to Shutterstock might sound tricky at first, but once you know the steps, it’s pretty straightforward. Let’s walk through the process together so you can start uploading quickly and easily.
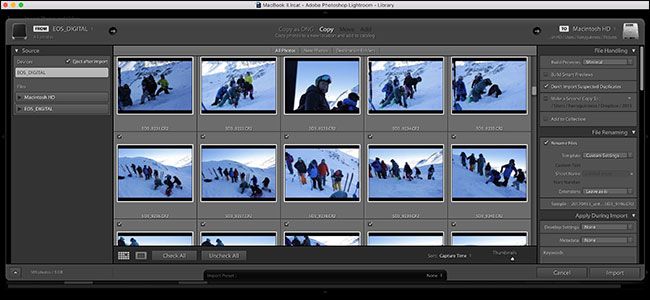
Step 1: Install the Shutterstock Plugin for Lightroom
- Head over to the Shutterstock Contributor page and look for the Lightroom plugin installation link.
- Download the plugin file, which is usually a ZIP or installer package.
- Follow the instructions provided to install the plugin into Lightroom. This usually involves copying files into Lightroom’s plugin folder or running an installer.
Step 2: Launch Lightroom and Enable the Shutterstock Plugin
- Open Lightroom, then go to File > Plug-in Manager.
- In the Plug-in Manager window, click Add and locate the Shutterstock plugin you just installed.
- Enable it by checking the box next to its name, then click Done.
Step 3: Sign into Your Shutterstock Contributor Account
- Once the plugin is enabled, you’ll see a Shutterstock icon or menu inside Lightroom.
- Click on it, and you’ll be prompted to log in with your Shutterstock Contributor credentials.
- Enter your username and password, then authorize Lightroom to access your account.
Step 4: Connect Your Lightroom Catalog to Shutterstock
- After logging in, you might need to select or specify the folder or collection within Lightroom that contains the photos you want to upload.
- Some plugins allow you to set preferences like default keywords or metadata, so consider configuring those now.
- Once everything is set, you’re ready to start uploading your images directly from Lightroom.
And that’s it! With these steps, your Lightroom is now connected to Shutterstock, making it super easy to upload your best photos without needing to switch between different apps or platforms. Next, let’s talk about how to prepare those photos to make sure they stand out on Shutterstock.
Preparing Your Photos in Lightroom for Upload
Before hitting that upload button, it’s a good idea to give your photos a final polish. Properly prepared images not only look better but also have higher chances of getting accepted and selling. Here’s what you should focus on when preparing your photos in Lightroom.
1. Adjust Exposure and Contrast
Start by fine-tuning the exposure to ensure your photo isn’t too dark or too bright. Use the Exposure slider in the Basic panel. Then, tweak contrast to add depth and make your image pop. Small adjustments here can make a big difference!
2. Enhance Colors and Correct White Balance
Check the white balance to ensure colors are accurate. If your photo looks too warm or cool, adjust the Temperature and Tint sliders. Boost or reduce vibrance and saturation carefully to make colors lively but natural.
3. Sharpen and Reduce Noise
- Use the Detail panel to sharpen your photo, but avoid over-sharpening, which can create unwanted halos.
- If your photo was taken in low light, use the Noise Reduction sliders to smooth out grain while retaining detail.
4. Crop and Straighten
Make sure your horizon is level and crop the image to the optimal aspect ratio for Shutterstock. Common formats include square, landscape, or portrait. Use the crop tool to remove any distractions or unnecessary elements.
5. Remove Distractions and Spot Clean
Zoom in and look for spots, dust, or distracting objects. Use the Spot Removal tool to clean up blemishes or unwanted elements. A clean, focused image is more appealing to buyers.
6. Add Metadata and Keywords
While some details can be added directly on Shutterstock, it’s helpful to add relevant keywords in Lightroom’s Metadata panel. Think about what buyers might search for and include descriptive tags, locations, and concepts.
By taking these steps, your photos will look professional and ready for sale. Remember, the better your images look, the more likely they are to attract buyers and earn you royalties. Now that your photos are polished and your account is connected, you’re all set to start uploading and sharing your work with the world!
Uploading Photos to Shutterstock from Lightroom
So, you’ve got your photos edited and ready to go—now what? Uploading your images directly from Lightroom to Shutterstock can save you time and streamline your workflow. It’s a pretty straightforward process once you get the hang of it, and I’m here to guide you through each step.
First off, make sure you have the necessary plugins set up. Shutterstock offers an official plugin called the Shutterstock Contributor plugin for Lightroom. You can download it from the Shutterstock contributor portal or their official website. Once installed, it integrates seamlessly with Lightroom, allowing you to upload images without leaving your editing environment.
Here’s a quick rundown of how to upload:
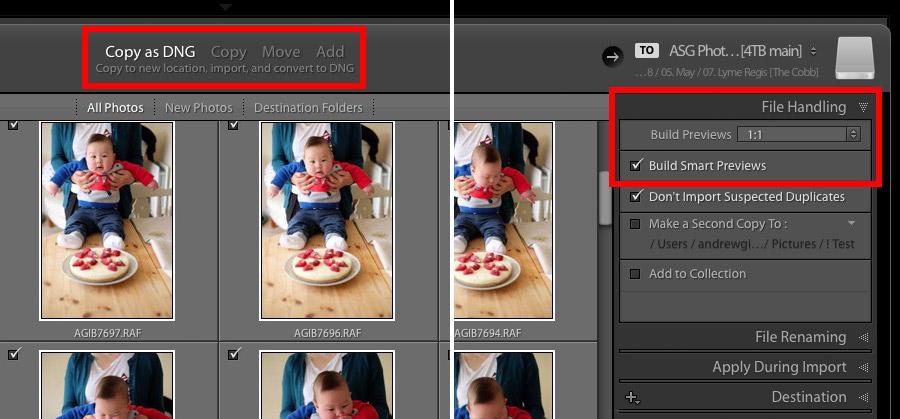
- Prepare your photos: Make sure they’re properly edited, resized if needed (check Shutterstock’s specifications), and have appropriate keywords and metadata added.
- Open Lightroom: Navigate to the folder containing your finalized images.
- Select photos: Highlight the images you want to upload.
- Launch the Shutterstock plugin: Usually, it appears as a menu option or in the export/export settings panel, depending on your plugin version.
- Configure upload settings: Fill out required details like titles, descriptions, keywords, and categories directly within the plugin interface. This metadata helps your photos get discovered.
- Upload your photos: Hit the upload button, and the plugin will handle sending your images straight to your Shutterstock contributor account.
Once uploaded, you can track your submissions directly within the plugin or through your Shutterstock contributor dashboard. It’s super convenient because it keeps everything in one place and reduces the need to juggle multiple programs. Just remember, after uploading, Shutterstock may review your images for quality and compliance—so don’t worry if they’re not live immediately.
Pro tip: Always double-check your metadata and make sure your images meet Shutterstock’s technical guidelines before uploading. This helps ensure a smooth review process and quicker approval times.
Tips for Optimizing Your Photos for Shutterstock Submission
Thinking about how to make your photos stand out on Shutterstock? Optimization is key! Here are some friendly tips to help your images get noticed, accepted, and potentially earn more:
1. Focus on Quality
Shutterstock is a professional platform, so only upload high-resolution, sharp, and well-exposed images. Avoid grainy or blurry photos. Use Lightroom or your preferred editing software to enhance clarity, contrast, and color accuracy.
2. Follow Technical Specifications
- Resolution: Usually, at least 4 MP (megapixels) for standard images, but higher is better.
- File Format: JPEG with sRGB color profile.
- Compression: Keep compression minimal to preserve quality.
- Size: Avoid upscaling images beyond their original resolution to prevent quality loss.
3. Use Relevant Keywords and Descriptions
Keywords are your best friends here. Use descriptive, accurate, and specific keywords that reflect the content of your photo. Think about what a buyer might search for. For example, instead of just “beach,” try “sunset over tropical beach with palm trees.”
Write clear, engaging descriptions that include important details. This helps your photo appear in more searches and increases the chances of being downloaded.
4. Showcase Authenticity and Diversity
Images that feel genuine and relatable tend to perform well. Include diverse subjects, perspectives, and settings to appeal to a broader audience. Authenticity builds trust and relevance.
5. Avoid Over-Editing and Watermarks
Keep editing natural and avoid heavy filters or over-saturation. Also, never include watermarks or logos—these are a big no-no for Shutterstock submissions.
6. Pay Attention to Composition and Lighting
Good composition and lighting make your photos more appealing. Use the rule of thirds, leading lines, and natural light whenever possible. Well-composed images stand out more in search results.
7. Check for Model and Property Releases
If your photos include recognizable people or private property, make sure you have the appropriate releases. Shutterstock reviews these during submission, and missing releases can lead to rejection.
By following these tips, you’re setting yourself up for success. Consistently uploading high-quality, well-optimized images will help grow your portfolio and maximize your earnings on Shutterstock. Happy shooting and uploading!
Troubleshooting Common Upload Issues from Lightroom to Shutterstock
Uploading photos from Lightroom to Shutterstock is generally smooth, but sometimes, you might run into a few hiccups. Don’t worry—many of these issues are easy to resolve once you know what to look out for. Here are some common problems and how to troubleshoot them:
Upload Failures or Errors
If your upload fails, check your internet connection first. A stable and fast connection makes all the difference. Also, ensure that Lightroom is properly connected to your Shutterstock account. Sometimes, re-authenticating or reconnecting your account can fix the issue.
File Size or Format Issues
Shutterstock has specific requirements for file formats and sizes. Your photos should be JPEG files, ideally saved with sRGB color profile, and within the maximum file size allowed. If your images are too large or in an unsupported format, uploads may be rejected. To fix this, you can:
- Export your images with correct settings from Lightroom.
- Check the file size and compress if necessary.
- Ensure the color profile is sRGB.
Metadata Not Uploading Correctly
Metadata like titles, descriptions, and keywords are crucial for discoverability. If they aren’t transferring properly, verify that you’ve entered them correctly in Lightroom’s export or plugin interface. Sometimes, re-entering or updating metadata before upload helps ensure everything is in sync.
Duplicate Uploads
If you notice duplicates in your Shutterstock portfolio, it might be due to accidental re-uploads. To avoid this, double-check your existing submissions before uploading again. Using the same filenames or metadata can sometimes trigger duplicates, so consider using unique naming conventions and consistent metadata practices.
Authentication or Authorization Issues
If Lightroom can’t connect to Shutterstock, try logging out and back into your Shutterstock account through the plugin or export interface. Clearing your browser cache or restarting Lightroom can also resolve connection hiccups.
Additional Tips:
- Keep Lightroom and your Shutterstock plugin up to date.
- Review Shutterstock’s upload guidelines periodically for any policy changes.
- Consult the Shutterstock help center or community forums if persistent issues occur.
By staying aware of these common problems and their solutions, you can streamline your workflow and keep your portfolio fresh and up-to-date without frustration.
Conclusion and Best Practices for Managing Your Shutterstock Portfolio from Lightroom
Managing your Shutterstock portfolio directly from Lightroom is a game-changer for many photographers. It saves time, keeps your editing workflow seamless, and helps you stay organized. To make the most of this integration, here are some best practices to keep in mind:
Maintain Organized Metadata
Consistently adding descriptive titles, keywords, and categories in Lightroom ensures your images are easy to find and properly categorized on Shutterstock. Developing a naming and tagging routine helps in managing large collections efficiently.
Use Consistent Export Settings
Set your export presets in Lightroom with the correct file format, size, and color profile (sRGB). This consistency reduces upload errors and ensures your images look their best online.
Regularly Update Your Portfolio
Stay active by uploading new images regularly. This keeps your portfolio fresh, increases visibility, and boosts your chances of sales. Consider setting a schedule or workflow for consistent uploads.
Leverage Keywords and Descriptions Effectively
Accurate and descriptive keywords help buyers find your images. Spend time researching relevant tags and writing clear descriptions. Use Lightroom’s metadata fields to prepare this information before upload.
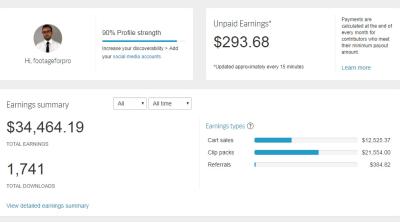
Monitor Your Uploads and Sales Performance
Keep an eye on your Shutterstock dashboard to see how your images are performing. Use this data to refine your shooting and editing focus, and update your portfolio based on trends and demand.
Backup Your Work
Always back up your original photos and metadata. While Lightroom saves your edits and metadata, having external backups ensures you don’t lose valuable work due to technical issues.
Stay Informed About Platform Updates
Shutterstock and Lightroom periodically update their features and policies. Staying informed through newsletters, forums, or official support pages helps you adapt quickly and continue working smoothly.
By following these best practices, you’ll create a streamlined, efficient process for managing your Shutterstock portfolio directly from Lightroom. This approach not only saves time but also helps you focus more on capturing and editing great images, confident that your workflow supports your creative and business goals.