Welcome to the world of stock photography! If you’re looking to share your creative work and earn some extra income, Shutterstock is one of the top platforms to consider. As we step into 2025, the process of uploading and submitting content has evolved, making it more user-friendly and efficient. Whether you’re a seasoned photographer or just starting out, understanding the latest best practices will help ensure your images get noticed and approved quickly. In this guide, we’ll walk you through the essentials of uploading to Shutterstock in 2025 and how to prepare your content for success.
Preparing Your Content for Submission
Before you hit that upload button, taking the time to prepare your content properly can make a huge difference. Shutterstock is all about high-quality, original images that meet their strict standards. Here’s how you can get your content ready for submission:
1. Ensure High-Quality Images
- Resolution: Aim for a minimum of 4 megapixels, but higher resolutions like 12MP or more are preferred. This ensures your images look sharp and professional across various uses.
- Focus and Sharpness: Make sure your subject is in sharp focus with clear details. Blurry images are a quick way to get rejected.
- Color & Exposure: Avoid overexposed or underexposed images. Use editing tools to balance brightness, contrast, and color accuracy.
2. Follow Technical Guidelines
Shutterstock has specific technical requirements to keep in mind:
| Parameter | Specification |
|---|---|
| File Format | JPEG for images, MP4 for videos |
| Color Profile | sRGB |
| File Size | Maximum 50MB for images |
| Resolution | Minimum 4MP (e.g., 2400×1600 pixels) |
3. Metadata and Keywords
Accurate and descriptive metadata can make or break your image’s visibility:
- Titles & Descriptions: Be clear and concise, highlighting what makes your image unique.
- Keywords: Use relevant keywords—think about what users might search for. Don’t stuff keywords; keep them natural and specific.
- Model & Property Releases: Make sure you have signed releases if your content features recognizable people or private property. Upload these documents during submission.
4. Review and Final Checks
Before submitting, double-check everything:
- Are your images sharp, well-exposed, and free of noise or artifacts?
- Have you included accurate metadata?
- Is your file properly formatted and within size limits?
- Did you review Shutterstock’s latest guidelines for 2025?
Preparing your content thoroughly might take extra time, but it increases your chances of acceptance and helps your work stand out in a crowded marketplace. Remember, quality and compliance are key to thriving on Shutterstock in 2025!
Creating a Shutterstock Contributor Account
Getting started on Shutterstock is an exciting step toward sharing your photography, illustrations, or vector art with a global audience. The first thing you’ll want to do is create a contributor account. Don’t worry—it’s straightforward, and I’ll walk you through it step-by-step.
First, head over to the Shutterstock Contributor website. You’ll see a button that says “Join Now” or “Sign Up”. Clicking this will take you to the registration page. Here, you’ll need to fill in some basic information:
- Name
- Email Address
- Password
- Country of Residence
Once you’ve entered your details, Shutterstock will send a verification email. Be sure to check your inbox and click the link to verify your account. This step is important because it activates your profile and allows you to start uploading content.
Next, you’ll be prompted to fill out your contributor profile. This includes your portfolio name, a brief bio, and your areas of expertise. Think of this as your storefront—make it inviting and professional! Upload a profile picture if you’d like; it adds a personal touch and helps build trust with potential buyers.
Now, before you can upload files, Shutterstock might ask you to agree to their contributor terms. It’s a good idea to read through these briefly so you understand what’s expected. After that, you’re officially a Shutterstock contributor!
Tip: Keep your email handy and check it regularly for updates from Shutterstock, including important notifications about your account or changes in submission policies. Setting up two-factor authentication is also recommended for added security.
Understanding Shutterstock Submission Guidelines
Before you start uploading your images or videos, it’s crucial to understand Shutterstock’s submission guidelines. These rules help ensure your content gets approved faster and complies with their standards. Think of it as the blueprint for a successful submission.
Let’s break down the key guidelines:
Quality is King
Shutterstock prioritizes high-quality content. This means your files should be sharp, well-exposed, and free of noise or artifacts. For photos, a resolution of at least 4 MP is required, but higher resolutions are encouraged. For vectors and illustrations, ensure clean lines and proper color profiles.
Technical Specifications
| Asset Type | Accepted Formats | Maximum Size | Other Notes |
|---|---|---|---|
| Photos | JPEG, TIFF | Up to 50 MB | RGB color space, sRGB preferred |
| Vectors/Illustrations | EPS, AI | Depends on complexity | Use vector formats, include fonts if applicable |
| Videos | MP4, MOV | Up to 4K resolution | H.264 codec recommended |
Content Restrictions
Shutterstock has strict rules about what can and cannot be uploaded. For example, avoid:
- Copyrighted material that you don’t own or have rights to
- Logos or trademarks without permission
- Explicit or offensive content
- Overly staged or fake scenes that don’t look natural
Model and Property Releases
If your content features recognizable people, private property, or copyrighted items, you’ll need appropriate releases. Without these, your content might be rejected or removed later. Always have model releases ready for identifiable individuals and property releases for private locations.
Metadata and Keywords
Adding accurate titles, descriptions, and keywords is essential. This helps buyers find your content easily. Be descriptive and specific—think about what someone would search for if they wanted to find your image.
By understanding and following these guidelines, you’ll streamline your submission process, reduce rejections, and increase your chances of earning royalties. Remember, quality, clarity, and adherence to rules are your best friends here. Happy uploading!
Optimizing Your Files for Upload
When it comes to uploading your images or videos to Shutterstock, optimizing your files is a crucial step that can make a big difference in how well your content performs. Think of it as preparing a gift — you want it to look its best and be easy to handle. Here are some best practices to ensure your files are optimized for a smooth upload and maximum visibility:
- Use High-Quality Files: Always upload the highest resolution and quality possible. Shutterstock prefers images with a minimum of 4 MP for photos, but higher resolutions tend to perform better. For videos, aim for 4K or at least 1080p resolution with good compression settings.
- File Formats Matter: Stick to the accepted formats — JPEG for images and MP4 or MOV for videos. Use sRGB color space for images to ensure color consistency across different devices.
- Proper Compression: Compress your files without sacrificing quality. Oversized files can lead to longer upload times or failures, while overly compressed files may look pixelated or blurry. Use tools like Adobe Photoshop or Lightroom for images, and HandBrake or Adobe Media Encoder for videos.
- Rename Your Files Thoughtfully: Use descriptive, clear file names without special characters or spaces. For example, “sunset-beach-vacation.jpg” is better than “IMG_1234.JPG”. This helps with organization and can aid in searchability.
- Check for Artifacts and Errors: Before uploading, review your files carefully for any unwanted artifacts, noise, or compression issues. Clean, professional-looking files are more likely to get accepted and appreciated by buyers.
Remember, the goal is to provide a file that looks professional and is easy for Shutterstock’s system to process. Taking the time to optimize your files can lead to faster approval times, better visibility, and ultimately, more sales.
Using Metadata and Keywords Effectively
Once your files are optimized and ready to upload, the next step is to make sure they’re easily discoverable. This is where metadata and keywords come into play. Think of metadata as the digital label that helps Shutterstock’s search algorithms understand what your content is about. Here’s how to use them effectively:
Understanding Metadata
Metadata includes details like titles, descriptions, keywords, categories, and model releases (if applicable). Filling these out accurately and thoughtfully significantly increases your content’s chances of being found by buyers.
Crafting a Compelling Title
Make your titles clear and descriptive. Use relevant keywords naturally, and avoid stuffing. For example, instead of “Beautiful Scene,” try “Sunset Over Mountain Lake with Reflection.” This gives viewers and search engines a better idea of what your image depicts.
Writing Effective Descriptions
Your description should expand on the title, providing context and details. Mention key elements, colors, emotions, or uses. For example:
"A vibrant sunset casting warm orange and pink hues over a tranquil mountain lake, perfect for travel, nature, or outdoor-themed projects."
Selecting Relevant Keywords
Keywords are the most critical part of metadata. Think about what your potential buyers might search for. Use a mix of specific and broad terms:
- Be Specific: “Golden retriever puppy,” “Vintage coffee shop interior,” “City skyline at night.”
- Use Synonyms and Variations: “Car,” “Automobile,” “Vehicle.”
- Include Use Cases: “Background,” “Website header,” “Marketing.”
Pro tip: Use Shutterstock’s keyword suggestions and trending tags to guide your choices. Also, avoid irrelevant or misleading keywords, as this can harm your reputation and acceptance rate.
Categories and Model Releases
Select the most appropriate categories to help your content be found in relevant searches. If your image features people, ensure you have the necessary model releases uploaded to avoid rejection and to comply with Shutterstock policies.
In summary, effective use of metadata and keywords isn’t just about filling out forms — it’s about making your content shine in search results. Take the time to do it well, and your images or videos will have a better shot at standing out in the crowded marketplace of 2025.
Uploading Your Files to Shutterstock
Alright, so you’ve got your amazing images ready to go—fantastic! Now, let’s walk through the actual process of uploading your files to Shutterstock. It’s pretty straightforward, but a few tips can make it smoother and help your submissions shine.
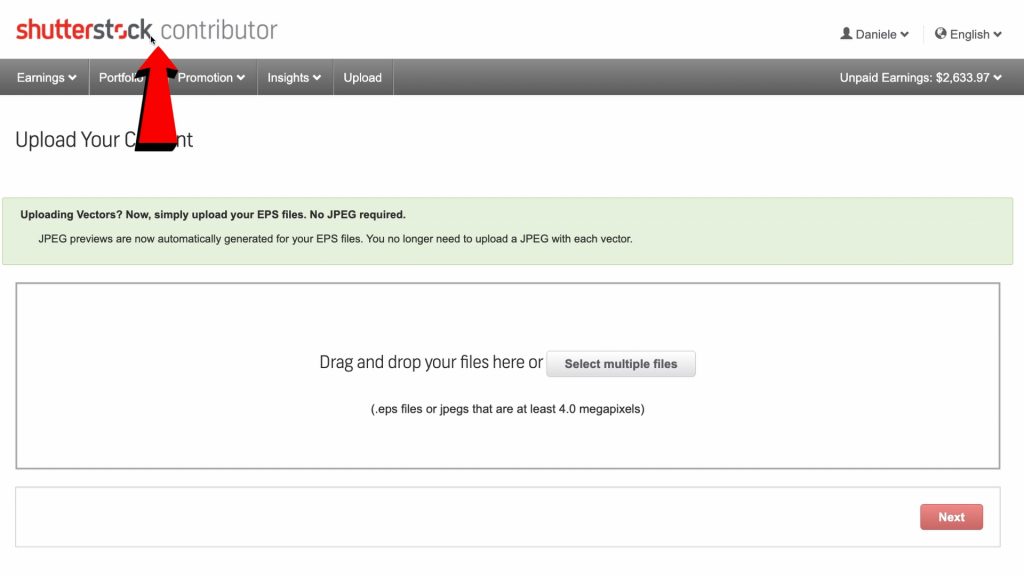
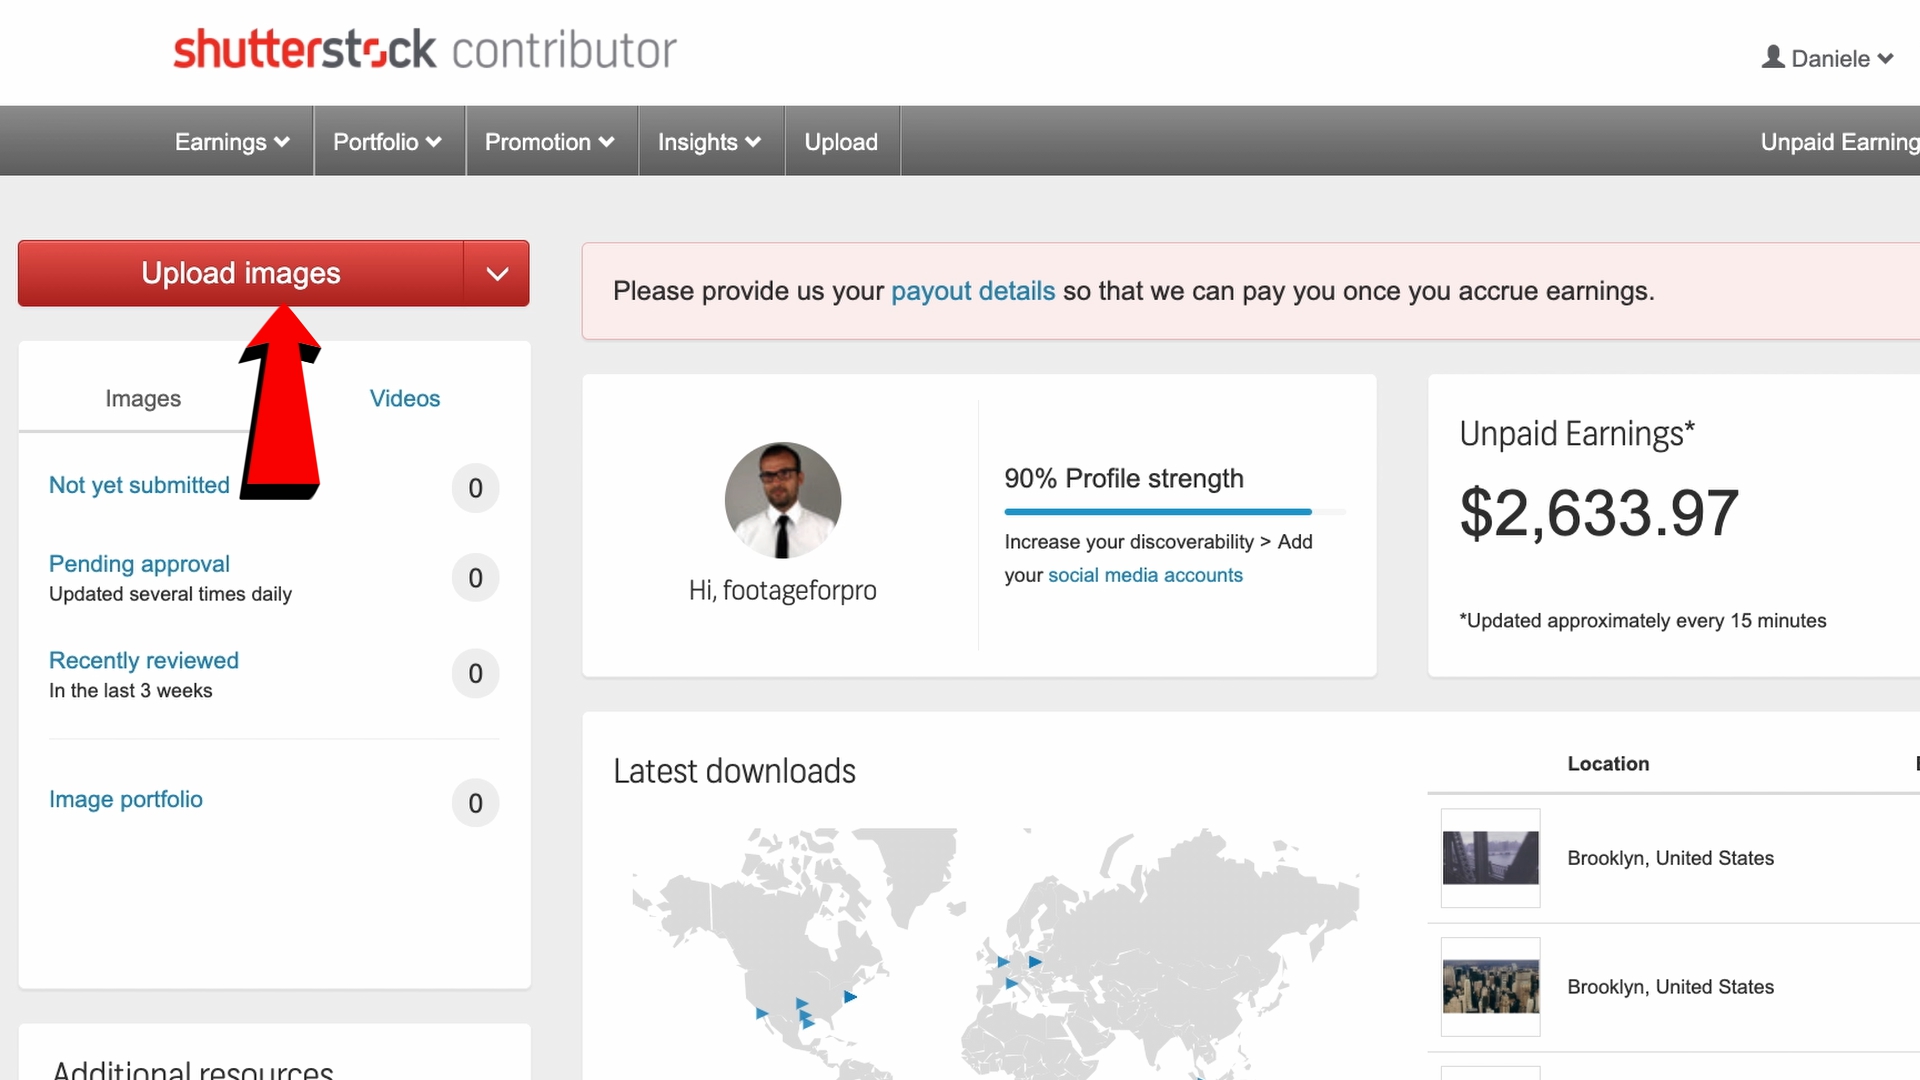
First things first, head over to your contributor dashboard. Once logged in, look for the “Upload” button—usually prominently displayed at the top or in the sidebar. Click on it, and you’ll be directed to the upload page where you can start adding your files.
When uploading, you can select multiple files at once, which is a huge time-saver. Just click the “Choose Files” button, or drag and drop your images directly into the upload window. Make sure your files meet Shutterstock’s technical specifications:
- File Format: JPEG for images, EPS or AI for vectors
- Resolution: Minimum of 4 MP (megapixels), but higher is better
- Color Mode: RGB for images, CMYK not accepted
- File Size: Usually under 50 MB per file
As you upload, add relevant details to each file. This includes:
- Title: Clear and descriptive
- Keywords: Think like your potential buyer—use relevant tags
- Category: Choose the most fitting category for your image
- Description: Briefly explain the context or story behind the image
Pro tip: Take your time with keywords. The right tags can significantly boost your image’s visibility. Use a mix of broad and specific keywords, and avoid stuffing—quality over quantity!
Once you’ve filled out all the info, double-check everything. Then, hit the “Submit” button. Your files will enter the review queue, and you’ll get a confirmation email that your upload was successful.
Remember, consistency is key. Upload regularly, keep your portfolio diverse, and pay attention to Shutterstock’s guidelines to keep your submissions flowing smoothly.
Review and Approval Process for Submissions
So, your files are uploaded—what’s next? Now, your images enter the review and approval process. Shutterstock’s review team will evaluate each submission to ensure it meets quality standards and adheres to their content guidelines.
The review process typically takes anywhere from a few hours to a few days, depending on the volume of submissions. During this period, your files are subject to thorough checks for:
- Technical Quality: Sharpness, proper exposure, no pixelation or noise
- Content Compliance: No offensive, copyrighted, or prohibited content
- Metadata Accuracy: Correct keywords, titles, and descriptions
If your submission passes the review, great! You’ll receive an email notification, and your image will go live on Shutterstock. You can then start earning royalties whenever someone downloads your work.
But sometimes, things don’t go as planned. If your submission is rejected, don’t get discouraged. Shutterstock will usually provide feedback explaining why. Common reasons include:
- Low image quality or technical issues
- Inappropriate or copyrighted content
- Incorrect or misleading metadata
When you receive a rejection, review the feedback carefully. Make the necessary adjustments—whether that’s re-editing your image for better quality or updating the metadata—and resubmit. Remember, many successful contributors go through multiple rounds before their work gets approved.
Staying patient and persistent is key. Use each rejection as a learning opportunity to improve your future submissions. Over time, with attention to detail and quality, you’ll build a strong portfolio that consistently gets approved and earns you revenue.
Best Practices for Increasing Your Acceptance Rate
So, you’ve started uploading your images to Shutterstock, and now you’re wondering how to boost your acceptance rate. After all, the more quality images you get approved, the faster your portfolio grows and the more you earn! Here are some tried-and-true best practices to help you get your work accepted more consistently.
Understand Shutterstock’s Content Guidelines
- Familiarize yourself with their content policies. Make sure your images meet their technical and creative standards.
- Pay attention to model and property releases—if your images feature recognizable people or private property, ensure you have the necessary permissions.
- Avoid overly processed or heavily filtered images unless it’s intentional and fits the theme.
Focus on Technical Quality
- Resolution: Upload high-resolution images. Shutterstock prefers images with a minimum of 4MP, but higher is better.
- Sharpness & Focus: Make sure your images are crisp and focused. Blurry or soft images are often rejected.
- Lighting & Exposure: Use natural or studio lighting to create well-exposed images with balanced contrast.
- Color Correction: Ensure colors are accurate and vibrant without being oversaturated.
Pay Attention to Composition & Creativity
- Follow the rule of thirds or other composition principles to create balanced, engaging images.
- Offer fresh perspectives or unique concepts that stand out from the crowd.
- Limit clutter in your shots—simple, clean images tend to perform better.
Meta Data & Keywords Matter
- Use relevant, specific keywords that accurately describe your image. Think like a buyer—what would they search for?
- Include synonyms and related terms to broaden your image’s discoverability.
- Write clear, concise titles and descriptions to complement your keywords.
Consistency & Portfolio Management
- Upload regularly to show Shutterstock you’re an active contributor.
- Maintain a cohesive style or theme in your portfolio to attract specific buyer segments.
- Review rejected images carefully and learn from feedback to improve your future submissions.
By adhering to these best practices, you’ll not only increase your acceptance rate but also build a strong, reputable portfolio that attracts more buyers over time. Remember, quality always beats quantity—focus on creating compelling, professional images that meet Shutterstock’s standards, and success will follow!
Tips for Maximizing Your Earnings on Shutterstock
Once your images are accepted and starting to sell, the next step is to maximize your earnings. It’s not just about uploading more; it’s about working smarter to get the most out of your portfolio. Here are some practical tips to help you boost your Shutterstock income in 2025 and beyond.
Optimize Your Keywords & Metadata
- Use detailed, accurate keywords—think about what buyers might search for, including synonyms and related terms.
- Update your tags periodically based on trending searches and popular themes.
- Write compelling titles and descriptions that highlight the unique aspects of your images.
Create High-Demand Content
- Stay ahead of trends—monitor industry news, seasonal events, and popular themes.
- Offer versatile images that can be used across multiple industries, like business, health, technology, and lifestyle.
- Include both broad and niche topics to diversify your income streams.
Focus on Quality Over Quantity
- Sell fewer, higher-quality images that command higher prices rather than many mediocre ones.
- Invest time in editing and refining your best shots to make them stand out.
- Curate your portfolio regularly—remove outdated or underperforming images.
Leverage Shutterstock’s Contributor Tools
- Use analytics to see which images are selling best and adapt your future uploads accordingly.
- Participate in Shutterstock challenges or promotional campaigns to boost visibility.
- Keep an eye on their updates—Shutterstock often introduces new features that can help you earn more.
Build a Niche Portfolio
- Specialize in a niche you’re passionate about or skilled in, like healthcare, technology, or travel.
- Niche images tend to face less competition and attract dedicated buyers.
- Establish yourself as an expert in that area, increasing your chances of repeat sales.
Engage with the Shutterstock Community
- Join forums, webinars, or social media groups for contributors.
- Share tips, get feedback, and stay inspired by other artists.
- Networking can lead to collaborations or insights that boost your earnings.
At the end of the day, growing your Shutterstock income is about consistency, strategic planning, and continually improving your craft. Keep an eye on market trends, optimize your submissions, and don’t be afraid to experiment. With patience and persistence, you’ll find your earning potential skyrocketing in 2025!
Common Mistakes to Avoid When Uploading Content
Uploading your work to Shutterstock can be an exciting step in sharing your creativity with the world, but it’s also easy to make some common mistakes that could hold back your submissions or even get your images rejected. Let’s go over some of the pitfalls to watch out for so you can streamline your process and increase your chances of approval.
Not Reading the Submission Guidelines Carefully
Every platform has its own set of rules, and Shutterstock is no exception. Skimming through the guidelines might seem tempting, but taking the time to read them thoroughly can save you time and frustration later. Pay attention to details like image quality, model and property releases, and content restrictions.
Ignoring Image Quality and Technical Requirements
- Low resolution: Always upload images that meet the minimum resolution requirements (generally 4MP or higher). Blurry or pixelated images won’t make the cut.
- Poor lighting or focus: Make sure your images are sharp, well-lit, and properly exposed.
- Incorrect file formats: Shutterstock prefers JPEG for photos and PNG for vectors. Avoid uploading unsupported formats.
Neglecting Keywording and Metadata
Proper keywording is essential for discoverability. Don’t just add a few generic tags—use relevant, specific keywords that accurately describe your content. Also, fill out the description and title fields thoughtfully, including important details and keywords naturally.
Uploading Content Without Proper Releases
If your images contain recognizable people, private property, or trademarks, you need to include model and property releases. Failing to do so can result in rejection or even legal issues down the line.
Overlooking Content Uniqueness and Authenticity
Stock platforms value original, high-quality content. Avoid uploading overly generic or heavily edited images that look artificial. Instead, focus on capturing authentic moments or unique perspectives that stand out.
Ignoring Copyright and Intellectual Property Laws
Make sure all your content is your own or you have the necessary rights. Avoid using copyrighted elements like logos, artwork, or branded products without permission, as this can lead to rejection or legal trouble.
Staying Updated with Shutterstock Policies and Features in 2025
As the digital landscape evolves, so do stock platforms with new policies, features, and best practices. Staying informed about these changes is key to maintaining a successful portfolio on Shutterstock in 2025.
Follow Official News and Announcements
Regularly check the Shutterstock Contributor Blog and your contributor dashboard for updates. Shutterstock often announces policy changes, platform updates, and new features through these channels.
Join Contributor Communities and Forums
Engaging with fellow contributors on forums and social media groups can provide valuable insights and tips. These communities often discuss recent changes and share strategies for adapting quickly.
Leverage New Platform Features
In 2025, Shutterstock might introduce features like AI-assisted keywording, enhanced analytics, or improved upload workflows. Embrace these tools to optimize your submissions and better understand your audience.
Stay Informed About Legal and Ethical Standards
With evolving privacy laws and content regulations, it’s important to keep abreast of legal standards. This includes understanding new requirements for model releases, content restrictions, and intellectual property rights.
Use Educational Resources and Training
Many platforms, including Shutterstock, offer tutorials, webinars, and guides. Investing time in these resources can help you stay ahead of best practices and leverage new features effectively.
Maintain Flexibility and Adaptability
Finally, the digital marketplace is always changing. Be open to experimenting with new types of content, formats, or styles that become popular. Staying adaptable will keep your portfolio relevant and competitive in 2025 and beyond.