Looking to get your photos noticed and approved quickly on Shutterstock? You’re in the right place! Uploading images might seem straightforward, but there’s a bit of a process to make sure your submissions stand out and pass review fast. Whether you’re a seasoned photographer or just starting out, understanding the ins and outs of Shutterstock’s upload system can make all the difference. In this guide, we’ll walk you through the essentials, from preparing your images to submitting them efficiently, so you can get your work online and earning in no time.
Preparing Your Images for Submission
Before you hit that upload button, it’s crucial to prepare your images to meet Shutterstock’s quality standards. This not only helps speed up the approval process but also increases your chances of getting accepted and earning royalties. Here’s what you need to focus on:
1. Choose High-Quality Photos
- Resolution: Submit images with a minimum of 4 megapixels (e.g., 1600×2400 pixels). Higher resolutions are always better.
- Sharpness: Make sure your photos are in focus with clear details.
- Lighting: Use natural or well-balanced artificial lighting to avoid shadows and overexposure.
2. Edit and Optimize Your Images
Use editing software like Adobe Photoshop or Lightroom to enhance your photos. Adjust brightness, contrast, and color balance to make your images pop. But remember: avoid over-editing or adding filters that distort the authenticity of your photo.
3. Remove Metadata and Watermarks
Strip any personal metadata or watermarks from your images. Shutterstock prefers clean images without branding or personal info embedded. You can do this during export settings in your editing software.
4. Save in the Correct Format and Size
| Format | Recommended Settings |
|---|---|
| JPEG | RGB color mode, sRGB profile, 8-bit, high quality (around 80-100%) |
| File Size | Under 50MB per image for easy uploading |
5. Add Relevant Keywords and Descriptions
Before uploading, prepare descriptive keywords and a compelling title. Use specific, relevant keywords to help your image get discovered. Think about what someone searching for your photo would type in.
Final Tips:
- Consistency: Upload images that fit your niche or style.
- Compliance: Make sure your photos don’t include prohibited content (like logos, copyrighted material, or inappropriate content).
By following these steps, your images will be polished, professional, and ready for a smooth approval process. Taking the time to prepare properly can make all the difference in getting your photos approved quickly and starting your Shutterstock journey on the right foot.
Creating an Account and Logging In
So, you’re ready to start sharing your amazing photos on Shutterstock? Great! The first step is creating an account. Don’t worry — it’s pretty straightforward, and I’ll walk you through it.
Head over to the Shutterstock Contributor Portal and click on the “Sign Up” button. You’ll be asked to fill in some basic information like your name, email address, and a password. Make sure to choose a strong password to keep your account secure.
Once you’ve entered your details, Shutterstock might ask you to verify your email address. Check your inbox for a verification email and click on the link provided to confirm your email. This step is important because it helps keep your account safe and ensures you can access all features without any hiccups.
After verification, you can log in by heading back to the Contributor Portal and entering your email and password. When you log in for the first time, Shutterstock might prompt you to fill out some additional profile info — like your name, location, and a few questions about your photography style. This info can help Shutterstock match your portfolio with potential buyers and get your images seen more often.
Remember, keeping your profile complete and accurate can positively impact your approval times and sales. So, take a few minutes to add some personal touches, like your website or social media links, if you have them.
And that’s it! You’re now officially a Shutterstock contributor. Next, let’s get into the exciting part — uploading your photos and getting them approved quickly.
Step-by-Step Guide to Upload Photos on Shutterstock
Uploading your photos to Shutterstock might seem like a simple task, but doing it the right way can make all the difference in getting fast approval. Here’s a step-by-step guide to help you upload efficiently and optimize your chances of approval.
- Prepare Your Files — Before uploading, make sure your images are high quality, properly edited, and meet Shutterstock’s guidelines. Usually, this means:
- JPEG format
- Minimum of 4 MP resolution
- RGB color mode
- No watermarks or borders
- Log into Your Contributor Account — Use your credentials to access the Shutterstock Contributor Dashboard.
- Click on “Upload Files” — You’ll find this button on your dashboard. It’s usually big and easy to spot.
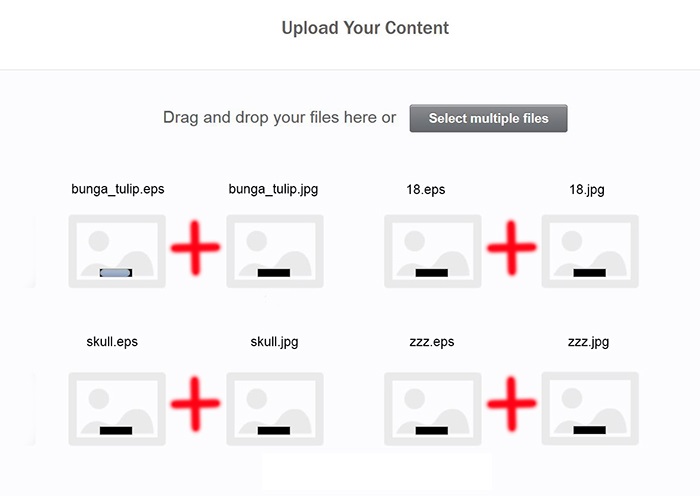
- Select Your Photos — Choose the images you want to upload from your computer. You can upload multiple files at once, which saves time.
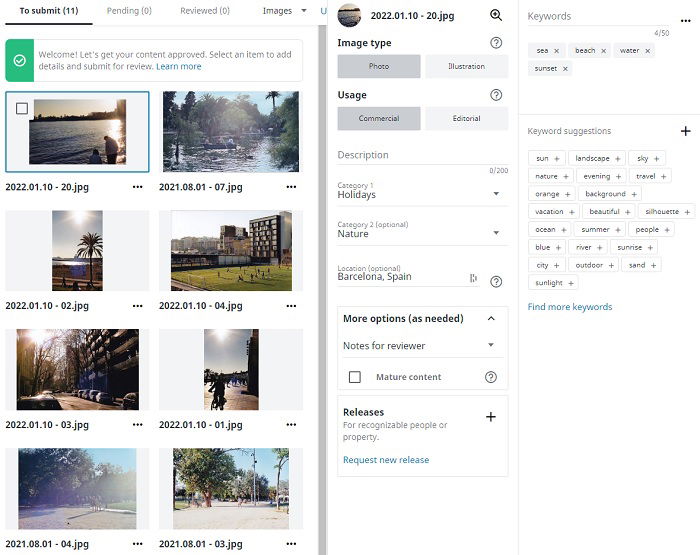
- Add Metadata — This is a crucial step. Fill in details like:
- Title
- Description
- Keywords (use relevant, specific tags)
- Category
Proper metadata helps your images get discovered faster, so spend a few extra minutes here.
- Set Licensing Options — Decide whether your images will be exclusive or non-exclusive. Usually, non-exclusive licensing allows you to sell the same image elsewhere, increasing your earning potential.
- Review Your Uploads — Before submitting, double-check that all info is correct and images are high quality. Make sure your keywords are relevant and not spammy.
- Submit for Review — Hit the “Submit” or “Upload” button. Your images will now go into Shutterstock’s review queue.
Here’s a quick tip: to speed up approval, avoid uploading images that are heavily edited or contain logos, watermarks, or identifiable people without model releases unless you have the proper legal permissions.
Once submitted, Shutterstock’s review team typically takes a few days to approve or provide feedback. If your images are rejected, don’t get discouraged — review their comments, make necessary adjustments, and try again. Keep uploading quality, relevant images, and your approval times will improve over time!
Tips for Ensuring Fast Approval of Your Images
Getting your images approved quickly on Shutterstock can feel like a bit of a mystery, but there are some tried-and-true tips that can help speed up the process. Think of it like preparing for a job interview — the better you present yourself, the quicker you’ll get the green light!
First, pay close attention to Shutterstock’s content guidelines. They’re pretty clear about what they’re looking for, so take the time to review their upload guidelines before submitting. This includes things like image quality, relevance, and avoiding certain restrictions like watermarks or logos.
Next, ensure your images are high resolution. Shutterstock prefers images that are at least 4 megapixels, but higher is better. This means shooting with a good quality camera or editing your photos to enhance clarity and sharpness. Blurry, pixelated, or poorly composed images are more likely to be rejected or delayed.
Another key tip is to focus on uniqueness and relevance. Shutterstock is a vast library, so standing out with original content that fills a niche can help your images get approved faster. Think about current trends, seasons, or specific themes that are in demand.
Before uploading, always edit your images for color correction, brightness, and contrast. Use editing software to make your images pop, but avoid over-processing or adding effects that look unnatural. Keep your images clean and professional-looking.
Lastly, add detailed and accurate descriptions, keywords, and titles. Use relevant keywords that truly describe your image without keyword stuffing. The more accurate your metadata, the easier it is for Shutterstock to categorize and approve your images quickly.
In summary, preparing your images with high quality, following guidelines, and providing precise metadata can significantly speed up the approval process. Think of it as setting yourself up for success — the more professional and thorough you are, the faster your images will find a new home.
Common Mistakes to Avoid When Uploading Photos
Even seasoned contributors can make mistakes that slow down their image approvals or cause rejections. Let’s go over some of the common pitfalls so you can steer clear of them and keep your workflow smooth and efficient.
1. Uploading Low-Quality or Blurry Images: This one’s a big no-no. Shutterstock emphasizes high-resolution, sharp, and well-composed photos. Blurry, pixelated, or overly compressed images are likely to be rejected or take longer to review.
2. Ignoring Content Guidelines: Each platform has specific rules about what can be uploaded. Including watermarks, logos, brand names, or copyrighted material without proper rights can lead to immediate rejection. Always double-check that your images comply with Shutterstock’s policies.
3. Poor Metadata and Keywording: Skimping on accurate titles, descriptions, or keywords can delay approval. It’s essential to be honest and precise with your metadata. Avoid keyword stuffing or irrelevant tags, as that can cause issues or make your images less discoverable.
4. Over-Editing or Adding Unnatural Effects: While editing is encouraged, overdoing it can make your images look artificial or unprofessional. Shutterstock prefers natural-looking photos that accurately depict real life.
5. Uploading Duplicate or Similar Shots: Flooding the platform with very similar images can be discouraged. Instead, select the best shot and optimize it for upload. If you have multiple similar images, consider submitting a diverse set that covers different angles or details.
6. Not Reviewing Before Upload: Skipping the final check can lead to mistakes like missing watermarks, incorrect orientation, or incomplete metadata. Always review your images thoroughly before hitting the upload button.
By avoiding these common mistakes, you not only increase your chances of quick approval but also build a strong portfolio that buyers will trust. Remember, attention to detail and adherence to guidelines are your best friends in the world of stock photography!
Understanding Shutterstock’s Review Process
Before you dive into uploading your images, it’s super helpful to understand how Shutterstock reviews submissions. Think of the review process as a friendly gatekeeper that’s making sure only high-quality, relevant images make it onto their platform. This not only maintains Shutterstock’s reputation but also helps your images stand out once approved.
Typically, once you upload your images, they go into a review queue. The review team, which consists of experienced reviewers, looks at several factors:
- Technical Quality: Is the image sharp, well-exposed, and free of noise or artifacts? Blurry or poorly lit images rarely make the cut.
- Composition: Is the image well-composed with an interesting subject and good framing? Cluttered or poorly composed images tend to be rejected.
- Relevance and Uniqueness: Does the image offer something new or valuable? Stock sites love fresh perspectives and original content.
- Model and Property Releases: If your image features recognizable people or private property, proper releases are essential for approval.
- Adherence to Guidelines: Shutterstock has specific rules about content, including no nudity unless appropriate, no offensive material, and adherence to copyright laws.
The review process usually takes anywhere from a few hours up to a few days, depending on the volume of submissions. If your images are rejected, don’t get discouraged! Shutterstock provides feedback on why they didn’t pass, so you can learn and improve for next time.
Pro Tip: Keep an eye on your email or dashboard notifications. If your images are rejected, take a moment to read the comments carefully—they often point out exactly what needs fixing. Remember, patience and persistence are key. The more you understand their standards, the better your chances of getting approved quickly!
Optimizing Your Images for Better Visibility and Approval
Once you understand the review process, it’s time to optimize your images to give yourself the best shot at approval—and to make sure they get seen by potential buyers. Optimization isn’t just about editing the image; it’s also about how you present and prepare your uploads.
Here are some practical tips to boost your images’ visibility and increase approval rates:
- Use High-Resolution Files: Upload images at a minimum of 4MP (megapixels). Shutterstock prefers high-quality images that look good in various sizes.
- Keep Files Well-Organized: Name your files descriptively, using relevant keywords. For example, instead of “IMG1234.jpg,” use “sunset-beach-vacation.jpg”.
- Choose the Right Keywords: Keywords are your best friends here. Use specific, relevant keywords to describe your image accurately. Think about what a buyer might search for—include details like location, mood, colors, and objects.
- Write Clear and Accurate Titles and Descriptions: When adding metadata, be honest and precise. This helps your images appear in the right searches and avoids rejection due to misleading info.
- Mind the Composition and Lighting: Bright, well-lit images with clean composition tend to perform better. Use editing tools to enhance your photos subtly if needed.
- Include Model and Property Releases When Necessary: Upload proper releases if your images feature recognizable people or private property. This is crucial for approval and sales potential.
- Avoid Over-Editing: While slight enhancements are okay, avoid heavy filters or alterations that distort the natural look of your image.
Another great tip is to look at successful images in your niche. Observe what makes them stand out—be it color palette, subject matter, or style—and try to incorporate those elements into your own work. Remember, the goal is to create images that are both high-quality and easily discoverable.
Finally, stay consistent. Regularly uploading well-optimized images builds your portfolio’s visibility over time. As Shutterstock’s algorithm recognizes your quality and relevance, your images will appear more frequently in search results, leading to faster approvals and more sales. Happy shooting and optimizing!
Conclusion and Final Tips for Successful Uploads
Uploading your images to Shutterstock can be a straightforward process when you follow best practices. To maximize your chances of fast approval, ensure that your photos meet Shutterstock’s quality standards and adhere to their content guidelines. Remember to:
- Use high-resolution images: Aim for at least 4 megapixels to meet minimum quality requirements.
- Ensure proper keywording: Add relevant and accurate keywords to improve discoverability.
- Maintain originality: Submit unique, high-quality photos that haven’t been published elsewhere.
- Check your metadata: Double-check titles, descriptions, and keywords for accuracy and clarity.
- Follow technical specifications: Pay attention to file format (JPEG, TIFF), color space (sRGB), and file size limits.
Before submitting, review Shutterstock’s contributor guidelines carefully to avoid common pitfalls that could delay approval. Consistently uploading high-quality, well-tagged images not only speeds up approval times but also enhances your portfolio’s visibility. Keep your camera gear well-maintained, and always pay attention to lighting and composition to produce images that stand out. Patience and attention to detail are key—successful contributors often see their work approved quickly by adhering to these tips. With perseverance and a keen eye for quality, you’ll be on your way to building a thriving stock photo portfolio on Shutterstock.
Happy uploading!