Hey there! If you’re a photographer or just love capturing moments on your Android phone, you might want to share your work with a wider audience. Shutterstock is a popular platform for selling high-quality images, and uploading directly from your Android device makes the process super convenient. In this guide, we’ll walk you through how to seamlessly upload your stunning photos to Shutterstock right from your Android phone. Whether you’re a seasoned pro or just starting out, you’ll find it easy to get your images online and potentially earn some extra income. Let’s dive in!
Preparing Your Photos for Upload on Android
Before you hit the upload button, it’s important to get your photos ready. High-quality, well-prepared images not only increase your chances of approval but also attract more buyers. Here are some tips to help you prepare your photos on your Android device:
- Organize Your Photos: Start by creating a dedicated folder for your selected images. This makes it easier to find the best shots when you’re ready to upload.
- Check Image Quality: Ensure your photos are sharp, well-exposed, and in focus. Use your phone’s editing tools or third-party apps like Snapseed or Lightroom to enhance brightness, contrast, and colors.
- Resize and Compress: Shutterstock recommends images be at least 4 MP (e.g., 2000 pixels on the shortest side). Use apps like Photo & Picture Resizer or JPEG Optimizer to resize your images without losing quality. Compress your photos to reduce file size while maintaining clarity—this speeds up upload times.
- Remove Metadata and Watermarks: Clean your images of any personal data or watermarks that might have been added during editing. You can do this with photo editing apps or file management tools.
- Review Shutterstock’s Requirements: Familiarize yourself with their guidelines regarding content, model releases, and property releases. Make sure your photos comply to avoid rejection.
Finally, give your images a quick quality check—zoom in to look for any imperfections or noise, and make sure they look professional. Once your photos are polished and ready, you’re all set to move on to uploading them directly from your Android device!
Downloading and Installing the Shutterstock Contributor App on Android
Alright, so you’re ready to start uploading your amazing photos to Shutterstock straight from your Android device? The first step is to get the Shutterstock Contributor App installed on your phone. It’s super straightforward, and I’ll walk you through it.
First things first, open the Google Play Store on your Android device. You can usually find it on your home screen or app drawer—it’s that colorful triangle icon. Once you’re in, tap on the search bar at the top and type “Shutterstock Contributor”.
Look for the app in the search results—it should be labeled as “Shutterstock Contributor” with the official logo. Tap on it to open the app page. Here, you’ll see a couple of buttons—just tap on Install. The app will start downloading, and once it’s done, it will automatically install on your device.
It’s a good idea to make sure you have a stable internet connection, like Wi-Fi, to avoid interruptions during the download. Also, verify you have enough storage space on your phone. Usually, the app isn’t very large, so most devices should handle it easily.
After installation, you’ll see the app icon appear on your home screen or app drawer. Tap on it to open the Shutterstock Contributor app. Now, you’re all set to begin the process of creating your contributor profile and uploading your photos.
Pro tip: If for some reason you can’t find the app in the Play Store, double-check that your device’s software is up to date or try searching for it using your device’s app store search feature. Sometimes, regional restrictions could also affect availability, but generally, it’s widely accessible.
Creating a Shutterstock Contributor Account on Your Android Phone
Great! You’ve installed the app, and now it’s time to create your Shutterstock Contributor account. Don’t worry—it’s quick and simple, and I’ll guide you through each step.
Open the Shutterstock Contributor app on your phone. You’ll be greeted with a welcome screen, prompting you to sign in or sign up. Since you’re new, tap on “Sign Up”.
You’ll need to provide some basic details:
- Full Name
- Email Address
- Choose a Password
- Country of Residence
Make sure to use a valid email address because Shutterstock will send you a verification email. Once you fill in the details, tap on Create Account.
Next, you’ll be asked to verify your email. Head over to your email inbox, find the email from Shutterstock, and click on the verification link. This step is crucial to activate your account.
After verifying your email, return to the app, and you’ll be prompted to agree to Shutterstock’s terms and conditions. Take a moment to read through them, then tap Agree & Continue.
Now, you’ll be asked to set up your contributor profile. Here, you can add a profile picture, write a short bio, and specify your areas of photography. Filling out this information helps buyers get to know your style and increases your chances of making sales.
Once your profile is complete, you’re officially a Shutterstock contributor! The app will take you to the main dashboard, where you can start uploading photos, check your earnings, and track your submissions.
Remember, the more complete your profile, the more professional you appear to potential buyers. Plus, a compelling profile can boost your chances of making those sales you’re aiming for.
And that’s it! You’re now ready to upload your photos and share your creativity with the world—all from your Android phone. Next up, we’ll dive into how to prepare your photos for upload and the best practices to make your submissions stand out.
Uploading Photos to Shutterstock Using the Android App
Ready to share your amazing photos with the world? Uploading directly from your Android phone to Shutterstock is easier than you might think. Let’s walk through the process step-by-step so you can get your photos online in no time.
First things first, make sure you’ve downloaded the Shutterstock Contributor App from the Google Play Store. Once installed, open the app and sign in with your contributor account credentials. If you don’t have an account yet, it’s simple to create one directly through the app or on the Shutterstock website.
Step-by-step upload process:
- Open the app and log in to your contributor account.
- Tap the camera icon or the “Upload” button on the homepage.
- Select your photos from your gallery or take new photos using the in-app camera feature. For best results, select high-quality images that meet Shutterstock’s guidelines.
- Add details: Enter a compelling title, detailed description, and relevant keywords. This helps your photos get discovered easier!
- Choose the appropriate category for your photo, so it’s easier for buyers to find.
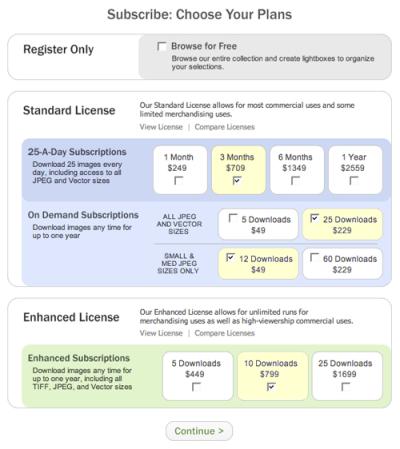
- Set licensing options if prompted, such as Standard or Enhanced licenses. Usually, the default options work fine, but it’s good to double-check.
- Review your upload to ensure everything looks good.
- Tap “Submit” to upload your photo. The app will give you a confirmation message once your image is successfully submitted.
And voilà! Your photo is now in the review queue. The Shutterstock team will evaluate your submission, and if it meets their quality standards, it’ll go live on the marketplace. Keep in mind, the review process can take anywhere from a few hours to several days, so be patient.
Pro tip: Using the app makes it super convenient to upload on the go, but always double-check your images and details before submitting. Consistent, high-quality uploads increase your chances of acceptance and boost your earning potential.
Tips for Optimizing Your Photos for Better Acceptance
Getting your photos accepted by Shutterstock isn’t just about uploading pretty pictures. There are some key best practices you should follow to increase your chances of approval and make your images stand out in the marketplace. Here are some tips to help you optimize your photos:
1. Focus on Quality
Shutterstock is all about high-quality images. Make sure your photos are sharp, well-exposed, and free of noise or distracting elements. Use good lighting and avoid over-editing; natural-looking images often perform better.
2. Follow Technical Guidelines
- Resolution: Upload images at a minimum of 4 megapixels (roughly 2000 pixels on the shortest side).
- Format: JPEG is preferred, saved in sRGB color space.
- Compression: Keep file sizes optimized without sacrificing quality.
- File Name: Use descriptive, relevant filenames to help with SEO.
3. Use Relevant Keywords and Descriptions
Accurate and descriptive keywords help buyers find your photos. Think about what someone might search for—be specific! For example, instead of “flower,” try “red tulip in spring garden.” Write detailed descriptions to provide context and improve discoverability.
4. Avoid Obvious Copyright or Trademarked Content
Make sure your photos don’t contain copyrighted logos, trademarked products, or recognizable private property unless you have the rights to use them. Shutterstock is strict about copyright infringement, so play it safe.
5. Capture Unique Perspectives or Niche Topics
Stand out from the crowd by photographing unique angles, interesting concepts, or niche subjects that aren’t oversaturated. Think about trending topics or underserved categories.
6. Maintain Consistency
If you’re serious about building your portfolio, develop a consistent style or theme. This can help attract repeat buyers and establish your brand as a contributor.
7. Review Shutterstock’s Content Guidelines
Before uploading, always review their guidelines to ensure compliance. Adhering to their standards reduces rejection rates and speeds up the approval process.
By paying attention to these tips, you’ll improve your chances of getting your photos accepted and earning more. Remember, quality and relevance are king in the stock photography world. Keep practicing, stay creative, and enjoy sharing your vision with the Shutterstock community!
Managing Your Uploaded Photos and Tracking Earnings on Android
Once you’ve uploaded your stunning photos to Shutterstock, the next step is managing your portfolio and keeping an eye on how much you’re earning — all from your Android device. Luckily, Shutterstock offers a user-friendly app that makes this process pretty straightforward, so you don’t have to be chained to your desktop.
First things first, download the Shutterstock Contributor app from the Google Play Store if you haven’t already. It’s free and designed specifically to help photographers like you manage your content on the go.
Managing Your Photos
Inside the app, you’ll find a dashboard that shows your uploaded photos, their approval status, and any comments or feedback from reviewers. Here are some tips to keep your portfolio in tip-top shape:
- Edit or Remove Photos: If you notice a photo that isn’t performing well or doesn’t meet your standards anymore, you can delete or update it directly through the app.
- Check Approval Status: Stay updated on which images are approved, rejected, or pending review. This helps you understand what types of photos do well and plan your future uploads accordingly.
- Organize Your Portfolio: Use tags and categories to organize your images. This not only helps you keep track but also makes it easier for buyers to find your work.
Tracking Your Earnings
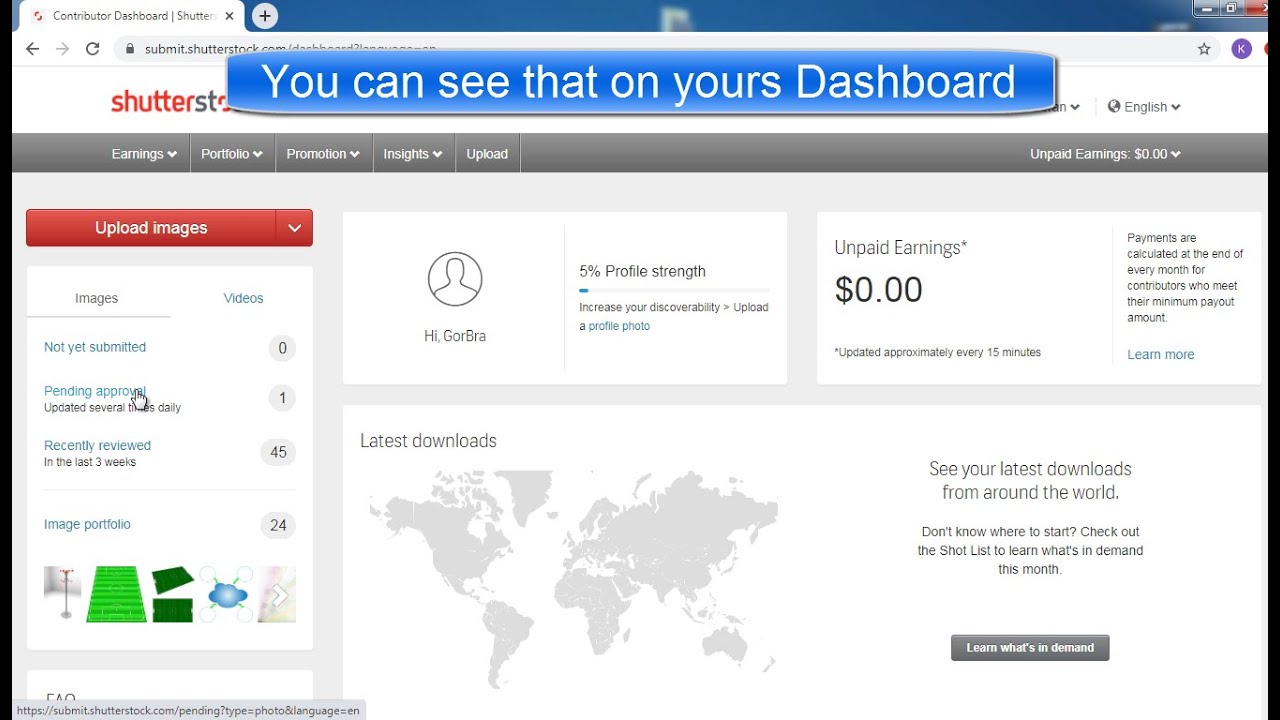
One of the coolest features of the app is the ability to monitor your earnings in real-time. Under the Dashboard tab, you’ll see a summary of your current balance, recent sales, and payout history. Here’s what you can do:
- View Earnings Breakdown: See how much you’ve earned from each image, which helps you identify your top-performing photos.
- Set Payout Preferences: Ensure your payment details are accurate for seamless payouts. You can update your bank or PayPal info directly in the app.
- Analyze Trends: Use the sales data to understand which topics or styles sell best, guiding your future photo shoots.
Managing your Shutterstock portfolio on Android is all about staying organized and informed, no matter where you are. Whether you’re reviewing your photos, optimizing your portfolio, or checking your earnings, the app makes it easy to stay connected and proactive as a contributor.
Conclusion and Additional Resources for Shutterstock Contributors
And that wraps up our step-by-step guide on uploading photos to Shutterstock from your Android phone! Remember, the process is designed to be simple and flexible, allowing you to contribute your work effortlessly, whether you’re at home or on the move.
To recap, you learned how to:
- Download and install the Shutterstock Contributor app
- Prepare your photos for upload with proper editing and metadata
- Upload your images directly from your Android device
- Manage your portfolio and track your earnings conveniently from your phone
As you continue your journey as a Shutterstock contributor, here are some additional resources to help you succeed:
- Shutterstock Contributor Help Center: Offers detailed guides, FAQs, and troubleshooting tips — visit submit.shutterstock.com.
- Photography Tips & Resources: Improve your skills and learn what types of images are in demand by browsing popular trends on Shutterstock’s blog and social media.
- Community Forums: Connect with other contributors, share tips, and get feedback to refine your portfolio.
Keep experimenting, stay consistent, and don’t forget to have fun capturing and sharing your unique perspective with the world. Happy uploading!