If you’re a photographer looking to share your work with a global audience, Shutterstock is a fantastic platform to consider. Not only does it give your images exposure to millions of potential buyers, but it also offers a straightforward process for uploading and selling your photos. However, getting your images approved quickly can sometimes feel tricky, especially if you’re new to the platform. In this guide, we’ll walk through the essentials of uploading photos to Shutterstock and share tips to help you get your images approved faster. Let’s get started on turning your photography passion into a profitable venture!
Preparing Your Photos for Upload

Before you hit the upload button, it’s crucial to prepare your photos properly. Proper preparation not only boosts your chances of approval but also ensures that your images look their best to buyers. Here are some key steps to get your photos ready:
- Choose High-Quality Images: Make sure your photos are sharp, well-exposed, and free of noise or blurriness. Shutterstock prefers professional-looking images that meet industry standards.
- Use the Correct File Format and Size: Upload images in JPEG format with a minimum of 4 megapixels (preferably higher). Keep the file size under 50MB for smooth uploading.
- Maintain Proper Composition: Pay attention to framing, focus, and overall composition. Avoid overly cluttered backgrounds or distracting elements.
- Edit Thoughtfully: Basic editing like color correction, contrast adjustment, and cropping can enhance your photos. Avoid heavy filters or over-editing that distort the original image.
- Metadata and Keywords: Prepare relevant titles, descriptions, and keywords for each photo. Think about what buyers might search for—this helps your images get discovered faster.
- Check for Copyright and Model Releases: Ensure you own the rights to all elements in your photo, and include model or property releases if necessary. This can speed up the approval process and prevent rejections.
Taking the time to properly prepare your photos shows Shutterstock that you’re serious about quality, which can significantly improve your approval speed. Remember, quality and relevance are key—so invest a little extra effort in editing and metadata. Once your images are polished and ready, you’re all set for the upload process!
Step-by-Step Instructions for Uploading Photos
Ready to get your stunning photos on Shutterstock and see your creativity in the world? The process is pretty straightforward, and I’ll walk you through each step so you can upload with confidence.
Step 1: Log into Your Contributor Account
If you haven’t created one yet, it’s quick to sign up. Just head over to the Shutterstock Contributor page and follow the prompts. Once logged in, you’ll see your dashboard — this is where all the magic begins.
Step 2: Click on the ‘Upload’ Button
Look for the bright blue ‘Upload’ button, usually at the top right corner of your dashboard. Clicking this takes you to the upload page where you can add your photos.
Step 3: Select Files to Upload
You can drag and drop your photos directly into the upload window or click ‘Browse’ to locate files on your computer. Shutterstock recommends uploading high-quality images, so make sure your files are in JPEG format, at least 4 MP, and in RGB color space.
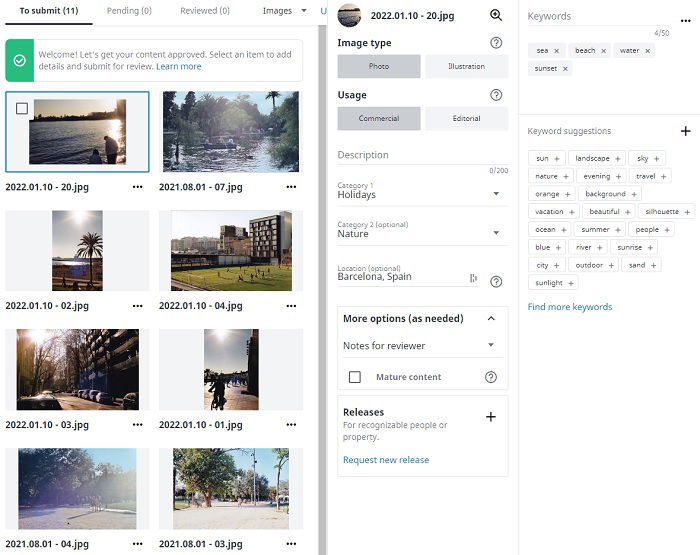
Step 4: Fill Out Metadata
This is super important! You’ll be prompted to add details about your photo:
- Title: Make it descriptive but straightforward.
- Keywords: Use relevant tags to help buyers find your image. Think of words someone might search for.
- Description: A brief explanation of what the photo depicts.
Accurate and keyword-rich metadata can boost your chances of approval and sales.
Step 5: Choose the Appropriate Category
Select the category that best fits your photo. Shutterstock offers a list of categories to help your image be discoverable by the right audience.
Step 6: Submit for Review
Once everything looks good, click the ‘Submit’ button. Your photo will then enter the review queue. You can upload multiple images in one go, which is a huge time-saver!
Step 7: Wait for Approval
Now, it’s just a matter of waiting. Shutterstock typically reviews images within a few days, but it can vary depending on the volume of submissions and other factors.
Tips to Ensure Quick Approval of Your Photos
Getting your photos approved fast isn’t just about luck; there are some best practices you can follow to speed up the process and improve your chances of approval.
1. Follow Shutterstock’s Technical Requirements
- Image Quality: Upload high-resolution images that are sharp and clear, with no pixelation or noise.
- File Format: JPEG only, with sRGB or Adobe RGB color profiles.
- File Size: Minimum 4 MP, ideally larger for better quality.
- No Watermarks or Borders: Keep images clean and professional.
2. Use Relevant and Accurate Metadata
Keywords and descriptions are crucial. Use specific, relevant keywords and avoid stuffing with unrelated tags. Think about what a buyer searching for your image might type. Accurate metadata helps reviewers understand and categorize your work correctly.
3. Submit Unique and High-Quality Content
Stock platforms favor original, high-quality photos. Avoid overused themes or overly edited images. Show your unique perspective and ensure your photos are well-composed, properly exposed, and free of distractions.
4. Avoid Common Rejection Triggers
- Overly commercial images with visible logos or trademarks.
- Images with poor lighting or focus.
- Photos that are heavily edited or contain filters that distort reality.
- Images with model or property releases missing when required.
5. Keep Up with Shutterstock’s Guidelines
Regularly review Shutterstock’s contributor guidelines. They update their policies and standards, and staying informed helps you adapt your submissions accordingly.
6. Batch Your Submissions
Uploading multiple images at once can be more efficient, but ensure each one meets the quality standards. Avoid submitting low-quality images just to increase your volume, as this can slow down approval or lead to rejections.
By following these tips, you’ll not only speed up the approval process but also increase your chances of making sales. Remember, patience and attention to detail are key — happy uploading!
Common Mistakes to Avoid During Upload
Uploading your photos to Shutterstock can be an exciting step toward sharing your work with a global audience, but it’s easy to make mistakes that could delay approval or even prevent your images from being accepted. Let’s go over some of the most common pitfalls so you can steer clear of them and make your submission process as smooth as possible.
1. Ignoring Shutterstock’s Submission Guidelines
Each platform has its own set of rules, and Shutterstock is no different. Failing to review their technical and content guidelines can lead to rejections. Make sure your images meet their resolution requirements, file format specifications, and avoid prohibited content like watermarks, logos, or copyrighted material that isn’t yours.
2. Poor Image Quality
Blurry, pixelated, or overly noisy images are a big no-no. Always upload high-resolution photos that are well-focused and properly exposed. Shutterstock prefers images that are sharp and clear, so take the time to edit and enhance your photos before uploading.
3. Wrong Metadata and Keywords
Keywords are crucial for discoverability. Avoid stuffing irrelevant keywords or leaving them blank. Use accurate, descriptive, and relevant tags that truly reflect the content of your image. This helps your photos reach the right audience and increases the chances of approval.
4. Duplicate or Similar Images
Uploading multiple similar images without variation can be seen as spammy and might hurt your reputation as a contributor. Instead, select the best shot and consider whether additional images add value or are redundant.
5. Not Reviewing the Image Before Submission
Sometimes, a quick glance isn’t enough. Double-check your images for any errors, like accidental objects, watermarks, or distracting elements. It’s a good idea to view your photo at full size to catch any issues before hitting submit.
Final Checks Before Submission
Before you click that upload button, take a few moments to do some final checks. This extra step can save you time in the review process and improve your chances of getting approved quickly.
1. Verify Technical Specifications
Ensure your image meets Shutterstock’s technical standards:
- Resolution: At least 4 Megapixels (e.g., 2400 x 1600 pixels)
- File format: JPEG (.jpg) for photos
- Color profile: sRGB or Adobe RGB
- File size: Under 50MB
2. Conduct a Content Review
Look for any unintended objects, watermarks, or branding that might violate Shutterstock’s policies. Remove or crop out anything distracting or inappropriate.
3. Optimize Metadata
Write clear, concise titles and detailed descriptions. Use relevant keywords thoughtfully — think about what someone would search for to find your image. Avoid keyword stuffing; quality over quantity is key.
4. Check for Copyright and Model Releases
Make sure you have the rights to all elements in your photo. If your image features recognizable people or private property, ensure you have the appropriate model or property releases uploaded along with your photo.
5. Preview Your Upload
Some platforms allow you to preview how your image will look after upload. Use this feature to catch any last-minute issues and confirm your image appears as intended.
Taking these final steps might seem small, but they make a big difference in ensuring your photos are approved quickly and smoothly. Remember, patience and attention to detail are your best friends in this process. Happy uploading!
Conclusion and Additional Resources
Uploading high-quality photos to Shutterstock is a crucial step toward gaining fast approval and increasing your chances of success. Remember to ensure your images meet the platform’s technical requirements, such as proper resolution, file format, and clear subject matter. Consistently submitting well-edited, original photos will help build your portfolio and enhance your reputation as a contributor. Patience is key; approval times can vary, but following the guidelines outlined in this guide will streamline the process and improve your overall experience.
For further assistance and to deepen your understanding, consider exploring the following resources:
- Shutterstock Contributor Help Center: Comprehensive FAQs and step-by-step tutorials.
- Photography Blogs and Forums: Community insights and tips from experienced contributors.
- Online Photography Courses: Improve your technical skills and editing techniques.
By utilizing these resources and adhering to best practices, you’ll be well-equipped to upload your photos efficiently and achieve quick approval, ultimately helping you grow your presence on Shutterstock and generate more income from your photography efforts.