Are you passionate about sharing your stunning panoramic images with the world? Shutterstock is a fantastic platform to showcase your work and earn from your photography. Uploading panoramas might seem a bit tricky at first, but with the right steps, you’ll be able to get your breathtaking views online in no time. In this guide, we’ll walk you through everything you need to know—from preparing your files to successfully submitting them. So, grab your camera and let’s dive into making your panoramic masterpieces available to millions of viewers worldwide!
Preparing Your Panorama Files for Upload
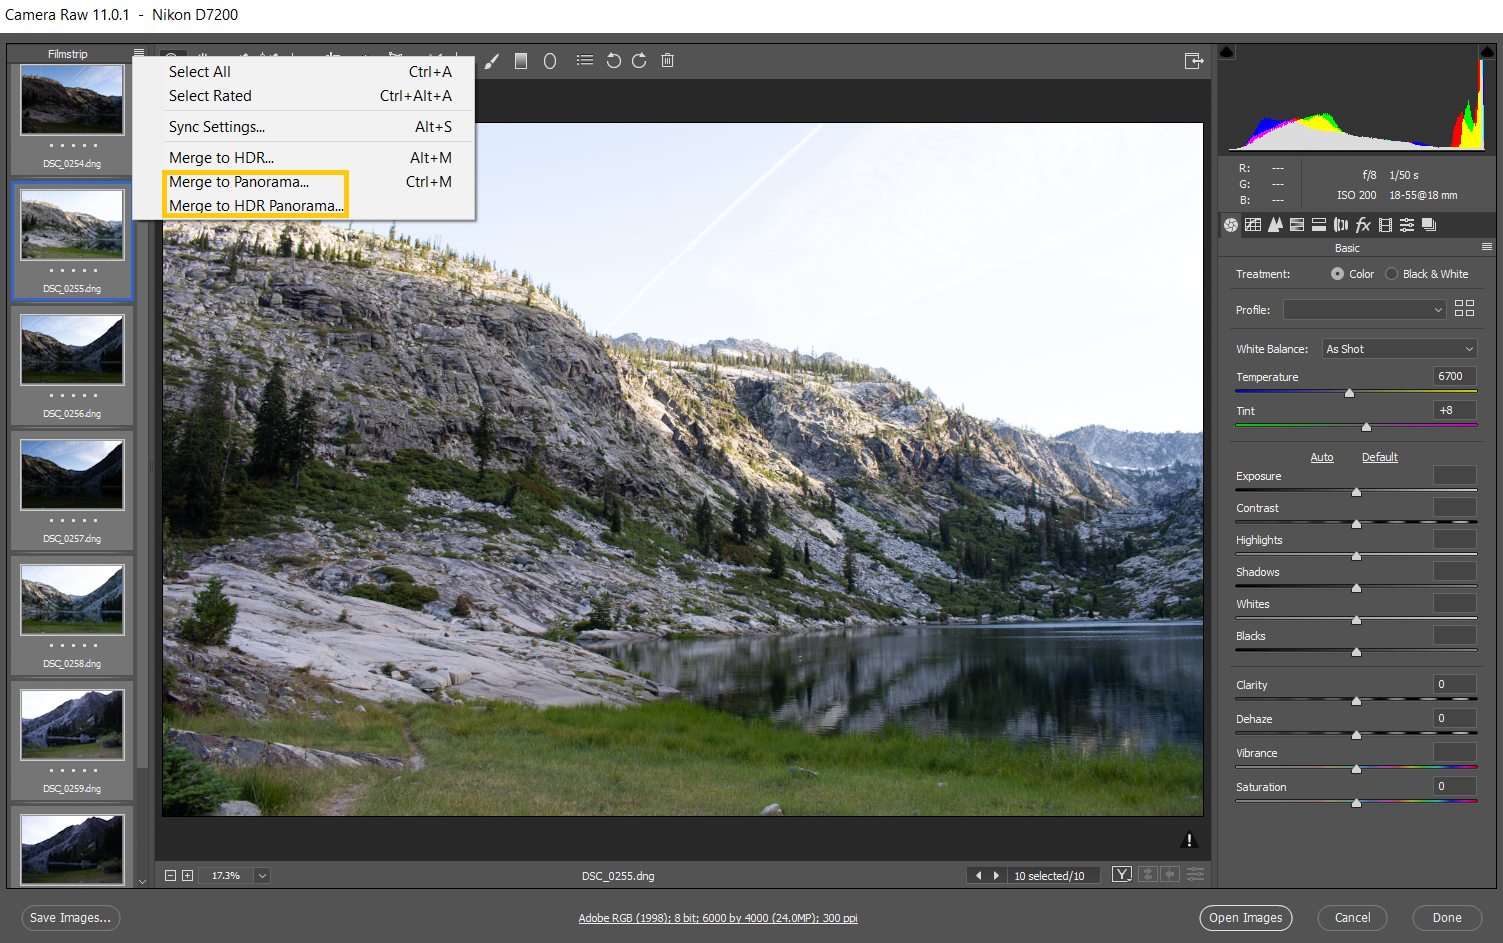
Before you hit the upload button, it’s essential to ensure your panorama files are perfectly prepared. Start by reviewing your images for clarity, proper stitching, and color consistency. Use editing software like Adobe Lightroom or Photoshop to make any necessary adjustments—brighten shadows, enhance colors, and correct distortions. When saving your files, choose high-resolution formats such as TIFF or JPEG, ensuring they meet Shutterstock’s minimum resolution requirements (generally 4,000 pixels on the shortest side). Keep in mind that panoramas are often large, so compress your files without sacrificing quality to facilitate smooth uploads.
Additionally, consider the following tips:
- Crop carefully: Remove unwanted edges or distractions to focus on the main subject.
- Maintain aspect ratio: Ensure your panorama isn’t stretched or squished, preserving the natural wide view.
- Metadata: Add relevant keywords, titles, and descriptions to help your image get discovered.
Finally, double-check your files to confirm they are free of watermarks, borders, or any other markings that could interfere with licensing. Proper preparation not only enhances your chances of acceptance but also ensures that your panoramic images look their best once uploaded. Taking the time to fine-tune your files will make the entire process smoother and more successful.
Creating an Account and Logging into Shutterstock Contributor Dashboard
If you’re excited to share your stunning panoramas with the world, the first step is to create a Shutterstock contributor account. Don’t worry—it’s a straightforward process, and we’ll walk through it together.
Start by visiting the Shutterstock Contributor page. Click on the “Sign Up” button, which you’ll find prominently displayed. You’ll be prompted to provide some basic information such as your name, email address, and a password. Make sure to choose a strong password to keep your account secure.
Once you’ve filled out the registration form, you’ll receive a confirmation email. Open it and click on the verification link to activate your account. After verification, head over to the Contributor Dashboard and log in using your credentials.
When you first access the dashboard, you might see a quick tutorial or onboarding prompts. Take a few minutes to familiarize yourself with the layout. Here, you can manage your profile, track your submissions, and see your earnings.
Tip: Complete your profile with accurate information and upload a professional profile picture. This adds credibility and helps build trust with buyers.
Now that you’re logged in, you’re all set to start uploading your panoramas. The dashboard is user-friendly, but if you ever get lost, Shutterstock offers helpful tutorials and support resources to guide you along the way.
Uploading Your Panorama Files to Shutterstock
Uploading your panoramas to Shutterstock might seem daunting at first, but it’s quite simple once you understand the process. Here’s a step-by-step guide to help you upload your files smoothly and ensure they meet Shutterstock‘s quality standards.
First, prepare your files. Make sure your panoramas are in the correct format—JPEG is the preferred file type. Check the resolution; Shutterstock recommends a minimum of 4,000 pixels on the shortest side for panoramic images, but higher resolutions are always better. Also, ensure your files are well-edited, with good exposure, sharpness, and minimal noise.
When you’re ready to upload, go to the “Upload” section of your Contributor Dashboard. Click on the “Add Files” button. You can select multiple files at once if you have several panoramas to upload. As files upload, you’ll see a progress bar indicating their status.
After uploading, you’ll need to enter some metadata for each image. This includes:
- Title: Make it descriptive but concise.
- Keywords: Use relevant and specific keywords to help buyers find your images. Think about what someone might search for.
- Category: Choose the appropriate category that best describes your panorama.
- Description: Write a brief but engaging description of your image.
Uploading panoramas requires extra attention to detail, especially with keywords and descriptions, since buyers often search for specific scenes or landscapes. Take your time to fill out these fields thoughtfully.
Once you’ve entered all necessary information, review your uploads to ensure everything looks good. If you notice any issues, Shutterstock allows you to edit the metadata before submitting for review.
Finally, click the “Submit for Review” button. Your images will go through Shutterstock’s review process, which typically takes a few days. You’ll receive feedback or approval notifications via email.
And that’s it! With a little patience and attention to detail, you’ll soon see your panoramic masterpieces available for licensing on Shutterstock, ready for the world to enjoy.
Adding Details and Metadata for Your Panoramas
Now that you’ve uploaded your stunning panorama, it’s time to make sure it gets noticed by the right audience. This step is all about adding the right details and metadata — think of it as giving your image a detailed label so buyers can find it easily.
Why is metadata important? Well, it helps search engines and Shutterstock’s own search algorithm understand what your image is about. The better your metadata, the higher the chances your panorama will appear in relevant searches.
Here’s what you should focus on when adding details:
- Title: Make it clear and descriptive. Use relevant keywords, but avoid keyword stuffing. For example, instead of “Beautiful Mountain,” go for “Sunset Over Snow-Capped Mountain Range.”
- Keywords: Think about what someone might type in to find your panorama. Use a mix of specific and broad keywords, like “panorama,” “mountains,” “sunset,” “landscape,” “nature,” and more.
- Description: Write a concise but detailed paragraph about your image. Mention the location, mood, and any interesting features. For instance, “A breathtaking panoramic view of the Rocky Mountains during sunset, showcasing vibrant orange and purple hues across snow-covered peaks.”
- Categories and Tags: Select the appropriate categories that fit your image best. Shutterstock offers category options like Nature, Travel, Landscape, etc. Proper categorization helps your image appear in the right collections.
Pro tip: Take your time crafting your metadata. Quality descriptions and relevant keywords boost your chances of sales and help your image stand out in a crowded marketplace.
Submitting Your Panoramas for Review and Approval
Once you’ve filled out all the details, it’s time to submit your panorama for review. Shutterstock has a team that checks each submission to ensure it meets quality standards and guidelines. Don’t worry, the process is straightforward, but a few tips can help speed things along.
Here’s what to keep in mind:
- Review Your Upload: Double-check your panorama for any technical issues such as blurriness, pixelation, or incorrect orientation. Make sure it’s sharp, well-exposed, and properly stitched if it’s a multi-image panorama.
- Complete All Required Fields: Ensure all metadata, titles, and descriptions are filled out accurately. Incomplete uploads may be rejected or delayed.
- Choose the Correct Category: Select the most appropriate category and keywords. Accurate categorization helps reviewers understand your image better.
- Submit for Review: Click the submit button, and your panorama will enter Shutterstock’s review queue. Usually, the review process takes anywhere from a few hours to a few days.
What happens next? Once your image passes the review, it will be published on Shutterstock’s platform, available for buyers worldwide. If it’s rejected, don’t get discouraged! Shutterstock often provides feedback on why it was rejected, giving you a chance to make adjustments and resubmit.
Remember, patience and attention to detail are key. Every successful upload brings you closer to earning royalties from your beautiful panoramas. Happy submitting!
Tips for Ensuring Your Panoramas Meet Shutterstock Standards
Uploading stunning panoramas is exciting, but it’s equally important to make sure they meet Shutterstock’s standards to increase your chances of acceptance and sales. Here are some practical tips to help you align your submissions with Shutterstock’s guidelines:
Understand the Technical Requirements
- Resolution: Upload images at a minimum of 4,000 pixels on the longest side. Higher resolutions are often preferred, especially for panoramic shots.
- File Format: JPEG is the standard format. Ensure your files are saved with the highest quality setting to retain detail.
- Color Profile: Use sRGB color space to ensure consistent display across devices and platforms.
Focus on Composition and Quality
- Steady Shooting: Use a tripod or stabilization equipment to keep your camera steady, avoiding distortions or misalignments.
- Overlap Shots: When capturing multiple images for a panorama, ensure enough overlap (usually 20-30%) for seamless stitching.
- Sharpness and Clarity: Make sure your images are in focus with minimal noise. Use proper exposure settings for vibrant, well-lit images.
Pay Attention to Content and Composition
- Visual Appeal: Your panoramas should tell a story or showcase a beautiful scene. Avoid cluttered or overly busy images.
- Avoid Watermarks or Logos: Shutterstock requires clean images without watermarks or branding.
- Check for Distractions: Remove any unwanted objects or elements that distract from the main scene.
Metadata Matters
Accurate and detailed metadata helps your image get discovered. Use descriptive titles, tags, and categories that accurately reflect the content of your panorama.
Final Checks Before Upload
- Preview Your Image: View your panorama on different screens to ensure color accuracy and clarity.
- Compliance: Confirm that your image complies with Shutterstock’s content guidelines, avoiding prohibited content like illegal activities, sensitive subjects, or copyrighted material.
By following these tips, you’ll significantly improve the chances of your panoramic images being accepted and appreciated by Shutterstock’s global community. Remember, quality, clarity, and adherence to standards are key to standing out!
Frequently Asked Questions About Uploading Panoramas
Got questions about uploading panoramas? You’re not alone! Here are some of the most common queries from photographers and creators just like you:
Q1: Can I upload stitched panoramas or do I need to shoot them in one shot?
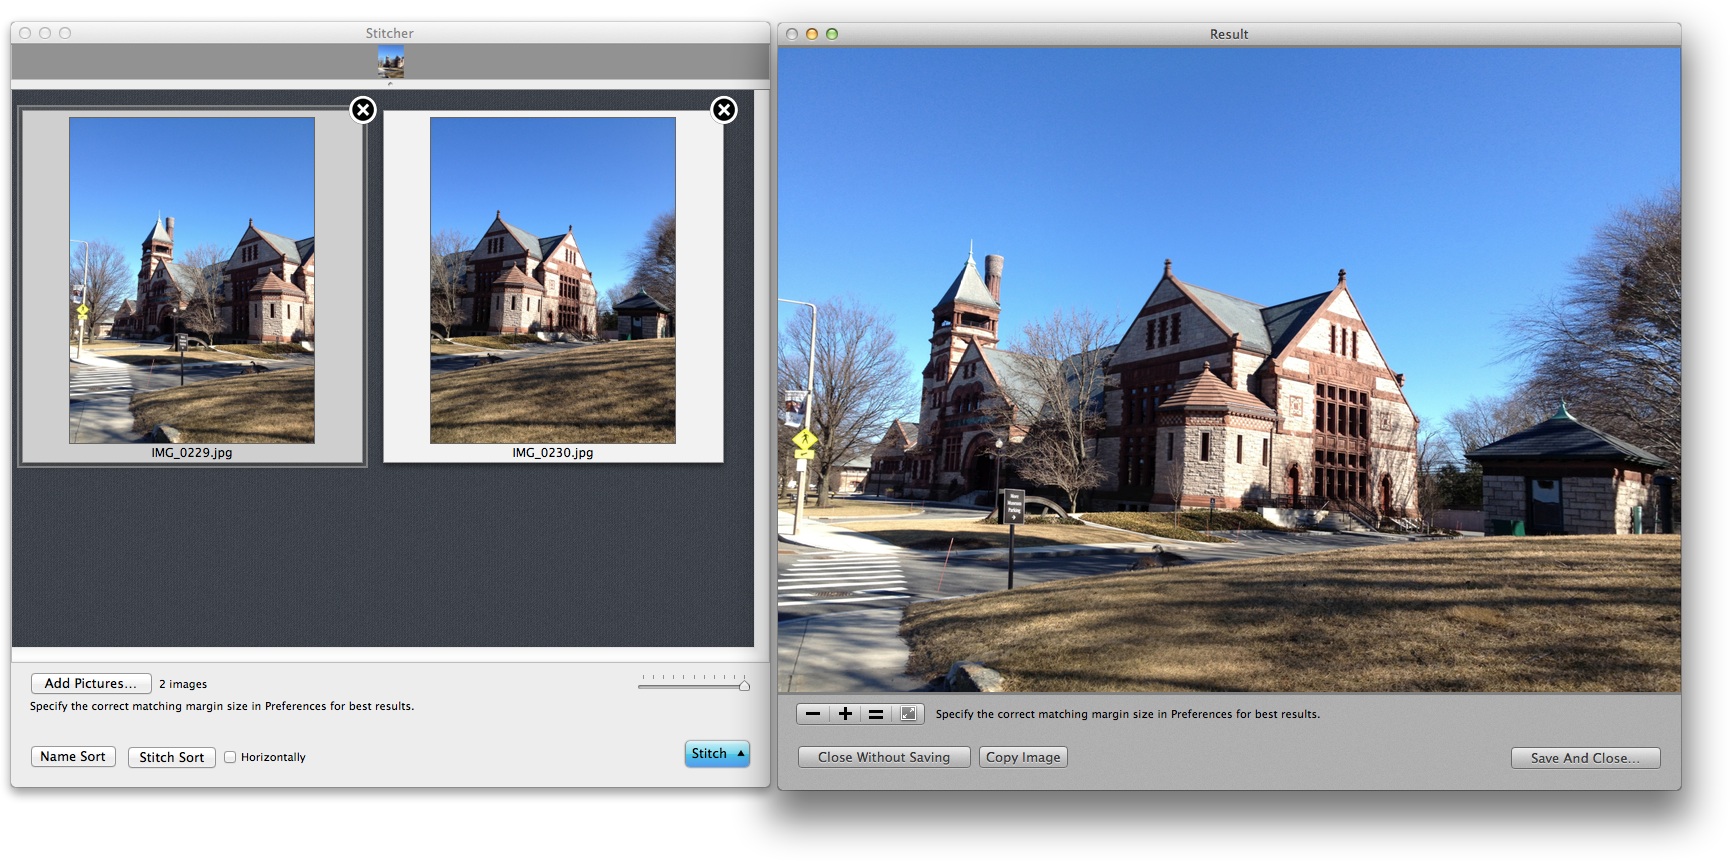
Answer: Both options are acceptable. If you choose to stitch images together, ensure they are aligned properly, with consistent exposure and focus. Shutterstock prefers seamless panoramas that are well-stitched without visible joins or distortions.
Q2: What if my panorama is larger than the maximum resolution allowed?
Answer: Shutterstock recommends images with a minimum of 4,000 pixels on the long side. If your panorama exceeds this, you can resize or crop it accordingly. Just make sure the quality remains high and details aren’t lost.
Q3: How should I title and tag my panoramic images?
Answer: Be descriptive and specific. Use keywords that accurately reflect the scene, location, and mood. For example, “Sunset over Santorini Caldera Panorama.” Including relevant tags improves discoverability.
Q4: Are there any restrictions on the content of panoramic images?
Answer: Yes. Shutterstock prohibits images that depict illegal activities, explicit content, identifiable individuals without model releases, or copyrighted elements. Always ensure your panoramas comply with their content guidelines.
Q5: Can I submit a panorama that includes copyrighted artwork or logos?
Answer: No. Your panorama must be free of copyrighted logos, trademarks, or artwork unless you have explicit permission or rights to include them.
Q6: How long does it typically take for my panorama to be reviewed and approved?
Answer: Review times vary but usually take between 24-72 hours. Make sure your files are properly formatted and meet all guidelines to avoid delays.
Q7: What should I do if my panorama gets rejected?
Answer: Review the rejection reasons provided, make necessary adjustments, and resubmit. Common reasons include poor quality, improper metadata, or content violations. Don’t be discouraged—use it as a learning opportunity to improve your future submissions.
Hopefully, this FAQ helps clear up some of your doubts and sets you on the right path to successfully uploading your panoramic shots to Shutterstock. Remember, patience and attention to detail are your best allies in this process!