Are you a photographer looking to showcase your stunning panoramic shots to a wider audience? Shutterstock is one of the top platforms for selling high-quality images, including breathtaking panoramas. Uploading your panoramic photos might seem a bit tricky at first, but don’t worry! In this guide, we’ll walk you through the process step-by-step, from preparing your images to getting them approved and live on the site. Whether you’re a seasoned pro or just starting out, understanding how to properly upload and optimize your panorama photos can make a big difference in attracting buyers and maximizing your earnings. Let’s dive in!
Preparing Your Panorama Photos for Submission
Before you hit that upload button, it’s essential to prepare your panorama photos properly. Well-prepared images not only increase your chances of approval but also ensure they look stunning to potential buyers. Here’s what you need to consider:
- High Resolution and Quality: Make sure your panoramic photos are captured in high resolution. Shutterstock prefers images that are at least 4MP, but higher resolution images (e.g., 8MP or more) are even better. This ensures clarity and allows buyers to crop or zoom without losing detail.
- Correct File Format: Save your images in JPEG format with a high-quality setting (e.g., 12-15 quality). Avoid overly compressed files that might look pixelated or blurry.
- Aspect Ratio and Dimensions: Panoramas often have wide aspect ratios. Shutterstock recommends keeping the aspect ratio between 2:1 and 6:1. Ensure your images are wide enough but not too tall, to meet platform standards and display well on various devices.
- Color and Exposure: Check that your photos are well-exposed, with vibrant but natural colors. Use photo editing software to adjust contrast, brightness, and saturation if needed.
- Metadata and Keywords: Prepare relevant keywords, titles, and descriptions to help your images get discovered. Use descriptive tags related to the scene, location, and mood of your panorama.
Additionally, consider the following:
| Preparation Step | Why It Matters |
|---|---|
| Color correction and sharpening | Enhances visual appeal and clarity |
| Removing noise or artifacts | Ensures professional quality |
| Cropping to aspect ratio | Fits Shutterstock’s display requirements |
By taking the time to properly prepare your panorama photos, you’re setting yourself up for a smoother upload process and increasing your chances of approval. Remember, high-quality, well-optimized images attract more buyers and can help boost your sales on Shutterstock!
Creating an Account and Logging into Shutterstock Contributor Portal
Getting started with submitting your panorama photos to Shutterstock is pretty straightforward, but the first step is setting up your contributor account. Think of this as your personal dashboard where all the magic happens — from uploading images to tracking your earnings.
To create an account, head over to the Shutterstock Contributor Portal website. Click on the Sign Up button, and you’ll be prompted to fill in some basic details like your name, email address, and a secure password. Make sure to use an email you check regularly, because Shutterstock will send you important updates and notifications.
During registration, you’ll also be asked to agree to Shutterstock‘s contributor terms and conditions. It’s always a good idea to give those a quick read so you know what to expect. Once you’ve completed the form, hit the Create Account button, and check your email for a confirmation message. Click the link in that email to verify your account.
Now that your account is set up, it’s time to log in. Simply visit the Shutterstock Contributor Portal and enter your email and password. When you log in for the first time, you’ll be guided through a quick onboarding process — setting up your profile, choosing your payout method, and getting familiar with the platform layout.
Tip: Take some time to fill out your profile completely and accurately. Including relevant keywords in your profile can help you get noticed by buyers, and specifying your payout preferences ensures you receive your earnings without hassle.
Remember, your contributor account is your gateway to uploading, managing, and selling your panorama photos. So, keep your login details safe and consider enabling two-factor authentication for added security.
Uploading Your Panorama Photos to Shutterstock
With your account ready, you’re all set to upload your stunning panorama photos. The process is designed to be user-friendly, but there are a few tips to keep in mind to ensure your images meet Shutterstock’s quality standards and get approved quickly.
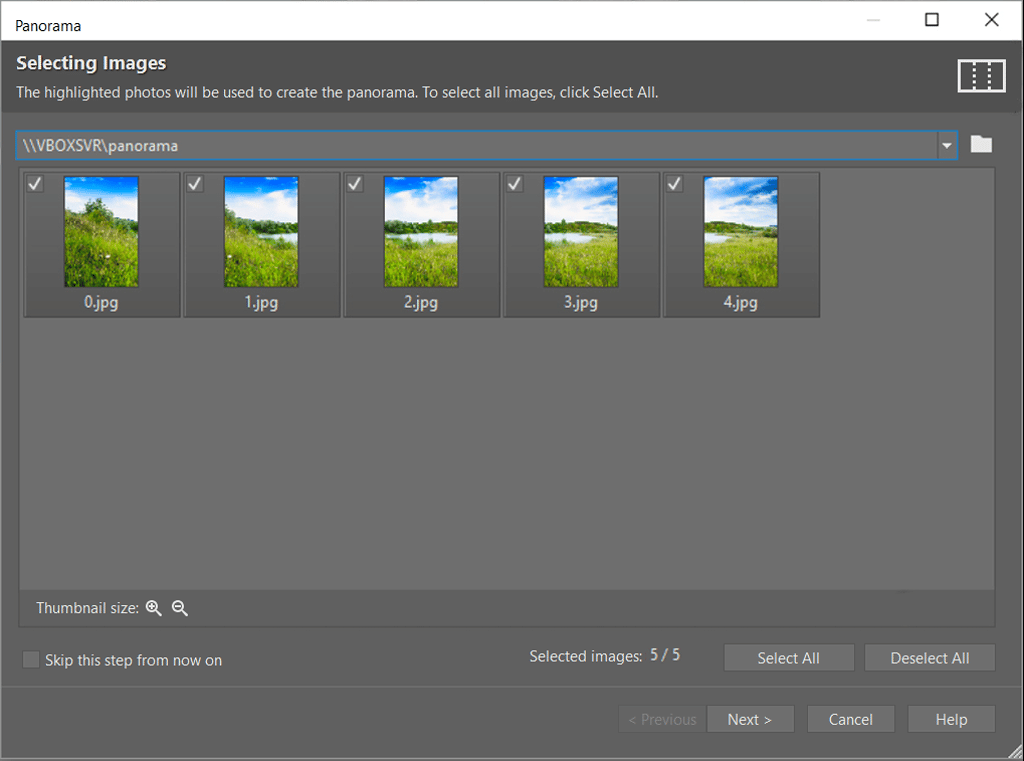
First, log into your Shutterstock Contributor Portal and navigate to the Upload section. Here, you’ll find options to upload files directly from your computer. You can upload multiple images at once, which is handy if you have a batch of panoramas ready to go.
When selecting your panorama photos, make sure they are in one of the accepted formats, typically JPEG or TIFF, and adhere to Shutterstock’s minimum resolution requirement — usually at least 4 megapixels, but higher resolutions are better for large prints and zoom-ins.
As you upload, you’ll be prompted to add essential metadata:
- Title: Use descriptive and engaging titles that highlight the content of your panorama.
- Keywords: Include relevant keywords to improve discoverability. Think about the location, scenery, and any unique features.
- Description: Provide a clear, concise description of your photo to give buyers context.
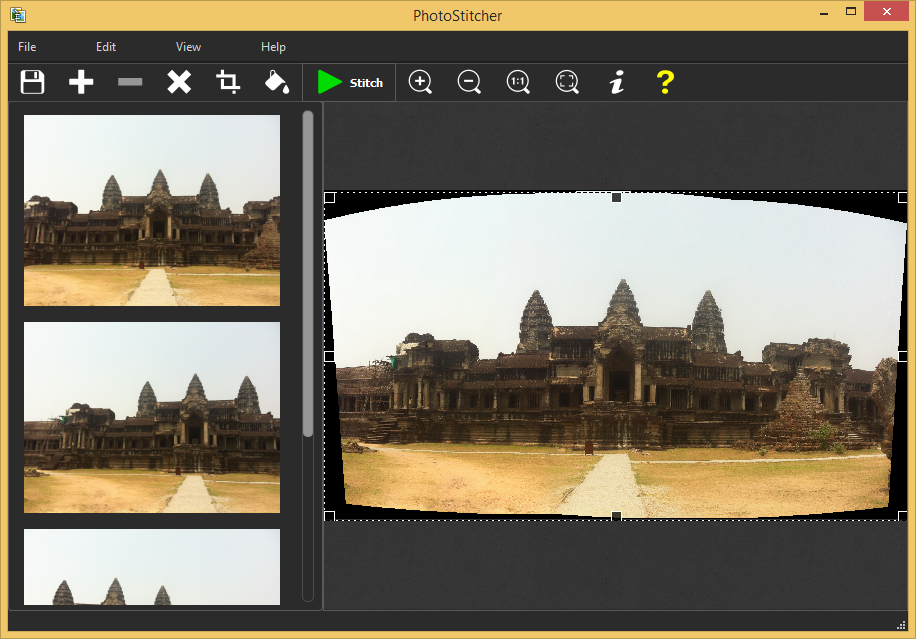
One of the key aspects of uploading panoramas is ensuring they are properly cropped and aligned. Make sure your images are straight and free of distortions. If your panorama is stitched from multiple shots, double-check that the stitch lines are seamless and the horizon is level.
After uploading, you’ll see options to categorize your images appropriately. Choose categories like “Landscapes,” “Cityscapes,” or specific themes relevant to your photo. Proper categorization helps your images reach the right audience more quickly.
Finally, before submitting, review your metadata and image quality. Shutterstock has a review team that checks for technical issues, so ensure your images are sharp, well-exposed, and free of noise or artifacts.
Once you’re satisfied, hit the Submit for Review button. Your panorama will be queued for Shutterstock’s review process, which typically takes a few days. If approved, your photo will go live and be available for purchase worldwide! Keep track of your uploads and review status through your contributor dashboard, and continue to upload new panoramas to grow your portfolio.
Optimizing Metadata and Tags for Better Visibility
Now that you’ve uploaded your stunning panorama photos, it’s time to make sure they get noticed. The key to increasing your photos’ visibility on Shutterstock is to optimize their metadata and tags thoughtfully. Think of metadata as the digital label that helps buyers find your images when they search for specific content.
Why is metadata important? Well, regardless of how amazing your photo looks, if it’s not properly tagged or described, it might never show up in relevant searches. Good metadata ensures your images reach the right audience and stand out among thousands of other photos.
How to optimize your metadata:
- Title: Create a clear, descriptive title that captures the essence of your panorama. Be specific and avoid generic titles like “Panorama Photo.” Instead, use something like “Sunset over Mountain Range Panorama.”
- Description: Write a concise yet detailed description. Mention key elements—such as location, mood, and notable features. For example, “A breathtaking panoramic view of the snowy Alps during sunset, highlighting the vibrant colors in the sky and the serene landscape below.”
- Keywords/Tags: Use relevant keywords that potential buyers might search for. Think about the scene, atmosphere, location, and emotions your photo evokes. Be specific but also consider broader terms to reach a larger audience.
Best practices for tagging:
| Do’s | Don’ts |
|---|---|
| Use a mix of broad and specific keywords | Overstuff with irrelevant tags |
| Include location details if applicable | Use misspelled or misleading tags |
| Think like a buyer—what would they search for? | Repeat the same tags across multiple images without variation |
Remember, the goal is to make your photos discoverable, so put yourself in the shoes of someone searching for a specific scene or mood. Take your time crafting your metadata—it’s an investment that can significantly boost your photo’s chances of being purchased.
Reviewing and Submitting Your Photos for Review
Once your metadata is polished and your panorama photo looks perfect, it’s time to review everything before submitting. This step ensures you catch any mistakes and that your image meets Shutterstock’s quality standards.
Why is reviewing important? Because Shutterstock has strict guidelines to maintain the quality of their collection. Submitting a well-reviewed photo increases the likelihood of acceptance and helps you build a reputation as a reliable contributor.
Checklist before submitting:
- Image Quality: Make sure your photo is sharp, properly exposed, and free of noise or artifacts. Check that the panorama stitching looks seamless and that there are no distracting elements.
- Metadata: Double-check your title, description, and tags. Correct any typos or inaccuracies. Ensure keywords are relevant and not overly stuffed.
- File Format & Size: Confirm your photo is uploaded in the correct format (JPEG) and meets size requirements. Typically, images should be at least 4 megapixels in resolution.
- Legal & Ethical Checks: Ensure you have all necessary rights, especially if your panorama includes recognizable people or private property. Avoid copyrighted elements unless properly licensed.
How to submit for review:
- Click the “Submit for Review” button on your image’s upload page.
- Review the submission details, including metadata and image quality.
- Click “Confirm” to send your photo into Shutterstock’s review process.
After submission, your photo will undergo a review process that can take anywhere from a few hours to several days. Be patient and prepared to make revisions if the reviewers request adjustments. Remember, thoroughness and attention to detail during this stage can make all the difference in getting your panorama approved and featured on the platform.
Tips for Ensuring Your Panorama Photos Meet Shutterstock Standards
Great, you’re almost ready to upload your stunning panorama photos to Shutterstock! But before hitting that submit button, let’s talk about some essential tips to make sure your images meet Shutterstock’s standards. Remember, the goal is to stand out in the marketplace, and quality is key.
First things first, always check Shutterstock’s submission guidelines. They specify technical requirements like resolution, file formats, and image quality. Make sure your panoramas are at least 4K resolution (around 3840 pixels wide) to ensure they look sharp across various platforms. Higher resolutions are even better, especially if you want to attract buyers looking for large prints or commercial uses.
Focus on image quality: Shutterstock is strict about images that are clear, well-exposed, and free of noise or artifacts. Use a tripod when capturing panoramas to prevent any misalignment or blurriness. Overlap your shots by about 20-30% to facilitate seamless stitching later.
Pay attention to composition and content: Your panorama should tell a story or capture a beautiful scene. Avoid clutter, distractions, or overly busy areas that can detract from the overall impact. Think about leading lines, balance, and focal points to create visually appealing images.
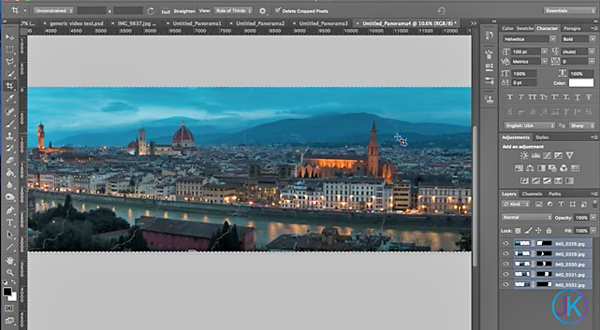
Ensure proper stitching and editing: Use reliable photo stitching software like Adobe Photoshop, Lightroom, or specialized panorama tools. After stitching, review the image carefully for any seams or distortions. Adjust brightness, contrast, and color balance uniformly across the entire panorama to maintain consistency.
Mind the file size and format: Shutterstock prefers JPEG files with high quality settings (around 80-100%) to preserve details without creating huge file sizes. Keep the file under 50 MB to ensure smooth uploading and processing.
Avoid watermarks or logos: Your uploaded images should be free of watermarks, logos, or any branding. Shutterstock requires clean, professional-looking images that can be used directly by buyers.
Finally, always review your uploaded panorama on different screens before submitting. What looks good on your monitor might not translate well elsewhere. A fresh pair of eyes or a second review can help catch any issues you might have missed.
Conclusion and Best Practices for Successful Uploads
Congratulations! You now have a solid understanding of how to prepare and upload your panorama photos to Shutterstock. Remember, success on platforms like Shutterstock isn’t just about having beautiful images; it’s about meeting quality standards, understanding buyer needs, and presenting your work professionally.
Here are some best practices to keep in mind for your future uploads:
- Maintain consistency: Build a cohesive portfolio by regularly uploading high-quality panoramas that align with your style and the types of scenes you love capturing.
- Stay updated with Shutterstock guidelines: Platforms evolve, and so do their standards. Keep an eye on their contributor resources for any changes in technical or content requirements.
- Optimize keywords and descriptions: Use clear, descriptive titles and tags to help buyers find your images easily. Think about what someone searching for panoramic landscapes might type.
- Engage with the community: Participate in forums or social media groups for photographers. Sharing tips and experiences can open doors to new ideas and opportunities.
- Be patient and persistent: It might take time to see your images approved and purchased. Keep uploading consistently, learning from feedback, and refining your technique.
Remember, every successful contributor started where you are now. With patience, attention to detail, and a passion for capturing beautiful scenes, you’ll build a portfolio that not only meets Shutterstock standards but also attracts eager buyers. Happy shooting and uploading!