Getting your images approved on Shutterstock can feel like a bit of a challenge, especially if you’re new to the platform. But don’t worry—it’s all about understanding what they’re looking for and making sure your submissions stand out. Shutterstock is a popular marketplace for photographers and designers to sell their work, so having a smooth upload process and high-quality images can really boost your approval rate. In this guide, we’ll walk you through the essentials—from how to prepare your images to tips for increasing your chances of getting approved. Ready to get your photos noticed? Let’s dive in!
Preparing Your Images for Submission
Before you hit the upload button, it’s super important to make sure your images are polished and meet Shutterstock’s standards. This step can make all the difference in whether your images get approved or not. Here’s what you should focus on:
- Resolution and Size: Shutterstock prefers images that are at least 4 megapixels, with a minimum of 3000 pixels on the long side. Higher resolution images look more professional and are more likely to be accepted.
- Quality and Clarity: Always upload sharp, well-focused images. Avoid blurry or pixelated shots, as these don’t meet the quality standards Shutterstock maintains.
- Proper Color Balance: Make sure your colors are accurate and vibrant without overdoing saturation. Use editing tools to correct any color issues before uploading.
- File Format and Compression: Save your images as JPEG files with maximum quality settings. Keep the file size under 50MB for smoother uploads, but don’t sacrifice quality for size.
- Metadata and Keywords: Include relevant titles, descriptions, and keywords. Think about what buyers might search for when looking for images like yours. Well-tagged images get more visibility.
Another tip is to review Shutterstock’s content guidelines carefully. They have specific rules about what can be uploaded, including restrictions on offensive content or images that contain identifiable people without model releases. Checking these details beforehand can save you a lot of time and frustration.
Lastly, consider editing your images to enhance their visual appeal. Simple adjustments like cropping, brightness, contrast, and sharpening can really make your photos pop. Just keep in mind that over-editing or unnatural effects might hurt your approval chances, so aim for a natural, professional look.
Understanding Shutterstock’s Image Requirements and Guidelines
Before you even hit that upload button, it’s super important to get familiar with what Shutterstock expects from your images. Think of it as the secret sauce to increasing your chances of approval and making sure your images look professional and appealing to buyers.
Shutterstock has specific technical and quality standards that all submissions must meet. Here’s a quick rundown of the key points:
- Resolution: Your images should be at least 4 megapixels, but higher resolution is always better. Aim for at least 300 dpi if you plan to sell prints or high-quality uses.
- File Format: JPEG is the way to go. Make sure your images are saved in the RGB color space, which is standard for digital images.
- File Size: Keep your files under 50 MB to ensure smooth uploads, but don’t compromise on quality.
- Image Quality: Shutterstock is picky about clarity and focus. Avoid blurry, pixelated, or noisy images. Every detail should be crisp and clean.
- Content Restrictions: Avoid images with copyrighted logos, recognizable brands, or private property without permission. Also, steer clear of offensive or controversial content.
- Model and Property Releases: If your image contains recognizable people or private property, you’ll need proper releases to sell those images commercially.
Understanding these guidelines helps you prepare your images properly before uploading, which in turn boosts your approval chances. Remember: high-quality, compliant images not only get accepted faster but also attract more buyers!
Step-by-Step Process for Uploading Images
Ready to upload your masterpiece? Let’s walk through the process step-by-step so you can upload confidently and efficiently to Shutterstock.
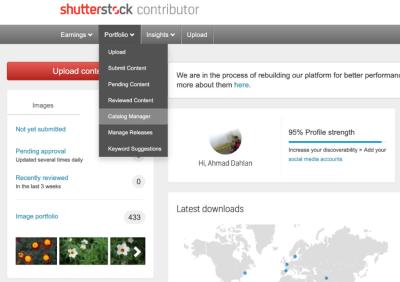
- Log In to Your Contributor Account: Head over to Shutterstock’s contributor portal and sign in with your credentials. If you’re new, create an account—it’s straightforward and free.
- Navigate to the Upload Section: Once logged in, find the “Upload” button on the dashboard. It’s usually prominently displayed, making it easy to start your submission.
- Select Your Files: Click the upload button and choose the images you want to submit from your device. You can upload multiple images at once—just select them all, and Shutterstock will process them collectively.
- Enter Metadata: For each image, add relevant details:
- Title: Craft a clear, descriptive title that captures the essence of the image.
- Keywords: Use specific, relevant keywords to help buyers find your image. Think about what someone might search for!
- Description: Provide a brief, informative description to add context.
And that’s it! After submission, Shutterstock’s reviewers will evaluate your images against their standards. If everything checks out, you’ll see your images live on the platform in no time. Keep in mind, patience is key—sometimes it takes a few days to get feedback or approval, so don’t get discouraged if it’s not instant. With practice and attention to detail, your uploads will become smoother, and your approval rates will improve!
Tips to Increase Your Approval Chances on Shutterstock
Getting your images approved on Shutterstock can sometimes feel like navigating a maze, but with a few smart strategies, you can significantly boost your success rate. Here are some friendly tips to help you stand out and get those images approved more often:
- Follow Shutterstock’s Submission Guidelines: Always start by reading and understanding their technical and content requirements. This includes image resolution, color space, and model releases when applicable. Compliance is key!
- Focus on Quality Over Quantity: Upload high-resolution, well-composed images with good lighting. Avoid overly busy or cluttered shots—clean, clear, and visually appealing images tend to perform better.
- Research Current Trends: Keep an eye on popular themes and styles on Shutterstock. Incorporate trending topics into your portfolio, but don’t compromise on originality or quality.
- Use Accurate and Descriptive Titles, Keywords, and Descriptions: Proper metadata helps your images get discovered. Be specific and honest—avoid keyword stuffing but include relevant terms that potential buyers might search for.
- Show Diversity and Include Various Subjects: Shutterstock values diverse content. Upload images representing different cultures, age groups, and lifestyles. This broadens your chances of approval and sales.
- Retouch and Edit Carefully: Use editing tools to enhance your images subtly. Remove distractions, correct color imbalances, and ensure your photos look polished but natural.
- Build a Cohesive Portfolio: Consistency in your style and subject matter can work in your favor. A well-curated portfolio shows Shutterstock that you’re serious and reliable.
Remember, patience and persistence are important. Not every shot will get through on the first try, but learning from feedback and refining your approach will improve your odds over time. Keep experimenting, stay updated with Shutterstock’s guidelines, and gradually your approval rate will climb!
Common Reasons for Rejection and How to Avoid Them
Understanding why images get rejected is half the battle won. Shutterstock provides feedback on why your submission didn’t make the cut, so paying attention to these reasons can save you time and frustration. Here are some common rejection reasons and tips to avoid them:
| Rejection Reason | What It Means | How to Avoid It |
|---|---|---|
| Technical Issues | Images are blurry, pixelated, improperly exposed, or don’t meet resolution standards. | Always upload high-quality, sharp images with at least 4 MP resolution. Use proper lighting, avoid noise, and check your images on different screens before submitting. |
| Model or Property Releases Missing | Images featuring recognizable people or private property lack legal release forms. | Obtain signed releases for identifiable individuals or private property. Keep scanned copies organized and ready for submission if needed. |
| Over-Editing or Artificial Appearance | Photos look overly manipulated, unnatural, or heavily retouched. | Enhance your images subtly. Aim for natural-looking results and avoid excessive filters or cloning that distort authenticity. |
| Inappropriate Content | Images featuring offensive, controversial, or copyrighted material without permission. | Ensure your content is appropriate, original, and free from copyrighted elements unless you have licensing rights. |
| Poor Composition or Focus | Images are poorly framed, have distracting backgrounds, or are out of focus. | Practice good composition principles. Use a tripod if needed, and review your shots carefully before uploading. |
| Irrelevant or Low-Quality Keywords | Incorrect or misleading metadata can hinder discoverability and lead to rejection. | Use accurate, relevant keywords and write clear, descriptive titles and descriptions. Think about what buyers would search for. |
By paying close attention to these common pitfalls and proactively addressing them, you’ll greatly improve your chances of getting your images approved. Remember, each rejection is a learning opportunity—review the feedback, adjust your approach, and keep creating! Success on Shutterstock is a marathon, not a sprint, and persistence pays off in the long run.
Optimizing Your Image Metadata for Better Visibility
When it comes to getting your images approved and noticed on Shutterstock, metadata plays a crucial role. Think of metadata as the information your images carry that help buyers find them easily. The better you optimize your metadata, the higher your chances of approval and sales. Let’s dive into some simple strategies to make your images stand out in search results.
Use Relevant and Specific Keywords
Start by choosing keywords that accurately describe your image. Instead of generic tags like “nature” or “happy,” get specific—like “sunset over mountain range” or “smiling woman with coffee.” Use keywords that potential buyers are likely to search for.
- Include descriptive nouns and adjectives
- Think about different ways people might search for your image
- Avoid keyword stuffing—keep it natural and relevant
Write Clear and Concise Titles
Your image title should be straightforward yet descriptive. Instead of “IMG1234,” try “Golden Sunset Over Rocky Mountains.” Clear titles help both Shutterstock’s algorithms and buyers understand what your image is about at a glance.
Craft Detailed Descriptions
Use the description box to add context about your image. Mention the location, mood, colors, or any story behind it. This not only helps with search visibility but also provides value to potential buyers.
Tag Wisely
Shutterstock allows you to add multiple tags. Use all available tags to cover different angles—think about related concepts, colors, emotions, or themes. For example, if your image is a beach scene, tags could include “ocean,” “summer,” “vacation,” “relaxation,” and “blue.”
Consistency and Accuracy
Always ensure your metadata accurately reflects the content of your image. Misleading tags or descriptions can hurt your approval chances and damage your reputation as a contributor.
Remember, well-optimized metadata doesn’t just help your image get approved; it also makes it easier for buyers to discover your work in a crowded marketplace. Take some extra time to craft thoughtful, accurate metadata, and you’ll see better visibility and more sales down the line.
Conclusion and Final Tips for Successful Uploading
Congratulations! You’re now equipped with the essential tips to increase your approval rates and boost your success on Shutterstock. Uploading images might seem simple at first, but mastering the process and understanding what makes an image stand out can make all the difference.
Here are some final tips to keep in mind:
- Quality First: Always upload high-resolution, sharp, and well-composed images. Quality is king in stock photography.
- Follow Guidelines: Carefully read Shutterstock’s contributor guidelines. Adhering to their standards increases your chances of approval.
- Be Consistent: Regularly upload fresh content to build your portfolio and improve visibility.
- Stay Inspired: Keep an eye on trending topics and popular categories. Creating relevant images can attract more buyers.
- Optimize Metadata: As discussed, well-crafted titles, descriptions, and tags are key to discoverability.
- Review Before Uploading: Double-check your images for any watermarks, artifacts, or issues—small details matter!
Finally, don’t get discouraged by rejections. Use feedback as a learning opportunity, improve your submissions, and stay persistent. Success on Shutterstock comes with patience, practice, and a keen eye for quality.
Happy uploading! Keep honing your skills, stay consistent, and watch your portfolio grow. With time and effort, you’ll be turning your creative visions into a steady stream of income.