If you’re a videographer or content creator looking to showcase your work to a global audience, Shutterstock is a fantastic platform to consider. Uploading footage might seem a bit daunting at first, especially if you’re new to the process, but using FTP (File Transfer Protocol) can make it much smoother and faster. In this guide, we’ll walk you through the steps to upload your footage via FTP, helping you get your videos online quickly and efficiently. Whether you’re managing a large library or just a few clips, this method is a reliable way to get your content in front of millions of potential customers.
Prerequisites for Uploading via FTP
Before you start uploading your footage to Shutterstock using FTP, there are a few important prerequisites to keep in mind. First and foremost, you’ll need an active Shutterstock Contributor account. If you haven’t signed up yet, head over to the
Next, ensure you have a stable internet connection and a reliable FTP client. Popular options include FileZilla, Cyberduck, or WinSCP. These tools make the upload process much easier by providing a user-friendly interface for managing your files.
It’s also essential to familiarize yourself with Shutterstock’s technical specifications for video submissions. These include:
- File formats: Typically, MP4 or MOV files.
- Maximum file size: Usually up to 300MB per clip, but check the latest guidelines.
- Resolution: HD (1920×1080) or higher, with 4K preferred for premium content.
- Frame rate: Usually 24, 25, or 30 fps.
- Codec: H.264 or H.265 for MP4 files.
Additionally, you’ll need the FTP server details from Shutterstock, which are typically provided after you request access or during the onboarding process. Keep these credentials handy, as they’ll be crucial for connecting your FTP client to their servers.
Lastly, organizing your footage beforehand—naming your files systematically and preparing metadata—can save you a lot of time during the upload process. Once you’ve met all these prerequisites, you’re ready to dive into the actual uploading process!
Setting Up Your FTP Client for Shutterstock Uploads
Alright, so you’re ready to start uploading your footage via FTP — great choice! It’s a fast and reliable way to transfer large video files, especially if you have a bunch to upload. But first, you’ve got to set up your FTP client properly. Don’t worry, I’ll walk you through it step-by-step.
First things first, you’ll need an FTP client. Popular options include FileZilla, Cyberduck, or WinSCP. If you haven’t already, download and install your preferred client. Once installed, open it up and get ready to connect to Shutterstock‘s server.
Gather Your FTP Details
Before you can connect, you’ll need some info from Shutterstock:
- FTP Server Address: Usually something like ftp.shutterstock.com
- Username & Password: Provided by Shutterstock after your account approval
- Port: Typically 21 for FTP or 22 for SFTP, depending on their setup
Check your Shutterstock contributor account or onboarding email for these details. If you’re unsure, don’t hesitate to reach out to their support team—they’re pretty helpful.
Configuring Your FTP Client
Now, let’s connect:
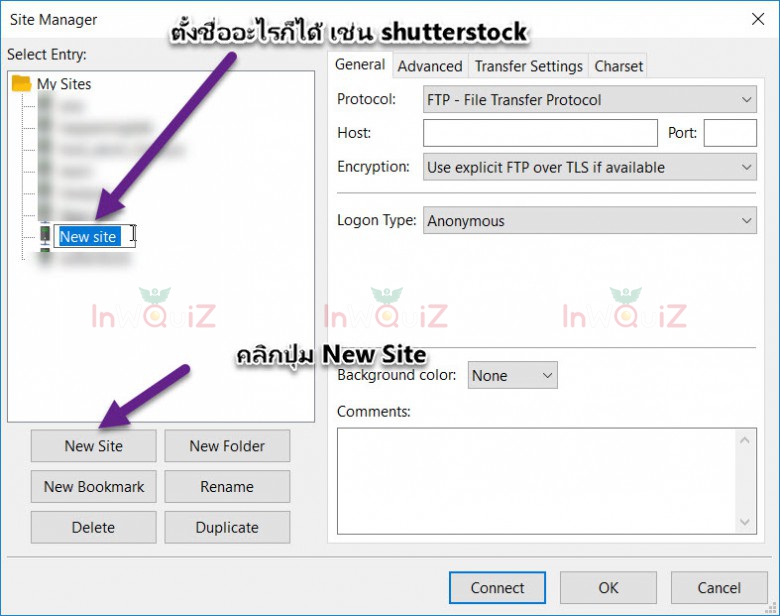
- Open your FTP client and select ‘New Site’ or ‘New Connection.’
- Enter the FTP Server Address in the host field.
- Set the port number as specified by Shutterstock (default is 21).
- Choose the protocol: FTP or SFTP, based on Shutterstock’s instructions.
- Input your username and password. These are your Shutterstock login credentials or specific FTP credentials they provided.
- Set Transfer Type: For video files, select ‘Binary’ mode to ensure your files don’t get corrupted during transfer.
- Save the settings so you can reuse them later.
Connecting and Troubleshooting
Once everything’s entered, hit ‘Connect’ or ‘Quickconnect’. If all details are correct, you should see a directory listing from Shutterstock’s server. If not, double-check your credentials and server info. Common issues include incorrect username/password, wrong port, or firewall restrictions. If you hit a snag, consult Shutterstock’s help docs or contact support—they’re usually quick to assist.
Preparing Your Video Files for Upload
Great! Your FTP client is set up, and you’re ready to upload. But hold on—before you drag and drop those files, let’s make sure your videos are properly prepared. Properly prepared files not only upload smoothly but also meet Shutterstock’s quality standards, which is crucial for acceptance and sales.
Check the Video Specifications
Shutterstock has specific requirements for video files. Here’s a quick rundown:
- Format: MP4 (H.264 codec)
- Resolution: Minimum 1920×1080 (Full HD), but higher is better
- Frame Rate: Usually 23.97, 24, 25, or 29.97 fps
- Bitrate: Keep it balanced—too high can cause long upload times, too low may affect quality
- File Size: Usually up to 3GB, but check Shutterstock’s current limits
Finalizing Your Video Files
Before uploading, do these quick checks:
- Rename your files with clear, descriptive titles—this helps you stay organized.
- Ensure the videos are properly color corrected and free of watermarks or logos.
- Compress or transcode your videos if necessary, to meet size and format requirements. Tools like HandBrake or Adobe Media Encoder work well for this.
- Preview your videos to confirm they play smoothly and look professional.
Organize Your Files
To keep things simple when uploading multiple clips, create a dedicated folder on your computer with all your ready-to-upload videos. This way, you can just select the entire folder in your FTP client, and all files will upload in batch. It saves time and keeps your project organized.
And that’s it! With your files properly prepared and your FTP client configured, you’re all set to start the upload process. Next, I’ll guide you through the actual upload steps to make sure everything goes smoothly. Stay tuned!
Uploading Footage to Shutterstock Using FTP
Alright, now that you’ve prepared your files and are feeling confident, it’s time to get them uploaded to Shutterstock using FTP. FTP, or File Transfer Protocol, is a reliable way to transfer large files quickly and securely. It might seem a bit technical at first, but don’t worry — I’ll walk you through each step so you can do it smoothly.
First things first, you’ll need an FTP client. Popular options include FileZilla, Cyberduck, or WinSCP. Pick one that suits your computer and install it. Once installed, you’ll need your FTP credentials from Shutterstock. These are typically provided in your contributor account under the upload instructions section.
Steps to Upload via FTP:
- Open your FTP client and enter the server details provided by Shutterstock. This usually includes the hostname (like ftp.shutterstock.com), your username, and password.
- Connect to the server. Once connected, you’ll see a directory structure — think of it as your digital filing cabinet.
- Navigate to the designated upload folder. Shutterstock often has specific folders for different types of content or submission batches.
- Prepare your files. Make sure your video files are properly named, compressed if necessary, and meet all Shutterstock guidelines.
- Transfer files. Drag and drop your footage from your computer into the upload folder in the FTP client. Keep an eye on the transfer status — larger files might take some time to upload.
Tip: Always double-check that your files have uploaded successfully before disconnecting. Some FTP clients allow you to verify file sizes and modification dates, which can help confirm your upload was complete.
Additional Tips:
- Use passive mode if you encounter connection issues.
- Limit simultaneous connections to avoid overloading your bandwidth.
- Keep your FTP credentials secure. Never share your username and password with others.
Uploading through FTP is especially handy for large files or if you have a batch of videos to submit. Once uploaded, your files are waiting in the designated folder, ready for Shutterstock’s review process. Now, let’s move on to how you can verify that everything’s in order and manage your files effectively.
Verifying Your Uploads and Managing Files
After you’ve uploaded your footage, it’s essential to verify that everything arrived correctly and is ready for review. Proper management of your files not only saves time but also helps you keep track of your submissions and avoid any mix-ups.
Checking Your Uploads
The first step is to ensure that all your files are present and intact. Here’s what you can do:
- Review the FTP directory. Confirm that the number of files matches your original batch.
- Compare file sizes and modification dates. This can help you verify that uploads were successful without corruption.
- Download a sample file from the server back to your computer to check quality and format.
Once you’re satisfied with the uploaded files, log into your Shutterstock contributor account to review the submission status. Some platforms provide a status indicator or a list of files pending review, approved, or rejected.
Organizing Your Files
Managing your files effectively can make future uploads much easier. Consider creating a folder structure on your computer and on your FTP server, like:
| Folder Name | Description |
|---|---|
| Raw Footage | Original, unedited files |
| Edited Versions | Final cuts ready for submission |
| Metadata | Descriptions, keywords, and other info |
| Submitted | Files already uploaded to Shutterstock |
Managing Your Submissions
Keep track of your submissions by maintaining a spreadsheet or a dedicated document. Record details such as:
- File name
- Date uploaded
- Keywords and descriptions
- Submission status
- Comments or notes about the review process
Finally, stay vigilant for feedback from Shutterstock. If a file is rejected, review their reasons carefully and update your footage or metadata accordingly before resubmitting. Proper file management and verification not only streamline your workflow but also increase your chances of getting your footage approved quickly and efficiently.
That wraps up our step-by-step guide to uploading footage via FTP and managing your files. With these tips, you’re well on your way to becoming a Shutterstock contributor who uploads confidently and efficiently. Happy uploading!
Tips for a Successful Upload Process
Uploading your footage to Shutterstock via FTP can seem straightforward, but a few tips can make the process smoother and help ensure your videos get approved quickly. Here are some practical tips you might find helpful:
- Check File Naming Conventions: Use clear, descriptive filenames that adhere to Shutterstock’s naming guidelines. Avoid special characters or spaces—use underscores or hyphens instead. For example, sunset_over_mountains.mp4.
- Optimize Your Files: Make sure your videos are in the correct format, such as MP4 or MOV, and meet the resolution and bitrate requirements. Compress files if necessary, but avoid losing quality.
- Use Consistent Metadata: Prepare your metadata—titles, descriptions, keywords—in advance. Keeping them consistent and relevant improves discoverability and speeds up review.
- Test Your Connection: Before uploading large batches, test your FTP connection with a small file. This helps troubleshoot any connectivity issues early on.
- Monitor Your Uploads: Keep an eye on the upload process. Sometimes, network interruptions happen, so resuming or re-uploading might be necessary.
- Follow Shutterstock Guidelines: Review their content guidelines regularly. Make sure your footage complies with their policies to avoid rejection or delays.
- Maintain Backup Copies: Save a backup of all files and metadata locally. This way, you won’t lose your work if something goes wrong during upload.
Conclusion and Additional Resources
Uploading footage to Shutterstock using FTP is a powerful way to streamline your submission process, especially if you have a large library of videos. While it requires a bit of setup and attention to detail, the efficiency it offers can save you lots of time in the long run. Remember to prepare your files properly, verify your connection, and adhere to Shutterstock’s guidelines for the best results.
If you’re new to this process or need a refresher, don’t hesitate to revisit this guide or explore additional resources. Shutterstock provides comprehensive documentation and support to help contributors succeed. Here are some helpful links to keep bookmarked:
Happy uploading! With a bit of practice, using FTP will become a seamless part of your creative workflow, allowing you to focus more on creating great content and less on the technical side of things.