If you’re looking to share your compelling editorial photos and videos with a global audience, Shutterstock is an excellent platform to do just that. In 2025, the process has become even more streamlined, making it easier than ever for photographers, videographers, and content creators to get their work published and earn royalties. Whether you’re new to Shutterstock or a seasoned contributor, understanding the step-by-step process will help you navigate the platform confidently. In this guide, we’ll walk you through everything you need to know about uploading editorial content, ensuring your submissions meet all the requirements and stand out in the marketplace.
Understanding Editorial Content and Shutterstock’s Policies
Before diving into the upload process, it’s crucial to grasp what constitutes editorial content and how Shutterstock handles such submissions. Editorial content typically includes photos, videos, or images that depict newsworthy events, historical moments, or cultural topics. These works are meant to inform or provide context rather than promote commercial products or services. Think of images capturing protests, political rallies, sports events, or iconic landmarks—if it’s newsworthy, it’s probably editorial.
Shutterstock has specific policies to ensure that editorial content is appropriately licensed and used. Here are some key points to keep in mind:
- Use of recognizable people: If your content features identifiable individuals, you must have model releases unless the image is clearly newsworthy or taken in a public place.
- Location and property rights: Avoid including private property or trademarks without permission. Public spaces are generally safe, but always verify if the location or objects are protected.
- Content appropriateness: Content should be suitable for editorial use—avoid offensive, violent, or sensitive material that might violate Shutterstock’s content guidelines.
- Legal considerations: Ensure you have the rights to all elements within your content and that your images do not infringe on copyrights or trademarks.
Remember, editorial content on Shutterstock isn’t for commercial advertising. It’s meant to provide context and inform audiences about current events or noteworthy topics. When in doubt, consult Shutterstock’s detailed policies or reach out to their support team for clarification. Properly understanding these guidelines will help you create submissions that are accepted smoothly and reach the right audiences.
Preparing Your Editorial Content for Upload
Before you even think about clicking that upload button, it’s crucial to get your editorial content ready to go. Think of this step as the foundation of a house—if it’s solid, everything else falls into place smoothly. Editorial content is a special category on Shutterstock because it’s newsworthy, timely, or culturally significant, so you want to make sure it’s polished and compliant with Shutterstock’s guidelines.
First things first, ensure your images or videos are high quality. This means they should be sharp, well-exposed, and free of distracting elements. For photos, aim for a resolution of at least 4 megapixels, but higher is always better. Videos should be in good lighting, steady, and free from noise or compression artifacts.
Next, pay special attention to copyright and release forms. Shutterstock is strict about only accepting content where you have clear rights to publish. If your editorial content features recognizable people, property, or trademarks, you need to have signed model or property releases. For news-related content, a signed release might not be required if the subject is newsworthy and captured in public spaces, but it’s always safer to have documentation.
| Tip | Details |
|---|---|
| Resolution | Minimum 4MP for photos; HD (1920×1080) or higher for videos |
| File Format | JPG for images, MP4 for videos |
| Size | Ensure files are optimized but retain quality; avoid overly compressed files |
| Metadata | Accurate titles, descriptions, and keywords help your content get discovered |
| Releases | Obtain signed model/property releases for recognizable people or trademarks |
Another important step is adding the right metadata. Think of it as your content’s GPS—keywords, titles, and descriptions help buyers find your work. Be descriptive but honest; avoid keyword stuffing. If your editorial piece is about a specific event, include details like date, location, and context. This makes your content more relevant and increases its chances of being used in news or editorial stories.
Finally, review Shutterstock’s content guidelines to ensure your submissions align with their policies. This includes avoiding copyrighted logos, offensive content, or anything that might infringe on intellectual property rights. Taking time to prepare your content thoroughly saves you from rejection and speeds up the approval process.
Creating a Shutterstock Contributor Account
Ready to share your editorial content with the world? The first step is setting up your Shutterstock Contributor account. The process is straightforward, but it’s important to do it right to avoid hiccups later on. Think of your contributor account as your storefront—it’s how buyers will discover and purchase your work, so make it professional and complete.
Start by heading over to the Shutterstock Contributor website. Click on the “Join Now” or “Sign Up” button, and you’ll be prompted to fill out a registration form. You’ll need to provide some basic information:
- Full Name
- Email Address
- Password
- Country of Residence
After submitting this info, Shutterstock will send you a verification email. Be sure to check your inbox and click the link to verify your account. Once verified, you’ll be prompted to complete your profile by adding additional details such as your payment preferences, tax information, and portfolio details.
Next, upload a sample of your work. Shutterstock might review your submissions to ensure they meet quality standards. Don’t worry if you’re asked to revise or resubmit—this is common and part of the process. Make sure your sample content is representative of what you’ll be uploading regularly.
As a contributor, you’ll also want to familiarize yourself with Shutterstock’s content guidelines and upload specifications. This ensures your submissions are compliant from the start, reducing the risk of rejection. It’s a good idea to explore the contributor dashboard, where you’ll manage your uploads, track sales, and communicate with Shutterstock support if needed.
Lastly, set up your payment details in your profile. Shutterstock offers various payout options, including PayPal and bank transfers. Ensuring your payment info is accurate and up-to-date will help you get paid smoothly once your content starts generating revenue.
And there you have it! Creating your contributor account is the first exciting step toward sharing your editorial content with a global audience. Once your account is set up and your content is prepared, you’re well on your way to making impactful editorial contributions on Shutterstock in 2025.
Uploading Your Editorial Content to Shutterstock
Alright, you’re almost there! Once you’ve prepared your editorial images or videos, it’s time to upload them to Shutterstock. The process is pretty straightforward, but a few tips can make it smoother and help ensure your content gets noticed.
First things first, log into your contributor account on Shutterstock. Navigate to the Upload section—usually found in your dashboard. Here, you’ll see options to upload files directly from your computer or via drag-and-drop. Shutterstock supports various formats, including JPEG, PNG, and certain video formats, so double-check your files meet the specifications.
When you’re ready, select the files you want to upload. Shutterstock recommends uploading high-resolution images with a minimum of 4 megapixels and videos that are at least 1080p for optimal quality. Larger, high-quality files tend to perform better in search results and attract more buyers.
As you upload, you’ll notice an upload progress bar. Depending on your internet speed and file size, this might take a few moments. Be patient! Once uploaded, you’ll see a thumbnail or preview of each piece of content, which is your chance to review everything before finalizing.
Before hitting the submit button, make sure to verify that your content adheres to Shutterstock’s content guidelines. This means no watermarks, no copyrighted logos, and no inappropriate material. Also, ensure your files are properly named—clear, descriptive filenames can help later during the review process.
After confirming everything looks good, click Submit for Review. Your content will then go into Shutterstock’s review queue, which typically takes anywhere from a few hours to a few days. During this time, Shutterstock’s reviewers will evaluate your submission for quality, copyright compliance, and editorial nature.
And that’s it! Once approved, your editorial content will be live and available for purchase. Remember, uploading regularly and maintaining high standards can significantly increase your chances of making sales, so keep uploading fresh content and stay consistent.
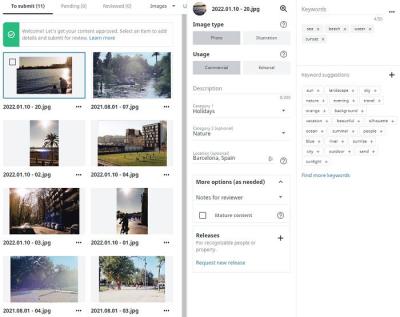
Adding Metadata and Descriptions for Your Editorial Upload
Great job on uploading your content! Now, the next crucial step is adding metadata and descriptions. Think of this as giving your images or videos a detailed map—so buyers can find them easily when searching.
Why is metadata important? Well, it improves discoverability. When someone searches for a specific topic—say, “city skyline at sunset” or “business meeting”—your content needs the right keywords and descriptions to show up in results.
Start with the Title. Make it clear, concise, and descriptive. For example, instead of “Image1,” use “Night City Skyline with Lights.” Be specific but avoid keyword stuffing. The title should give a quick idea of what the content portrays.
Next, add a detailed Description. This is your chance to tell the story behind the image or video. Mention the location, the mood, any notable elements, and potential uses. For example:
- “A stunning nighttime shot of downtown New York City, showcasing illuminated skyscrapers and busy streets. Perfect for articles about urban life, travel, or cityscapes.”
Then, include relevant Keywords. Think of these as tags that help categorize your content. Use specific, relevant keywords like “city,” “night,” “lights,” “urban,” “skyscrapers,” or more niche terms based on your content.
Helpful tips for metadata:
- Use a mix of broad and specific keywords
- Avoid irrelevant keywords—they can hurt your ranking
- Include location details if applicable
- Be honest and accurate to avoid rejection during review
Once you’ve added your metadata, review everything to make sure it’s accurate and compelling. Well-crafted descriptions and relevant keywords not only help your content get discovered but also attract the right buyers.
Remember, metadata is your content’s digital passport—invest time here, and you’ll see better visibility and more sales in the long run. Keep practicing, and over time, you’ll get a feel for what keywords and descriptions resonate best with your audience.
Reviewing and Submitting Your Editorial Content
Once you’ve uploaded your editorial images or videos, the next crucial step is to carefully review everything before hitting that submit button. Think of this as giving your work a final once-over—it’s the difference between a smooth approval process and unnecessary delays.
Start by double-checking each file. Make sure the resolution is high enough, the images are in focus, and the content accurately represents what you intend to share. If you’re uploading videos, verify their length, quality, and that they play correctly from start to finish.
Next, review the metadata—this includes titles, descriptions, keywords, and categories. These elements are vital because they help Shutterstock users find your content. Be descriptive but concise, and use relevant keywords that truly reflect your editorial piece. Avoid keyword stuffing; instead, aim for clarity and accuracy.
Here’s a quick checklist to ensure you’ve covered everything:
- All files are correctly uploaded and in the proper format
- Resolution and quality meet Shutterstock standards
- Metadata (titles, descriptions, keywords) are accurate and complete
- Content complies with Shutterstock’s editorial guidelines
- Model and property releases (if applicable) are uploaded and approved
Once you’re satisfied, review the licensing options—since editorial content typically has specific uses, confirm that the rights and restrictions align with your intentions. Then, when everything looks good, click the Submit button. Shutterstock will process your files, and you’ll receive confirmation that your content is under review. Patience is key here—review times can vary, but rest assured, once approved, your editorial content will be available for licensing worldwide.
Tips for Ensuring Successful Uploads and Compliance
Uploading content to Shutterstock might seem straightforward, but to maximize your chances of success and avoid unnecessary rejections, keep these helpful tips in mind:
- Understand Shutterstock’s Editorial Guidelines: Every platform has rules. Make sure your content aligns with Shutterstock’s policies—this includes avoiding prohibited content, respecting privacy rights, and ensuring your images are newsworthy or of current events.
- Use High-Quality Files: Always upload the highest quality images and videos you can. Avoid compression artifacts, blurriness, or pixelation. Clear, crisp visuals are more likely to be accepted and attract buyers.
- Accurate and Descriptive Metadata: Your titles, descriptions, and keywords should be specific and relevant. Think about what someone would search for when looking for your content. The more precise, the better your content will perform in searches.
- Proper Releases and Permissions: For editorial content featuring recognizable people, private property, or trademarks, ensure you have the necessary model or property releases uploaded and approved. This is crucial to avoid legal issues and rejections.
- Stay Updated with Policy Changes: Shutterstock occasionally updates its submission policies. Regularly check their Contributor Guidelines and FAQs to stay informed about new requirements or restrictions.
- Batch Upload in Manageable Sizes: If you’re uploading multiple files, do so in manageable batches. This helps prevent errors and makes it easier to review each upload during the process.
- Preview Before Final Submission: Take advantage of any preview features to see how your content appears with the metadata. This way, you can catch mistakes or omissions early.
- Maintain Consistency: Keep your style and quality consistent across your uploads. This builds your reputation as a contributor and can increase your success rate over time.
By following these tips, you’ll not only streamline your upload process but also enhance the chances of your editorial content being approved and reaching a broad audience. Remember, quality, compliance, and professionalism are your best allies in the world of stock content creation!
Common Troubleshooting and Support Resources
Even with a straightforward process, you might run into some hiccups while uploading your editorial content to Shutterstock. Don’t worry—most issues are easy to resolve once you know where to look and what steps to take. Let’s go over some common problems and the support options available to you.
Common Troubleshooting Tips
- Upload Failures: If your files aren’t uploading, check your internet connection first. Sometimes, a slow or unstable connection can cause uploads to timeout or fail. Also, ensure your files meet Shutterstock’s specifications—correct format, size, and resolution.
- File Rejections: If your content gets rejected after submission, review the rejection reasons carefully. Shutterstock provides feedback that can help you understand what needs fixing—like watermark issues, inappropriate content, or metadata errors.
- Metadata Problems: Accurate and complete metadata (titles, descriptions, keywords) are crucial. If your content isn’t appearing in searches, double-check your keywords and descriptions for relevance and accuracy.
- Account Issues: If you’re unable to log in or notice account restrictions, visit the Shutterstock contributor dashboard for alerts or messages. Sometimes, account verification or payment issues can cause access problems.
Support Resources
Whenever you’re stuck, Shutterstock offers several support channels to help you out:
- Help Center: The Shutterstock Help Center is a treasure trove of FAQs, guides, and troubleshooting tips. It covers everything from technical issues to content guidelines.
- Contact Support: If you need personalized assistance, you can submit a support ticket directly through your contributor dashboard. Be as detailed as possible to get the most effective help.
- Community Forums: Engage with other contributors in forums or social media groups. Sharing experiences can often lead to quick solutions and useful tips.
- Video Tutorials and Guides: Shutterstock also offers step-by-step video tutorials that walk you through common tasks and troubleshooting scenarios.
Pro Tips for Smooth Uploads
To minimize issues:
- Always double-check your files before uploading—correct format, size, and resolution.
- Maintain a stable internet connection during uploads.
- Keep your browser updated and clear your cache if you encounter technical glitches.
- Stay informed about Shutterstock’s content policies and technical specifications by reviewing their guidelines regularly.
Remember, most issues are temporary and resolvable. Don’t hesitate to reach out for support—Shutterstock’s team is there to help ensure your editorial content gets uploaded smoothly and accepted without hassle.
Conclusion and Best Practices for Shutterstock Editorial Contributors
Congratulations! You’ve now got a clear roadmap for uploading your editorial content to Shutterstock in 2025. While the process might seem detailed at first, following these step-by-step instructions makes it manageable—and even enjoyable. As you continue contributing, keep these best practices in mind to maximize your success and streamline your workflow.
Key Takeaways
- Stay Informed: Regularly review Shutterstock’s content guidelines and technical specifications to ensure your submissions meet the platform’s standards.
- Organize Your Content: Maintain a well-organized folder system for your images and videos, with clear filenames and metadata ready to upload.
- Prioritize Quality: Focus on creating high-quality, relevant content that tells a story or provides value—this increases your chances of acceptance and sales.
- Optimize Metadata: Use accurate, descriptive titles, keywords, and captions. Think like a searcher—what would someone type to find your content?
- Engage with the Community: Participate in forums, webinars, or social media groups. Networking with other contributors can provide valuable insights and motivation.
- Embrace Feedback: Learn from rejection reasons and continuously improve your submissions. Each piece is a chance to refine your craft.
- Leverage Support Resources: Don’t hesitate to contact Shutterstock support when needed. They’re there to help you succeed.
Final Thoughts
Becoming a successful Shutterstock editorial contributor takes patience, attention to detail, and a willingness to learn. By following the steps outlined in this guide and adopting best practices, you’re setting yourself up for a rewarding journey in stock content creation. Keep experimenting, stay consistent, and remember—every upload is a new opportunity to share your perspective with the world. Happy contributing!