Thinking about sharing your creative work with the world? Shutterstock is one of the top platforms for photographers, illustrators, and graphic designers to showcase and monetize their designs. Whether you’re a seasoned pro or just starting out, understanding the ins and outs of uploading your content is essential. In this guide, we’ll walk you through the process step-by-step, from preparing your files to making your first submission. By the end, you’ll feel confident navigating Shutterstock‘s platform and getting your designs in front of millions of potential customers. Let’s dive in!
Preparing Your Design Files for Submission
Before you hit the upload button, it’s crucial to ensure your design files are polished, correctly formatted, and meet Shutterstock’s requirements. Proper preparation not only speeds up the review process but also increases the chances of your content being accepted and selling well. Here’s what you need to focus on:
1. Check Shutterstock’s Content Guidelines
- File Types Accepted: Shutterstock accepts a variety of formats including JPEG, PNG, EPS, AI, and TIFF. Make sure your files are saved in one of these formats.
- Resolution & Size: For images, a minimum of 4 MP (megapixels) is required, but higher resolutions are better for quality. Vector files should be scalable without loss of quality.
- Color Profile: Use sRGB color space for images to ensure accurate colors across devices.
- Content Restrictions: Avoid copyrighted material, watermarks, or inappropriate content. Only upload original work or content you have rights to distribute.
2. Optimize Your Files
Optimizing your files doesn’t mean just making them look good—it also involves ensuring they meet technical standards:
- Compress Files: Use tools like Photoshop or TinyPNG to reduce file size without sacrificing quality. Smaller files upload faster and save storage space.
- Rename Files Thoughtfully: Use descriptive, keyword-rich filenames that reflect your design. For example, “sunset-beach-illustration.jpg” instead of “IMG1234.jpg”.
- Check for Artifacts & Errors: Zoom in to check for pixelation, artifacts, or unwanted marks. Clean, crisp files are more likely to pass review.
3. Prepare Metadata and Keywords
Good metadata helps your content get discovered. Prepare relevant titles, descriptions, and keywords before uploading. Think about what potential buyers might search for—be specific and descriptive.
4. Organize Your Files
Keep your files organized in folders based on categories or themes. This makes it easier to batch upload and manage your portfolio efficiently.
5. Test Your Files
Before submitting, open your files on different devices or screens to ensure they look great everywhere. Also, double-check that all files are correctly formatted and named.
By taking these steps to prepare your design files, you’re setting yourself up for a smooth upload process and a better chance at success on Shutterstock. Happy creating and uploading!
Creating an Account and Setting Up Your Contributor Profile
Getting started with Shutterstock is an exciting step towards sharing your creative work with a global audience. The first thing you’ll want to do is create your contributor account. It’s pretty straightforward, but taking some time to set up your profile thoughtfully can really pay off in the long run.
To create your account, visit the Shutterstock Contributor portal and click on the “Sign Up” button. You’ll be prompted to enter some basic information like your name, email address, and a secure password. Make sure to choose a strong password to keep your account safe.
Once your account is created, it’s time to set up your profile. This is your chance to tell potential buyers a little about your style and expertise. Here’s what you should focus on:
- Profile Picture: Upload a clear, professional-looking photo. This helps build trust and makes your profile more personable.
- Display Name: Use your real name or a professional alias that reflects your brand.
- Bio: Write a brief but engaging bio. Mention your background, the type of work you create, and what inspires you. Keep it friendly and approachable!
- Keywords & Tags: Think about keywords that describe your style and content. These will help buyers find your work easily.
Remember, your profile is often the first impression buyers will have of you, so make it count! The more complete and professional it looks, the more likely you are to attract clients and sales.
Finally, review the Shutterstock contributor guidelines to make sure your profile and content align with their standards. This will save you from potential rejections later and help you maintain a good standing as a contributor.
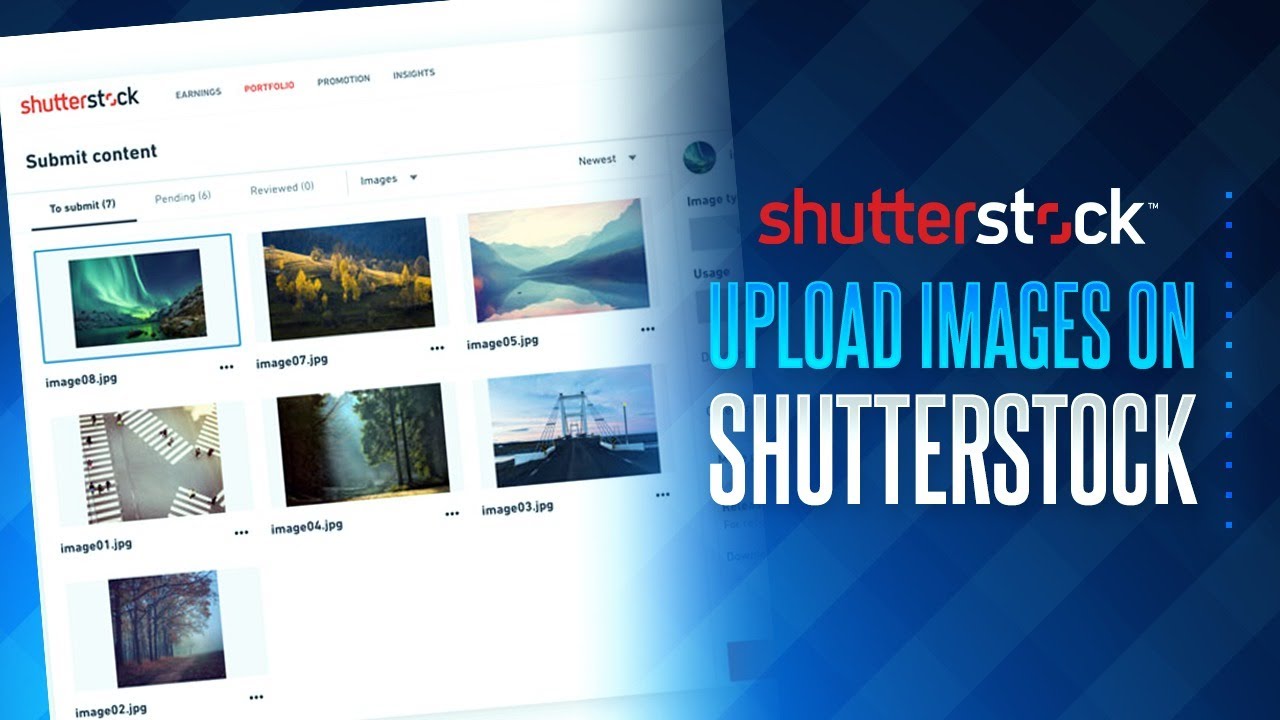
Step-by-Step Process for Uploading Your Designs to Shutterstock

Uploading your designs to Shutterstock might seem like a small task, but doing it correctly ensures your work is presented professionally and has the best chance of selling. Let’s walk through the process step-by-step so you can get your content online with confidence.
- Log In to Your Contributor Account: Head to the Shutterstock Contributor site and sign in with your email and password.
- Click on “Upload Files”: You’ll find this button on your dashboard or in the menu. It’s where the magic begins!
- Select Your Files: Choose the images, vectors, or videos you want to upload from your computer. You can upload multiple files at once, which is a big time-saver.
- Add Titles and Descriptions: For each file, give it a clear, descriptive title. Write a concise description that highlights the main features of your design. Use relevant keywords naturally—think about what buyers might search for.
- Choose Appropriate Categories and Subcategories: Select the right categories that best fit your content. This helps buyers find your work in the right context.
- Set the Keywords: Add keywords to improve your content’s visibility. Be specific and include synonyms or related terms. Shutterstock often provides keyword suggestions based on your content.
- Specify Model and Property Releases (if applicable): If your design features recognizable people, private property, or copyrighted material, upload the necessary releases. This is crucial for legal compliance and sales potential.
- Review and Submit: Before finalizing, double-check all the details. Make sure your titles, descriptions, keywords, and categories are accurate and complete.
- Click “Submit for Review”: Once everything looks good, hit the submit button. Your content will go into Shutterstock’s review queue.
After submission, Shutterstock’s review team will evaluate your work to ensure it meets their quality and content standards. This process can take anywhere from a few hours to a few days. If your content is approved, it’ll be published on the platform and ready for buyers to discover.
Remember, patience is key! If your uploads are rejected, don’t get discouraged. Use any feedback provided to improve your future submissions, and keep uploading. Over time, you’ll get a feel for what works best and start building a solid portfolio of sellable designs.
Understanding Shutterstock’s Content Guidelines and Requirements
Before you start uploading your amazing designs to Shutterstock, it’s super important to get a good grasp of their content guidelines and requirements. Think of these rules as the playbook that helps your submissions get accepted and stand out in a positive way. Missing a detail or misunderstanding the guidelines can mean your content gets rejected, which is frustrating and time-consuming. So, let’s break down what you need to know.
First, Shutterstock has specific technical specifications for all types of content—whether it’s photos, illustrations, vectors, or videos. For images, this typically means:
- Resolution: Minimum of 4 megapixels, but higher is always better for quality.
- File type: JPEG for photos and raster images, EPS or AI for vectors.
- Color Profile: RGB is standard, especially for online use.
- File size: Usually up to 50MB for images, but check the latest specs to be sure.
Next, the content itself needs to meet certain standards:
- Originality: Your work should be unique and not directly copied from other sources.
- Model and Property Releases: If your content features recognizable people, private properties, or copyrighted items, you need proper releases. This is crucial for legal and licensing reasons.
- Proper Licensing: You must have the rights to all elements in your design—no unauthorized use of stock images, logos, or trademarks.
- Content Restrictions: Shutterstock prohibits certain subjects, like sensitive political content, hate symbols, or explicit material. Review their content guidelines regularly because these rules can evolve.
Another key point is metadata. When uploading, you’ll need to provide accurate titles, descriptions, and tags. This information helps your content be discoverable, so be honest and precise. Avoid misleading keywords or vague descriptions, as these can hurt your reputation or result in rejection.
Finally, always double-check Shutterstock’s latest contributor guidelines and FAQs. They often update their rules, and staying informed ensures your content remains compliant. Remember, quality, originality, and adherence to guidelines are the foundation of a successful portfolio on Shutterstock.
Optimizing Your Uploads for Better Visibility and Sales
Once your content is ready and meets all guidelines, the next step is making sure it gets noticed by buyers. Optimizing your uploads is like adding a splash of SEO magic—helping your work stand out in a crowded marketplace. Here are some practical tips to boost your visibility and increase sales.
Craft Accurate and Descriptive Titles
Your title is the first thing buyers see, so make it clear and relevant. Instead of vague titles like “Design1,” use descriptive words like “Modern Business Meeting Illustration” or “Vintage Floral Pattern.” This helps people find your content when searching specific keywords.
Write Detailed and Relevant Descriptions
Descriptions should expand on the title, providing context and details. Mention the style, purpose, or target audience. For example: “A vibrant vector illustration of a modern office workspace, perfect for business presentations or website banners.” Clear descriptions make your content more discoverable and appealing.
Use Strategic Tags
Tags are the keywords that connect your content with search queries. Think about what potential buyers might search for—consider synonyms, related terms, and variations. Don’t overstuff with irrelevant tags; keep them focused and accurate.
Choose the Right Categories and Keywords
Proper categorization helps buyers filter searches effectively. Select the most relevant categories and subcategories for your content. For keywords, include both specific terms (e.g., “business infographic”) and broader ones (“marketing,” “technology”).
Leverage Trends and Seasonal Topics
Staying current with design trends or seasonal themes can give your content a boost. For example, creating holiday-themed graphics or trendy color palettes can attract more attention during peak times.
Regularly Update Your Portfolio
Keep adding fresh content and refresh your existing uploads by updating keywords or descriptions if needed. An active portfolio signals to Shutterstock that you’re engaged and committed, which can improve your visibility in search rankings.
Lastly, monitor your performance stats through Shutterstock’s contributor dashboard. See which uploads are performing well and analyze why. Use that insight to refine your future submissions—maybe certain styles, topics, or tags resonate more with buyers. The key is to be strategic, consistent, and always ready to adapt to what the market wants.
Managing Your Portfolio and Tracking Performance
Once you’ve uploaded some fantastic design content to Shutterstock, it’s important to stay on top of how your work is doing. Managing your portfolio effectively can help you identify what’s resonating with buyers and where you might want to improve or add more content. Plus, tracking your performance gives you insights into your earnings, popular content, and overall growth as a contributor.
Shutterstock provides a user-friendly dashboard where you can see all your uploaded files, sales statistics, and earnings. Here’s how you can make the most out of it:
- Organize Your Portfolio: Keep your portfolio tidy by regularly reviewing your uploads. Remove outdated or underperforming content and focus on creating new pieces that align with current trends.
- Analyze Performance Metrics: Look at which images or videos sell best. Factors like keywords, subject matter, and style can influence sales. Use this data to guide your future submissions.
- Set Goals: Whether it’s increasing your monthly earnings or diversifying your content types, setting clear goals helps you stay motivated and focused.
- Monitor Trends: Keep an eye on popular categories and keywords on Shutterstock. This can inspire new ideas and help you stay relevant in a competitive marketplace.
Another handy feature is the ability to see detailed stats for each piece of content—such as how many views it has received, how many downloads, and your earnings per file. Use this information to identify your top-performing work and understand what buyers are looking for.
Remember, managing your portfolio isn’t just about keeping things organized; it’s about actively engaging with your data to optimize your contributions. Consistently reviewing your performance and adjusting your strategy can lead to better sales and a more rewarding experience on Shutterstock.
Tips for Successful Design Content Submission on Shutterstock
Submitting design content to Shutterstock can feel a bit daunting at first, but with some insider tips, you’ll be well on your way to creating submissions that stand out and attract buyers. Here are some tried-and-true recommendations:
1. Focus on Quality, Not Quantity
High-quality images and videos are essential. Make sure your files are sharp, well-lit, and free of distractions or imperfections. Remember, buyers are looking for polished content that they can use immediately.
2. Follow the Guidelines
Always review Shutterstock’s submission guidelines before uploading. Pay close attention to technical specs, file formats, and content restrictions. Compliant files are more likely to be accepted and perform well.
3. Use Relevant and Specific Keywords
Effective keywording can dramatically improve your content’s visibility. Be descriptive and precise—think about what a buyer would search for. Use keywords that match the content accurately, including synonyms and related terms.
4. Create Evergreen Content
While trending topics can bring quick wins, evergreen content that remains relevant over time can generate consistent sales. Think about universal themes like business, lifestyle, or nature.
5. Diversify Your Portfolio
Submitting a variety of content types and subjects increases your chances of success. Experiment with different styles, formats, and themes to find what works best for you and the marketplace.
6. Keep Up with Trends and Market Demand
Stay updated on current trends in design and stock content. Check out popular categories, seasonal themes, and emerging styles. Incorporate these into your work to stay competitive.
7. Review and Edit Your Files Before Upload
Double-check your files for any issues—incorrect color profiles, watermarks, or accidental elements. A clean, polished file makes a better impression and reduces rejection risk.
8. Be Patient and Persistent
Stock content success doesn’t happen overnight. Keep uploading consistently, learn from feedback, and refine your approach. Over time, your portfolio will grow, and so will your sales.
By following these tips, you’ll increase your chances of having your design content accepted and purchased on Shutterstock. Remember, the key is to create top-notch, relevant, and well-tagged content that meets the needs of buyers. Happy uploading!
Frequently Asked Questions About Uploading to Shutterstock
Stepping into the world of stock photography can feel overwhelming at first, especially when you’re unsure about the process or the requirements. Let’s go over some of the most common questions new contributors ask about uploading content to Shutterstock. Hopefully, this will clear up any doubts and give you the confidence to start uploading your best work!
Q: Do I need to be a professional photographer or designer to contribute?
Not at all! Shutterstock welcomes contributions from hobbyists, amateurs, and professionals alike. The key is to upload high-quality, original content that meets their standards. Whether you’re an avid photographer capturing stunning landscapes or a graphic designer creating unique illustrations, your work can find a place on Shutterstock.
Q: What types of files can I upload?
Shutterstock accepts a variety of formats depending on the content type:
- Photos & Images: JPEG (highest quality, RGB color space)
- Vectors & Illustrations: AI, EPS, SVG
- Video Clips: MOV, MP4 (H.264 codec recommended)
Make sure your files are properly prepared and meet the technical specifications outlined in their guidelines.
Q: How do I ensure my images are accepted?
Shutterstock has strict quality standards. To improve your chances of acceptance:
- Upload only high-resolution, well-focused images.
- Avoid noise, artifacts, or compression issues.
- Ensure your content is free of watermarks, logos, or branding unless they are part of the original image.
- Check that your images are properly exposed and color-balanced.
Review their contributor guidelines carefully before uploading to align with their quality expectations.
Q: Do I retain copyright ownership of my images?
Yes! When you upload content to Shutterstock, you retain copyright ownership. However, you grant Shutterstock a license to distribute and sell your work. Always read their licensing terms so you understand how your images will be used.
Q: How long does it take for my images to be reviewed and approved?
Typically, the review process takes about 1-3 business days. During busy periods, it might take a little longer. You’ll receive an email notification once your content has been approved or if it requires revisions.
Q: Can I edit or delete my images after uploading?
Absolutely! You can manage your portfolio through your contributor dashboard. Edit descriptions, keywords, or replace images as needed. If you decide to withdraw a photo, you can do so at any time, but keep in mind that sales made before withdrawal remain valid.
Conclusion and Final Tips for Shutterstock Content Uploads
Congratulations! You’re now equipped with the knowledge to start uploading your creative content to Shutterstock confidently. Remember, success on stock platforms often comes down to quality, consistency, and understanding the marketplace. Here are some final tips to help you make the most of your contributions:
- Focus on Quality First: Always aim for crisp, well-composed images or designs. High-quality content sells better and is more likely to be accepted.
- Use Relevant Keywords: Think about what potential buyers might search for. Accurate and descriptive keywords increase your chances of being discovered.
- Stay Consistent: Upload regularly to build a diverse portfolio and increase visibility.
- Research Trends: Keep an eye on popular themes or styles in the marketplace to tailor your content accordingly.
- Review Shutterstock’s Guidelines: Regularly revisit their contributor guidelines to stay updated on technical and legal requirements.
- Be Patient and Persistent: Stock contributing is a long-term game. It might take time to see significant sales, but persistence pays off.
Finally, have fun with the process! Creativity and enthusiasm shine through in your work, making it stand out to buyers. Happy uploading, and here’s to turning your passion into a profitable venture on Shutterstock!